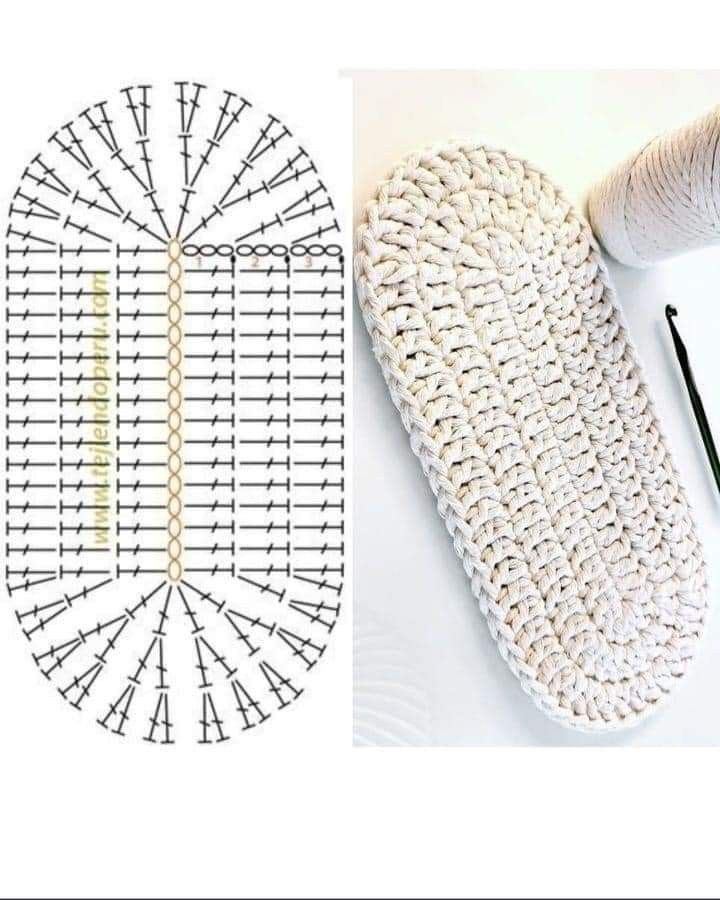
Crochet Oval Rug Base for Beginners Tutorial
Discover the joy of creating your own Easy Crochet Star Bag! In this guide, you’ll find everything you need to design a stylish and unique accessory that adds a handmade touch to your daily look. The Easy Crochet Star Bag is perfect for beginners and experienced crocheters alike, offering a fun yet practical project that combines creativity with functionality.
This article will take you through every step of making your own Easy Crochet Star Bag, from choosing the right yarn and fabric lining to assembling the final piece. Alongside detailed instructions, you’ll find helpful tips to ensure your project comes out beautifully. Plus, all fabric cuts and measurements are included, so you can prepare with confidence.
Whether you’re crafting it for yourself, as a gift, or even to sell, the Easy Crochet Star Bag is a project you’ll love to repeat. Let’s get started on this creative journey together!

The first step to making your Easy Crochet Star Bag is gathering the right materials. You’ll need medium-weight cotton yarn, preferably in two or three colors to highlight the star pattern. Cotton yarn is a great choice because it holds its shape and gives the bag a sturdy yet soft feel.
For the fabric lining, select a cotton or canvas fabric that complements your yarn colors. Cut two rectangular pieces of fabric measuring 12 inches (30 cm) wide by 14 inches (36 cm) high. These will form the inside of your Easy Crochet Star Bag and keep it structured.
Next, choose a crochet hook that matches your yarn—usually, a 4.0 mm (G) or 4.5 mm (7) hook works well. Make sure to check the label on your yarn for recommendations. Having the right hook helps maintain even stitches and keeps your Easy Crochet Star Bag looking professional.
You’ll also need a pair of sharp scissors, a yarn needle for weaving in ends, and a stitch marker to keep track of your rounds or star points. Optional but useful items include magnetic snaps or a zipper for closure and decorative tassels for extra flair.
Don’t forget to measure and prepare the handles. For this pattern, you’ll cut two strips of sturdy fabric, each measuring 20 inches (50 cm) long and 2 inches (5 cm) wide. Fold them in half lengthwise and sew to reinforce them before attaching to the bag.
Having all materials prepared before starting ensures a smooth and enjoyable crochet process. It also means your Easy Crochet Star Bag will come together quickly, with fewer interruptions.
Now that your materials are ready, let’s begin crafting the Easy Crochet Star Bag. Start by making the star motifs, which give this bag its charming and unique appearance. Each star is crocheted separately and then joined to create the main panels.
To make one star, create a magic ring, then chain 3 (counts as first double crochet). Crochet 14 more double crochets into the ring (total 15 double crochets). Slip stitch to the top of the chain-3 to join. Fasten off or change color if desired.
Next, create five star points: Chain 5, skip one stitch, slip stitch into the next stitch. Repeat around until you have five loops. Into each loop: single crochet, half double crochet, 3 double crochets, half double crochet, single crochet. This creates a textured, raised star.
Make six of these stars in total—three for each side of your Easy Crochet Star Bag. Once all stars are done, arrange them into two panels, sewing them together along their edges with a yarn needle and matching yarn color.
After assembling the star panels, crochet around each panel with single crochets to create a smooth border. Then, place the two panels together (right sides facing each other) and crochet around three sides, leaving the top open. Turn the bag right side out.
Attach the fabric lining you cut earlier. Fold the top edge of the fabric about half an inch (1 cm) and sew it to the top inside edge of your Easy Crochet Star Bag using small, neat stitches. This keeps the lining secure and gives the bag a polished finish.
Finally, attach the handles by sewing each end securely to the top edge of the bag. If adding a closure, sew the magnetic snap or zipper to the lining before finishing. Your Easy Crochet Star Bag is now complete!
The right fabric cuts give your Easy Crochet Star Bag structure and style. As mentioned earlier, cut two rectangular pieces of cotton or canvas fabric: 12 inches (30 cm) wide by 14 inches (36 cm) high. This size fits perfectly inside the crocheted outer layer.
Reinforce the top edge of each fabric piece by folding it over by about half an inch (1 cm) and pressing with an iron. This makes it easier to sew the lining into the bag later, ensuring a clean finish.
If you’d like an inner pocket, cut an extra piece of fabric measuring 6 inches (15 cm) wide by 5 inches (13 cm) high. Fold and sew the top edge, then sew the other three edges onto one of the lining panels where you’d like the pocket to sit.
Consider adding fusible interfacing to your fabric pieces if you want extra firmness. Cut interfacing pieces the same size as your fabric rectangles and iron them onto the back of the fabric before assembling the lining.
Once your fabric is prepared, place the two lining pieces right sides together. Sew around three sides, leaving the top open. Turn the lining right side out and insert it into your crocheted bag.
Finish by sewing the folded top edge of the lining to the crocheted top edge of your Easy Crochet Star Bag, making sure your stitches are even and hidden. This step keeps the lining from shifting and adds to the bag’s durability.
Adding fabric details might feel like an extra step, but it truly elevates the final look and function of your Easy Crochet Star Bag. It keeps the bag’s shape and protects your crochet work from stretching out over time.
Your Easy Crochet Star Bag is beautiful as it is—but you can make it even more special with a few creative touches. Start by adding tassels or pompoms in matching or contrasting yarn colors. These can hang from the handles or the sides of the bag.
Another idea is to embroider your initials or a small design on one of the star panels. Use a thin yarn or embroidery floss in a color that complements your main yarn. This small detail turns your Easy Crochet Star Bag into a truly unique accessory.
Decorative beads can be sewn into the center of each crocheted star, adding a bit of sparkle. Choose wooden beads for a natural look or metallic beads for an elegant finish.
If you’d like to adjust the size, simply add more stars to widen the bag or use larger hooks and thicker yarn to create a bigger version. Remember to adjust the fabric lining measurements to match.
For a secure closure, you can sew in a zipper or use a magnetic snap, as mentioned earlier. If you prefer a more casual look, you could also crochet a simple drawstring and weave it around the top edge of the bag.
Finally, block your Easy Crochet Star Bag by gently wetting it, shaping it by hand, and letting it dry flat. Blocking helps set the stitches and keeps your bag looking its best for years to come.
Congratulations! You’ve now made your own beautiful Easy Crochet Star Bag. This project combines creativity, practicality, and style, resulting in an accessory you can proudly use or gift to someone special.
The star design adds a playful touch, while the fabric lining keeps the bag sturdy and functional. Thanks to your careful fabric cuts and detailed crochet work, your Easy Crochet Star Bag is as durable as it is charming.
Remember, crochet is all about personalization—don’t hesitate to explore different colors, yarn textures, or decorative elements. Each bag you create tells its own story and reflects your unique style.
We hope this step-by-step guide makes the process simple and enjoyable, even if it’s your first crochet bag. Keep practicing, and soon you’ll have a collection of beautiful handmade accessories.
If you enjoyed making this Easy Crochet Star Bag, share your creations on social media or with fellow crafters. Inspiring others is one of the most rewarding parts of the crochet community.
Happy crocheting—and may your Easy Crochet Star Bag bring you joy every time you carry it!


