Fabric Oval Basket Tutorial: A Complete Guide to Creating a Beautiful Handmade Organizer
The Fabric Oval Basket Tutorial is one of the most practical and creative sewing projects for beginners and experienced crafters alike.
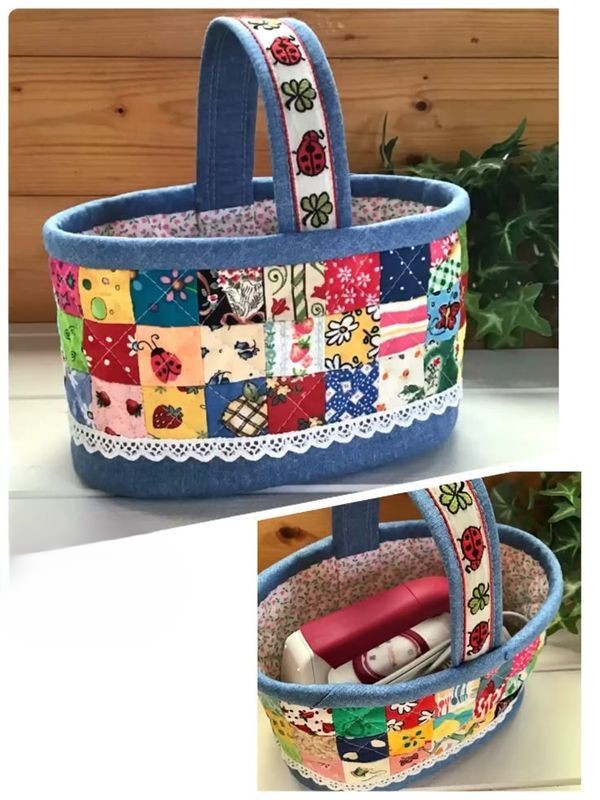
Handmade fabric baskets are not only beautiful decorative pieces, but they are also incredibly useful for organizing everyday items around the home. Whether you want to store sewing supplies, yarn, cosmetics, or small accessories, learning this project can help you create functional and stylish storage solutions.
Following a well-structured Fabric Oval Basket Tutorial allows you to transform simple pieces of fabric into a sturdy and elegant basket. This project combines basic sewing techniques with a touch of creativity, making it ideal for anyone who enjoys DIY crafts. Because the basket uses fabric and interfacing instead of rigid materials, it becomes lightweight, washable, and customizable with different colors and patterns.
Another reason why the Fabric Oval Basket Tutorial has become so popular among DIY enthusiasts is its versatility. You can easily adapt the size, fabric type, and decorative elements to match your home décor or personal style. With a few simple materials and a little patience, you can create a beautiful handmade organizer that looks professional and lasts for years.
Before starting the Fabric Oval Basket Tutorial, gathering the right materials is essential. Using quality fabric and proper interfacing will ensure that the basket keeps its shape and remains durable over time. Many beginners underestimate the importance of preparation, but this step makes the entire sewing process much smoother.
For this project, you will typically need cotton fabric for the exterior and lining. Cotton is easy to sew and provides a clean finish, making it ideal for beginners. Some crafters prefer using quilting cotton because it is slightly thicker and comes in a wide variety of patterns that can make your Fabric Oval Basket Tutorial result look even more charming.
Another important material is fusible interfacing or stabilizer. This helps reinforce the fabric so the basket can stand upright. Without interfacing, the basket may collapse or lose its shape after use. Choosing a medium or heavy-weight interfacing will give the finished basket a structured look.
You will also need basic sewing tools such as scissors, pins or clips, a measuring ruler, and a sewing machine. If you prefer hand sewing, the project can still be completed, but a sewing machine makes the process faster and more precise when following the Fabric Oval Basket Tutorial steps.
Thread selection is another small but important detail. Choose a thread color that complements your fabric. Matching thread creates a seamless appearance, while contrasting thread can highlight the stitching and add a decorative touch.
Finally, preparing your fabric before cutting is highly recommended. Washing and ironing the fabric helps prevent shrinkage and ensures accurate measurements during the Fabric Oval Basket Tutorial process.
Accurate cutting is one of the most important steps in any Fabric Oval Basket Tutorial. Even small measurement mistakes can affect how the basket pieces fit together during sewing. Taking time to measure carefully will help you achieve a professional result.
To begin, you will cut two oval pieces that will form the base of the basket. One piece will be for the outer fabric and the other for the lining. The size of the oval determines the overall size of the basket, so you can adjust these measurements depending on how large you want your finished piece to be.
Next, cut rectangular fabric pieces that will become the sides of the basket. These pieces should match the circumference of the oval base. If the side panel is too short, it will not attach properly, and if it is too long, you may end up with unwanted folds.
During the Fabric Oval Basket Tutorial, it is also necessary to cut interfacing pieces that match the fabric pieces. The interfacing should be attached to the wrong side of the fabric using heat from an iron. This step strengthens the basket and helps maintain its structure.
Some crafters also add batting or foam stabilizer between the layers. This optional step can give the basket a thicker and more padded appearance. While not mandatory, it can enhance the final look of your Fabric Oval Basket Tutorial project.
Before moving on to sewing, double-check all your pieces to ensure they are symmetrical and properly aligned. Precision during the cutting stage saves time and prevents frustration later in the project.
Now that your pieces are prepared, the next stage of the Fabric Oval Basket Tutorial involves assembling the base and side panels. This is where the basket begins to take shape, and careful stitching ensures durability and a clean finish.
Start by sewing the side panel pieces together to form a loop. Place the fabric with the right sides facing each other and stitch along the short edge. Once sewn, press the seam open with an iron to reduce bulk and create a smoother finish.
Next, pin the side panel loop around the oval base piece. This step can be slightly tricky because you are attaching a curved edge to a straight panel. Distribute the fabric evenly and use clips or pins to hold everything in place before sewing.
When stitching the base to the sides in the Fabric Oval Basket Tutorial, sew slowly and guide the fabric gently through the machine. This helps maintain an even seam allowance and prevents puckering around the curves.
After attaching the outer layer, repeat the same process for the lining pieces. The lining is sewn in the same way but will later be inserted into the outer basket. Leaving a small opening in the lining seam will allow you to turn the basket right side out later.
Once both sections are sewn, carefully trim any excess seam allowance and clip small notches along the curved areas. This helps the fabric lay smoothly when the basket is turned.
Pressing the seams with an iron at this stage will greatly improve the final appearance of your Fabric Oval Basket Tutorial project.
The final stage of the Fabric Oval Basket Tutorial focuses on assembling the outer basket with the lining and adding finishing touches. This step transforms the sewn pieces into a fully functional basket.
Insert the outer basket into the lining so that the right sides of the fabric face each other. Align the top edges and secure them with pins or clips before sewing around the rim.
After stitching the top edge, pull the basket through the small opening left in the lining seam. This will turn the entire basket right side out. Once turned, gently push out the corners and curves to shape the basket properly.
Close the opening in the lining using a small invisible stitch or a sewing machine seam. Then place the lining inside the basket and press the top edge with an iron to create a crisp finish.
Many crafters add a topstitch around the rim during the Fabric Oval Basket Tutorial. This not only strengthens the edge but also adds a professional decorative detail.
At this stage, you can personalize your basket with optional features such as fabric handles, decorative labels, or contrasting trim. These small details can make your handmade basket unique.
Once completed, shape the basket with your hands and fill it with lightweight items so it maintains its structure. Your Fabric Oval Basket Tutorial project is now ready to be used as a stylish organizer.
Cotton fabric is the most recommended choice for a Fabric Oval Basket Tutorial because it is easy to sew and holds its shape well when combined with interfacing. Quilting cotton is especially popular due to its durability and wide variety of patterns.
While a sewing machine makes the process faster and provides stronger seams, it is still possible to complete a Fabric Oval Basket Tutorial using hand sewing. However, it may take more time and patience.
Using heavier interfacing, foam stabilizer, or batting between the fabric layers can make your Fabric Oval Basket Tutorial basket more structured and durable.
Yes, the Fabric Oval Basket Tutorial is suitable for beginners who know basic sewing techniques. The project is simple enough to learn new skills while still producing a useful finished item.
These baskets are perfect for organizing sewing tools, yarn, craft supplies, cosmetics, or small household items. The versatility of the Fabric Oval Basket Tutorial makes it useful in many rooms of the home.
Most baskets made from cotton fabric can be gently washed if necessary. It is best to reshape the basket while it dries so it maintains its original form after completing the Fabric Oval Basket Tutorial.
In this article, we explored a complete Fabric Oval Basket Tutorial, covering everything from selecting materials to finishing the final basket. You learned how to prepare fabric and interfacing, measure and cut the pieces accurately, sew the base and side panels, and assemble the lining for a professional-looking result.
Creating a handmade basket using this Fabric Oval Basket Tutorial is a rewarding project that combines creativity with practicality. Not only does it help improve sewing skills, but it also results in a beautiful and useful storage solution for everyday items.
If you enjoyed learning this project, consider experimenting with different fabric combinations, sizes, and decorative details to make your baskets even more unique.
Now I would love to hear from you. Share your honest opinion about this tutorial and feel free to leave suggestions or ideas for future projects. Your feedback can inspire even more creative sewing guides.

