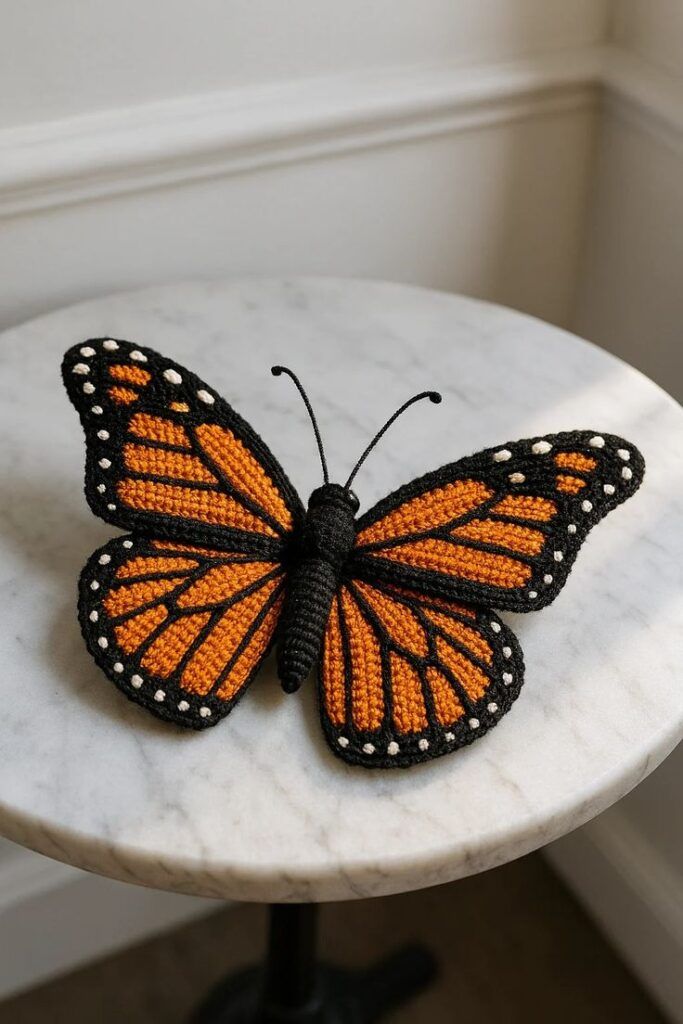
How to Make a Monarch Butterfly Crochet Pattern
If you’re searching for a charming and functional crochet project, the Gnome Tissue Box Cover Crochet Pattern is a delightful choice that adds both personality and warmth to your home decor. With its whimsical design and cozy texture, this crochet project transforms an ordinary tissue box into a playful decorative piece. Whether you are crafting it as a gift or to brighten up your living space, this Gnome Tissue Box Cover Crochet Pattern offers a creative way to express your love for handmade details while keeping your tissues neatly stored and easily accessible.
The beauty of the Gnome Tissue Box Cover Crochet Pattern lies in its versatility. You can experiment with different yarn colors and textures to create unique variations that suit your home’s aesthetic. From classic red and gray gnomes that evoke holiday charm to pastel hues perfect for springtime, this project allows endless possibilities. Beginners and seasoned crocheters alike will find it both manageable and rewarding, as it combines simple stitches with creative assembly to bring the cheerful gnome design to life.
Beyond its decorative appeal, this Gnome Tissue Box Cover Crochet Pattern also makes for a thoughtful handmade gift. Whether for birthdays, housewarmings, or seasonal celebrations, it’s sure to impress friends and family who appreciate the cozy, heartfelt touch of crochet. The satisfaction of crafting something practical yet adorable makes this project a must-try for anyone passionate about crochet and home décor. Now, let’s explore how you can create your very own gnome tissue box cover step by step.

To bring your Gnome Tissue Box Cover Crochet Pattern to life, start by gathering the right materials and tools. You will need medium-weight yarn in several colors—commonly red, white, gray, beige, and a small amount of black. These shades create the classic gnome look with a red hat, white beard, and soft skin tone. You can substitute colors to match your personal taste or seasonal themes.
Next, choose a crochet hook that corresponds to your yarn weight, typically a 4 mm (G) or 4.5 mm (7) hook. The correct hook size ensures even tension, giving your gnome cover a neat and professional appearance. Be sure to have scissors and a yarn needle on hand for cutting and weaving in ends once your project is complete.
Polyester fiberfill or small stuffing material may be used to give your gnome’s nose and hat a three-dimensional look. This simple addition enhances the playful aesthetic of your Gnome Tissue Box Cover Crochet Pattern, making it stand out as a decorative piece.
You’ll also need a standard square or rectangular tissue box to use as the base model. Measure it before you begin to ensure that your crocheted cover fits perfectly. The most common size works well with the pattern described here, but slight adjustments can easily be made for different dimensions.
Lastly, consider adding embellishments such as buttons, pom-poms, or small felt shapes to give your gnome extra personality. These small touches make your project unique and fun, allowing your creativity to shine through each stitch.
With your tools ready, you’re now set to start crocheting this charming and practical project that’s sure to bring smiles to everyone who sees it.
To begin your Gnome Tissue Box Cover Crochet Pattern, start by crocheting the main box cover. This is typically done using single crochet (sc) or half double crochet (hdc) stitches to create a tight fabric that won’t stretch out of shape. Measure your tissue box and chain enough stitches to match its width. Then, work in rows until your piece wraps comfortably around the box.
Once the main piece is done, join the sides using slip stitches or by sewing them together with a yarn needle. Leave the top and bottom open so the box can be easily inserted. The top part will later be shaped to allow tissues to be pulled through effortlessly.
Next, it’s time to create the gnome’s signature hat. The hat is crocheted separately, often in the shape of a cone. Use red yarn for the traditional gnome style and increase your stitches gradually to create a gentle slope. The hat can be stuffed lightly to keep its shape or left unstuffed for a softer drape.
For the beard, use white or off-white yarn and work with loop stitches or fringe pieces to give a fluffy appearance. Attach the beard just under the hat, covering the front side of the tissue box. This is one of the most defining features of the Gnome Tissue Box Cover Crochet Pattern, giving your project that instantly recognizable gnome charm.
The nose is made with a small crochet circle stuffed lightly with fiberfill. Sew it right in the center of the beard, slightly overlapping with the hat. This detail completes the gnome’s cheerful face and gives it dimension.
Finally, assemble all the parts together—attach the hat, beard, and nose securely. You can also add optional details like eyes, a small belt, or decorative snowflakes depending on your theme. Once complete, slip your tissue box inside, and your adorable gnome is ready to display.
One of the most enjoyable aspects of working with the Gnome Tissue Box Cover Crochet Pattern is customization. Each gnome can reflect a unique personality based on the colors, materials, and small decorative touches you choose. For a festive look, add gold thread accents or crochet tiny Christmas ornaments to attach to the hat.
If you prefer a minimalist aesthetic, use neutral tones like cream, taupe, and gray to create a Scandinavian-inspired gnome. These soft hues blend seamlessly into modern or rustic interiors, making the tissue box cover both stylish and practical.
For a spring or summer version, switch up the palette with bright pastels—mint, lavender, or baby pink. Add tiny crocheted flowers around the beard or hat for a cheerful and fresh twist. The Gnome Tissue Box Cover Crochet Pattern adapts beautifully to every season and occasion.
Experimenting with textures also enhances the final result. Try combining smooth cotton yarn with fuzzy acrylic fibers for the beard to give it a lifelike softness. A textured stitch on the hat, like bobble or puff stitches, can add a playful touch to your gnome’s design.
Personalization doesn’t stop there—consider adding initials or small motifs to make your project truly one of a kind. Many crafters even crochet themed versions, such as a Halloween gnome with a black hat and orange beard or a Valentine’s Day gnome in red and pink.
The ability to tailor every detail makes this pattern a joy to revisit again and again. Each time you make a new version, your skills improve, and your creativity grows, ensuring that no two gnome tissue box covers ever look the same.
To achieve a professional finish on your Gnome Tissue Box Cover Crochet Pattern, maintaining consistent tension is key. Uneven stitches can cause the cover to stretch or sag, so try to keep your yarn tension uniform throughout. Practice a few sample rows before beginning the final project to find your ideal tension.
Blocking your finished pieces before assembling can make a significant difference. It helps smooth edges and ensures that all sections align neatly. Lay your crocheted pieces flat, lightly dampen them, and let them dry completely before joining.
When attaching the hat and beard, use invisible stitches to keep the seams clean and secure. A hidden seam will make your gnome look polished and cohesive, enhancing its overall appearance.
For added structure, some crocheters line the inside of the cover with felt or fabric. This simple step helps maintain shape and prevents stretching over time, especially if the tissue box is frequently replaced.
Don’t rush the assembly process. Carefully position each element—hat, nose, and beard—before sewing them down. Adjust until you’re happy with the placement; small changes can make a big difference in your gnome’s expression.
Lastly, remember to enjoy the creative journey. Crochet is as much about relaxation and self-expression as it is about crafting something beautiful. Each stitch brings your Gnome Tissue Box Cover Crochet Pattern closer to completion, and the final result will be a handmade treasure you can be proud of.
1. What skill level is required for this project?
The Gnome Tissue Box Cover Crochet Pattern is beginner-friendly. It mainly uses basic stitches such as single crochet and double crochet, making it suitable for anyone with foundational crochet knowledge.
2. Can I adjust the pattern for different tissue box sizes?
Yes, simply adjust your foundation chain to match the dimensions of your tissue box. You can easily add or subtract rows to achieve a perfect fit.
3. What type of yarn is best for this pattern?
Medium-weight acrylic or cotton yarn works best. Acrylic yarn offers flexibility and easy maintenance, while cotton provides a sturdy and clean finish.
4. How do I clean the gnome tissue box cover?
Hand wash it gently with mild detergent and lay it flat to dry. Avoid machine washing to maintain its shape and texture.
5. Can I sell items made from this pattern?
Yes, you can sell handmade items created using this pattern, but always credit the designer if you’re following someone else’s version. For your own original interpretation, feel free to market it as your unique creation.
6. How long does it take to complete the project?
Depending on your crochet speed, this project typically takes between 4 to 6 hours. Beginners might take a little longer, while experienced crafters may finish sooner.
Creating a Gnome Tissue Box Cover Crochet Pattern is a wonderful way to combine creativity, functionality, and charm into a single project. With its delightful gnome design, this crochet piece transforms an everyday item into a cozy accent that brightens any room. From choosing yarn colors to assembling each detail, every step offers a chance to express your personal style.
We hope this guide inspired you to try your hand at making your own gnome tissue box cover. It’s a rewarding project that makes a perfect gift or decorative piece for your home. If you’ve followed along, share your experience—leave your honest opinion and suggestions about the pattern and what variations you’d like to see next!


