
Easter Bunny Basket - Crochet Pattern
If you’re passionate about crochet, learning how to make the Mitered Flower Granny Square is a fantastic way to add beauty and dimension to your projects. This stunning square combines the charm of floral motifs with the elegance of mitered corners, creating a sophisticated yet fun crochet piece. Whether you’re a beginner or an experienced crocheter, this pattern is enjoyable, rewarding, and versatile.
The Mitered Flower Granny Square is perfect for creating blankets, bags, cushion covers, and even wearable accessories. This pattern stands out because it blends the softness of a flower in the center with the sharp, geometric lines of a mitered frame. In this article, you’ll learn exactly how to crochet a Mitered Flower Granny Square, including detailed instructions, yarn suggestions, and accurate measurements.
Let’s dive into the creative process and master this unique pattern together.

To create a gorgeous Mitered Flower Granny Square, gathering the right materials is crucial for achieving the best results. The choice of yarn affects the final look, texture, and durability of your project.
Start by selecting medium-weight (Category 4) cotton or acrylic yarn. Cotton yarn provides a crisp finish, while acrylic offers softness and flexibility. You can use multiple colors — one for the flower, one for the background, and another for the mitered frame — or keep it monochromatic for a minimalist look.
You’ll need a 4.0 mm (G-6) crochet hook, which is ideal for medium-weight yarn and creates a balanced stitch tension. Having a tapestry needle on hand will help you weave in the ends seamlessly after finishing your Mitered Flower Granny Square.
A pair of sharp scissors is essential for clean cuts, and stitch markers may be helpful, especially when working the corners of the mitered frame. Keeping your tools organized will make the process smoother.
As for yarn amounts, you’ll need approximately:
Before starting, prepare a comfortable, well-lit workspace. This pattern is relaxing, but concentration is key for getting those perfect mitered edges.
The heart of the Mitered Flower Granny Square is a charming little flower that serves as the focal point. Begin by choosing a color that stands out, giving your flower a bold presence.
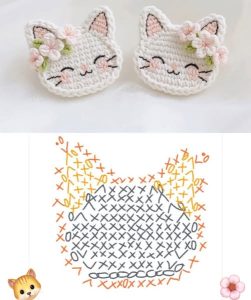
Start with a magic ring. Into the magic ring, crochet 12 double crochets (dc). This will form the first round. Pull the ring tight and slip stitch (sl st) into the first dc to close the circle neatly.
For the second round, switch to your petal color. Chain 2, then make a cluster of 3 double crochets in the same stitch. Chain 2 again and slip stitch into the next stitch. Repeat this process around to form 6 petals in total.
Each petal will be separated by a slip stitch, giving a clear and beautiful definition. This simple yet effective method ensures the flower looks clean and symmetrical.
If you’d like fuller petals, you can opt for 4 double crochets instead of 3 for each cluster. This is a great customization tip for the Mitered Flower Granny Square.
Once the flower is complete, fasten off and weave in any loose ends with a tapestry needle. The result is a delicate crochet flower that’s ready to be framed.
With the flower ready, the next step in the Mitered Flower Granny Square is adding the background, which transforms the circle into a perfect square. This part brings stability and prepares the piece for the mitered frame.
Attach your background color yarn to the top of any petal. Chain 3 (counts as the first double crochet), then make 2 more double crochets into the same space. This forms the first corner.
Chain 2 to create the corner space, then make 3 double crochets into the next petal space. Repeat this process around the flower — you’ll end up with 4 groups of 3 double crochets, each separated by chain-2 spaces for the corners.
In the next round, continue building the square. Into each chain-2 corner space, make (3 dc, ch 2, 3 dc). Along the sides, simply place 3 dc clusters in the spaces between previous clusters.
This method gradually turns your flower from a circle into a square without warping. The stitch count should stay consistent for the Mitered Flower Granny Square to lay flat.
Pay close attention to your tension during this part. Even tension ensures that the square maintains its shape without curling or ruffling.
Once you finish the background section, your piece should measure approximately 4 inches by 4 inches, depending on your yarn and hook size.
The mitered frame is what makes the Mitered Flower Granny Square truly unique. This part adds a clean, geometric border that beautifully contrasts the soft flower center.
Start by attaching your frame color yarn to any corner. Chain 3 (counts as first dc), then make 2 more dc into the same corner. Chain 2, and add 3 more dc into the same corner — this forms a corner shell.
Work along the side by placing 3 dc clusters in each space between the previous round’s clusters. Continue until you reach the next corner.
In each corner, always work (3 dc, ch 2, 3 dc) to maintain the mitered shape. This creates a clean 90-degree angle that’s essential for the Mitered Flower Granny Square look.
Repeat this process for 2-3 more rounds, depending on how large you want the mitered frame. Each round expands the square evenly without distorting the shape.
Your square should now measure approximately 6 inches by 6 inches if you’ve completed three rounds of the mitered frame. You can adjust the number of rounds to fit your desired project size.
The crisp lines of the mitered corners contrast beautifully with the softness of the flower, creating a harmonious balance of textures.
Once your Mitered Flower Granny Square is complete, it’s time to focus on the finishing touches that make it look polished and professional.
Start by carefully weaving in all loose ends using your tapestry needle. This step is essential not only for aesthetics but also for the durability of your finished piece.
If your square has any minor warping, lightly block it by pinning it to a foam board and spraying it with water. Let it dry completely to set the shape perfectly.
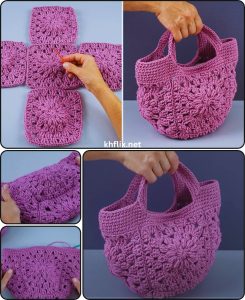
The versatility of the Mitered Flower Granny Square means you can use it in countless projects. Join multiple squares together to create a stunning blanket, or use a single square for a cushion cover.
These squares also make beautiful tote bags, table runners, or even wall hangings. Play with colors to suit your personal style or seasonal themes.
Finally, share your creations with the crochet community online or as thoughtful handmade gifts. The Mitered Flower Granny Square is a conversation starter and a testament to your creativity.
The Mitered Flower Granny Square is a delightful combination of floral beauty and geometric precision. Whether you’re making one square or assembling several for a larger project, the process is enjoyable and rewarding.
By following this step-by-step guide, you now have all the tools to create your own Mitered Flower Granny Square, complete with detailed measurements, stitch counts, and professional finishing tips.
Remember, the beauty of crochet lies in customization. Experiment with colors, yarn textures, and sizes to make each square uniquely yours.
If you enjoyed this tutorial, leave a comment below and share your experiences or suggestions. What will you create with your Mitered Flower Granny Square?


