
Easter Bunny Basket - Crochet Pattern
The Pumpkin Stitch – Crochet Pattern is one of the most charming and versatile designs in the world of crochet. Its unique texture resembles little pumpkins lined up in neat rows, making it a favorite for creating blankets, scarves, cardigans, and even seasonal decorations. This stitch has grown in popularity among beginners and experienced crocheters alike because of its simplicity, visual appeal, and the endless creative possibilities it offers. Whether you want to make a cozy afghan or add detail to a fall-inspired project, this pattern will help bring warmth and creativity to your handmade crafts.
One of the most appealing things about the Pumpkin Stitch – Crochet Pattern is how it blends simplicity with style. It uses basic crochet techniques, yet creates a bold texture that looks intricate and professional. Crafters often describe this stitch as therapeutic, as the repeating motions are both relaxing and rewarding. With every row you complete, the pumpkin-like design becomes more defined, giving a sense of progress and accomplishment. It’s also a stitch that works beautifully with solid colors, variegated yarns, or even a combination of shades to highlight the textured effect.
For those who love seasonal crafts, the Pumpkin Stitch – Crochet Pattern is the perfect choice. It instantly adds an autumnal feel to your projects, yet it is versatile enough to be used year-round. The stitch is not limited to orange or fall-themed colors; you can experiment with pastels for spring, jewel tones for winter, or even bold brights for summer. By mastering this stitch, you will have a valuable addition to your crochet skill set that you can use across multiple projects. Let’s now dive into the steps, techniques, and creative uses of this beautiful pattern.
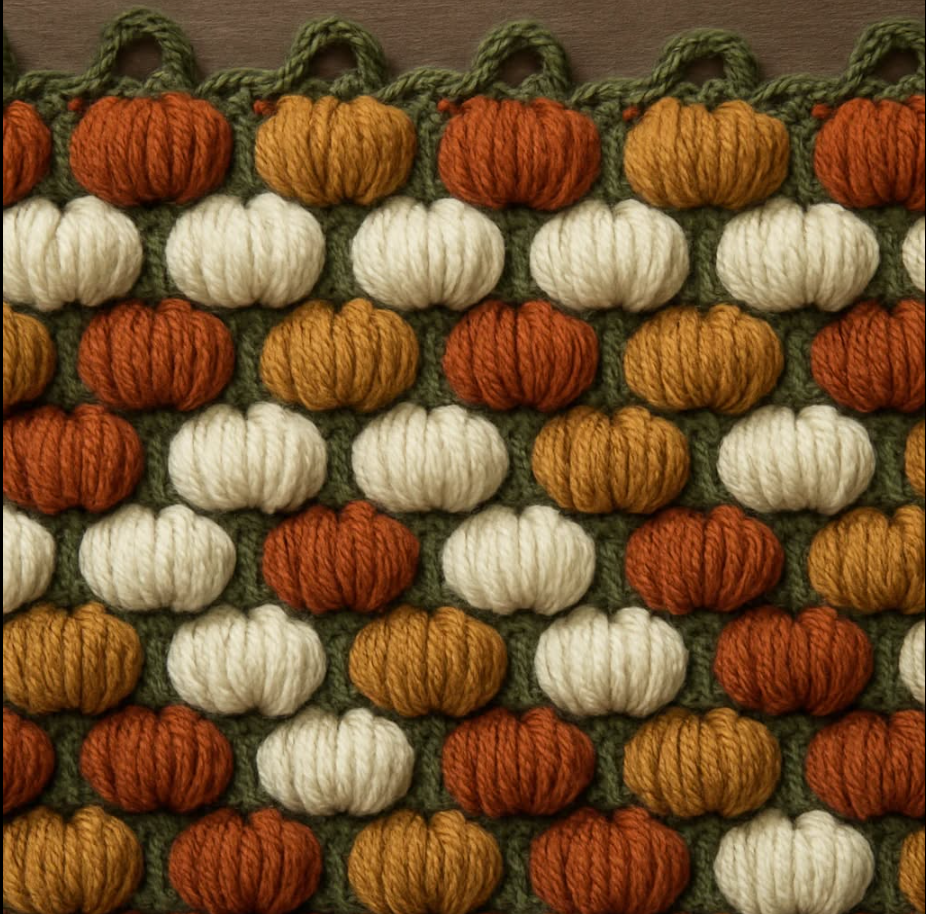
The Pumpkin Stitch – Crochet Pattern is constructed by combining clusters of stitches that puff out, creating a rounded, pumpkin-like effect. Unlike flat stitches, this technique gives depth and texture, which makes it ideal for adding dimension to your work. Beginners often find this stitch easier than it looks because it relies heavily on repeating a simple sequence. Once you understand the rhythm, the stitch flows naturally and quickly.
The foundation of this pattern is usually made up of basic chains and double crochets. These create the base rows that support the clusters. The clusters are what form the rounded pumpkin shapes, and they are often built by working multiple stitches into the same space. This layering is what creates the puffed, textured effect. Each row alternates to give the project balance and symmetry, ensuring that the pumpkins line up neatly.
When choosing yarn for this stitch, consider the thickness and softness. Medium-weight yarns work beautifully, as they highlight the raised texture without making the project too bulky. Cotton yarns provide structure, while acrylic yarns give warmth and softness. For blankets, a softer yarn may be preferable, while for decorative items, sturdier fibers might be better.
Another key aspect of the Pumpkin Stitch – Crochet Pattern is the hook size. Using the recommended hook for your yarn weight ensures that the pumpkins look well-formed. If your hook is too small, the stitches may appear tight and lose their puffiness. If it’s too large, the design may look loose and less defined. The balance of yarn and hook size is essential to achieving the perfect result.
This stitch is not only beautiful but also practical. Because of its raised texture, it provides warmth and coziness in projects like throws and sweaters. At the same time, it adds visual interest to smaller items like pouches, coasters, or even cushion covers. The Pumpkin Stitch – Crochet Pattern is adaptable to both small and large-scale projects, making it a favorite for crochet lovers.
Finally, one of the reasons this stitch has gained popularity is its accessibility. Even if you are a beginner, you can master it with a little patience and practice. It’s a stitch that looks advanced but is rooted in simple crochet skills. For those who want to create impressive handmade gifts or stylish home décor, this pattern is an excellent choice.
To start working with the Pumpkin Stitch – Crochet Pattern, you’ll begin with a foundation chain. The number of chains will depend on the width of your project, but it’s important to ensure that the stitch count matches the pattern repeat. Most versions of this stitch work in multiples, so always check before you begin.
Once you have your foundation chain, you will work a row of double crochets. This sets up the base for the pumpkin clusters. On the next row, you’ll begin forming the pumpkins by working groups of half double crochets or puff stitches into the same space. These clusters are then anchored by chains or single crochets, which help define the shape and keep the fabric structured.
The process continues by alternating rows of clusters and base stitches. Each pumpkin aligns with the ones below it, creating a continuous pattern. As you progress, the pumpkin shapes become more visible, and the fabric takes on a raised, textured appearance. This repetition makes it easy to memorize the stitch sequence, allowing you to crochet while watching TV, listening to music, or chatting with friends.
Tension control is important when working this pattern. If your tension is too tight, the pumpkins won’t puff out as much, and the design will lose its character. If it’s too loose, the clusters may look sloppy. Practicing a swatch before starting a large project is a good idea to get comfortable with the motion and adjust your tension.
Finishing off your work neatly is also essential. Because this stitch is textured, weaving in ends securely helps maintain the look of the design. Many crocheters use a tapestry needle to weave the yarn ends through the clusters so they remain invisible. Blocking your finished project can also help the pumpkins settle evenly, giving the final piece a polished appearance.
As you practice, you can experiment with color changes to create striped pumpkins or gradient effects. Adding different shades can highlight the rounded shapes and bring extra dimension to your project. With a little creativity, the Pumpkin Stitch – Crochet Pattern can be transformed into countless designs that reflect your style.
The Pumpkin Stitch – Crochet Pattern is not limited to blankets or throws. It has countless applications across a wide range of crochet projects. One of the most popular uses is for baby blankets. The soft, textured design is cozy and appealing for infants, and parents appreciate the warmth and comfort it provides. Choosing soft pastel colors can make a delightful gift for a newborn.
Another great use is for scarves and shawls. The pumpkin stitch creates a cozy fabric that traps warmth, making it perfect for fall and winter wear. A scarf made with this stitch not only looks stylish but also feels plush and comfortable. By using different yarn weights, you can adjust the thickness to suit your preferences.
Home décor is another area where this stitch shines. Cushion covers, table runners, and even wall hangings can be elevated with this unique design. The texture adds depth to interiors and makes handmade pieces stand out. Many crafters use the Pumpkin Stitch – Crochet Pattern to add seasonal flair to their homes, especially around autumn.
For those who love fashion, the pumpkin stitch can be incorporated into cardigans, sweaters, and even handbags. The raised design makes any garment look more sophisticated, while still maintaining a handmade charm. Combining this stitch with simple stitches in one garment creates a balanced look that is both stylish and comfortable.
Seasonal crafts are also popular. Since the stitch resembles pumpkins, it’s a perfect choice for fall decorations. You can create placemats, coasters, or even small pumpkin-shaped ornaments for Halloween and Thanksgiving. Adding in traditional autumn colors like orange, brown, and cream enhances the festive spirit.
Finally, the Pumpkin Stitch – Crochet Pattern is a wonderful option for personalized gifts. Handmade items carry a special sentiment, and when they feature such a distinctive stitch, they become even more meaningful. Whether you’re making a gift for a loved one or preparing items for a craft fair, this stitch will make your work stand out.
As with any crochet design, there are a few helpful tips to keep in mind when working with the Pumpkin Stitch – Crochet Pattern. First, always start with a swatch. Practicing on a small piece allows you to test your yarn and hook combination, ensuring the pumpkins form correctly before committing to a large project.
Counting stitches carefully is another important habit. Because this pattern involves clusters and chains, it’s easy to lose track and accidentally skip a stitch. Using stitch markers can help you keep your place, especially in longer rows. Double-checking your count at the end of each row will save you from having to undo sections later.
Yarn choice can dramatically change the outcome of your project. For beginners, it’s often easier to work with lighter colors, as dark yarns can make it difficult to see the stitches. Smooth yarns also highlight the texture better than fluffy or novelty yarns, which can obscure the pumpkin shapes.
If you want to add extra dimension, try experimenting with different heights of stitches in the clusters. Some versions use puff stitches, while others use bobbles. By adjusting the stitch type, you can create slightly different looks, each with its own charm. This flexibility makes the Pumpkin Stitch – Crochet Pattern a versatile tool in your crochet journey.
Blocking your finished piece is another tip worth following. Because the stitch is textured, blocking helps even out the fabric and ensures that the pumpkins are aligned neatly. It also gives the project a professional finish, which is especially important if you’re planning to give it as a gift or sell it.
Lastly, don’t be afraid to personalize your projects. Adding borders, mixing colors, or combining the pumpkin stitch with other patterns can make your work unique. The more you practice, the more comfortable you will become, and soon you’ll find yourself incorporating this stitch into a variety of creative projects.
What is the Pumpkin Stitch – Crochet Pattern best used for?
It’s best used for blankets, scarves, cushions, and seasonal decorations, but it can also be applied to garments and accessories.
Is the Pumpkin Stitch beginner-friendly?
Yes, it is suitable for beginners who are familiar with basic stitches like chains, single crochet, and double crochet.
What type of yarn works best for this stitch?
Medium-weight yarns are ideal because they highlight the texture without making the project too bulky.
Can I use multiple colors in the Pumpkin Stitch?
Absolutely. Changing colors creates stripes or gradients that enhance the pumpkin effect.
Does the Pumpkin Stitch use a lot of yarn?
It uses slightly more yarn than flat stitches due to the puffed clusters, but the result is worth it for the added texture.
How long does it take to learn the Pumpkin Stitch?
Most crafters can pick it up after practicing for a few rows, making it a relatively quick stitch to master.
The Pumpkin Stitch – Crochet Pattern is a versatile, beautiful, and beginner-friendly design that adds depth and charm to any crochet project. From cozy blankets to stylish garments and seasonal decorations, this stitch can be adapted to countless creative ideas. Its textured, pumpkin-like appearance makes it stand out, while its simple sequence ensures it remains accessible to crocheters of all skill levels.
Now that you’ve explored the details, tips, and creative possibilities of this stitch, you’re ready to try it out in your own projects. Have you ever made something with the Pumpkin Stitch – Crochet Pattern? Share your honest opinion and suggestions—I’d love to hear about your experience and ideas!


