
Shell bag Crochet Pattern
Shell bag Crochet Pattern is more than just a creative project; it is a beautiful opportunity to combine texture, elegance, and functionality in one handmade accessory. If you are passionate about crochet and looking for a design that feels both delicate and practical, this pattern is the perfect choice.
The charm of a shell stitch design brings softness and visual interest, making your bag stand out while still being easy to customize. In this article, you will learn everything you need to confidently create your own bag using the Shell bag Crochet Pattern, from materials to finishing touches.
Crochet lovers often search for patterns that are both beginner-friendly and visually impressive. The Shell bag Crochet Pattern fits perfectly into this category because it uses repetitive shell stitches that are simple to memorize yet create a sophisticated texture. Whether you are crafting for yourself, as a gift, or even to sell as handmade items, this pattern offers versatility and timeless appeal. The rounded shell shapes add a romantic and feminine feel that works beautifully with different yarn types and colors.
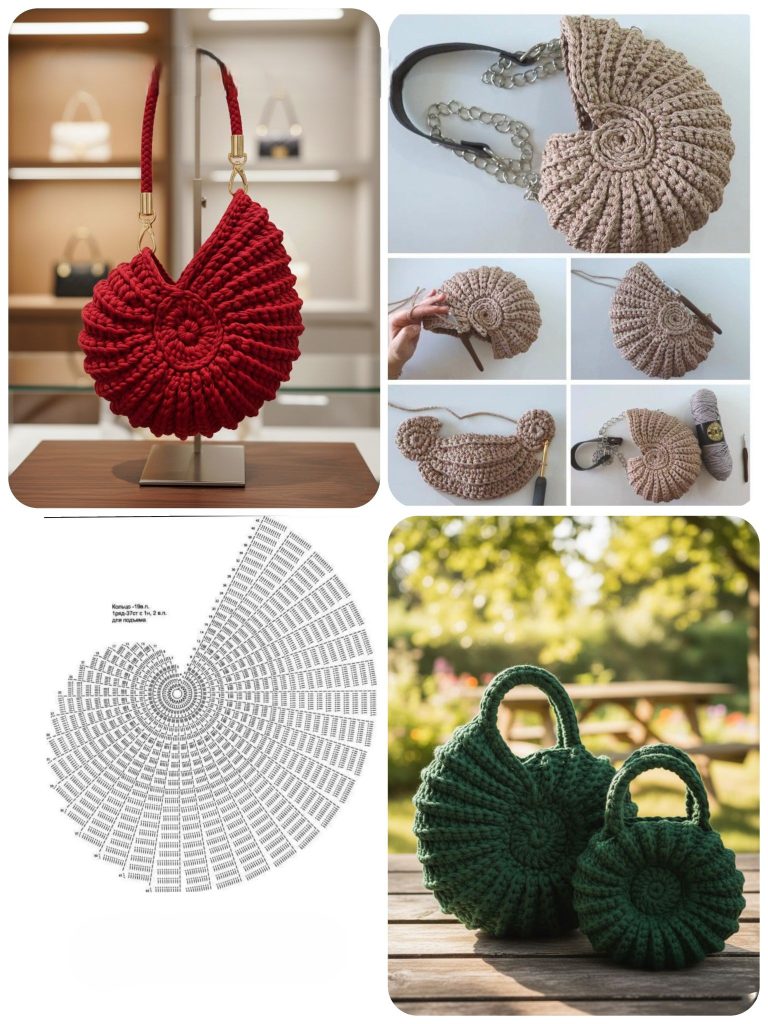
Another reason why the Shell bag Crochet Pattern is so popular is its adaptability. You can transform it into a shoulder bag, a small purse, a beach bag, or even a market tote depending on the yarn weight and size adjustments. The design allows you to experiment with lining, handles, closures, and embellishments without compromising structure. Throughout this guide, we will explore each step in detail, explain the core concepts, and help you achieve a professional finish with confidence.
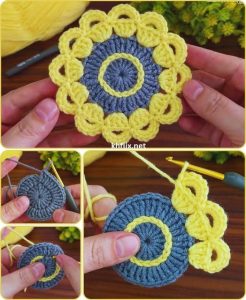
The Shell bag Crochet Pattern is built around the classic shell stitch, which typically consists of multiple double crochets worked into the same stitch or space. This creates a fan-like or scalloped appearance that resembles seashells. The beauty of this stitch lies in its rhythm and repetition, making it both relaxing and visually rewarding. Even beginners can quickly grasp the flow of the pattern.
When working with a shell stitch, tension plays an important role. Keeping your stitches consistent ensures that the shells align neatly, forming a balanced and symmetrical texture. In the Shell bag Crochet Pattern, uniformity enhances the overall shape of the bag and prevents distortion. Practicing a small swatch before starting your project can help you achieve the desired stitch consistency.
Yarn choice significantly affects the final look of your bag. Cotton yarn is often recommended because it provides structure and durability. Acrylic yarn can also work well, especially for lightweight casual bags. If you want a more luxurious finish, blended yarns may add softness while maintaining strength. The Shell bag Crochet Pattern adapts beautifully to different fibers.
Hook size is another essential element. Using the recommended hook size for your yarn helps maintain stitch clarity. However, if you prefer a tighter fabric for added durability, you may choose a slightly smaller hook. For a softer and more flexible result, a larger hook can create a looser texture. Always test your gauge before fully committing to your project.
Color selection can transform the mood of your bag. Soft pastel tones create a romantic feel, while bold and vibrant shades make a statement piece. You can even alternate colors between shell rows to highlight the texture. The Shell bag Crochet Pattern works exceptionally well with both solid and variegated yarns.
Finally, understanding the construction method is crucial. Most shell bags are worked either in rows and then seamed, or in the round for a seamless finish. Both techniques are effective, and your choice depends on your comfort level and design preference. Knowing how the bag is structured ensures a smoother crafting experience.
Before starting your Shell bag Crochet Pattern, gathering the right materials will set you up for success. Typically, you will need yarn, a crochet hook, scissors, a yarn needle, and optional accessories like a magnetic snap or lining fabric. Preparing everything in advance prevents interruptions during your creative flow.
Choosing high-quality yarn ensures longevity. For everyday use, cotton yarn is highly recommended because it resists stretching and maintains shape. If you are creating a decorative or occasional-use bag, softer fibers can add elegance. The durability of your finished piece depends heavily on your material selection.
A sturdy base is important in the Shell bag Crochet Pattern. Some crocheters like to start with a solid single crochet or half double crochet base before transitioning into shell stitches. This reinforces the bottom of the bag and prevents sagging. You can even crochet a double-layered base for extra support.
Measuring and planning dimensions is another key step. Decide whether you want a compact purse or a spacious tote. Creating a simple sketch or noting the desired width and height will help you stay consistent as you work. Adjusting the number of starting chains allows you to customize the bag size easily.
Adding a lining is optional but highly recommended for practicality. Fabric lining enhances durability and prevents small items from slipping through stitch gaps. You can sew the lining by hand for a neat finish. The Shell bag Crochet Pattern looks especially professional when paired with a carefully fitted lining.
Lastly, consider your handles. Crochet straps can be made using tight stitches for strength, or you can attach leather or wooden handles for a modern touch. Reinforcing the attachment points ensures your bag can handle weight without stretching.
To begin your Shell bag Crochet Pattern, create a foundation chain that matches your desired width. Make sure the chain is not twisted and maintain even tension throughout. This first step determines the alignment of your shells and the overall symmetry of your bag.
Work a few rows of basic stitches to establish the base. Many patterns use single crochet rows before transitioning into shell stitches. This creates stability and a clean visual foundation. Once the base is complete, you can begin forming your first shell row.
A typical shell is made by working multiple double crochets into one stitch, skipping stitches, and repeating the process. This creates the iconic scalloped texture. Continue repeating the pattern across the row, ensuring spacing remains consistent. The rhythm becomes intuitive after a few repetitions.
As you build height, the shells begin stacking in a staggered formation. This layering effect gives the Shell bag Crochet Pattern its signature elegance. Pay attention to stitch placement, especially when working into chain spaces between shells.
If working in the round, use stitch markers to keep track of your rounds. This helps maintain pattern alignment. Consistency is key to achieving a polished look. Check periodically that your bag is not curving inward or flaring outward unintentionally.
Once you reach the desired height, finish with a row of single crochet or slip stitch edging. This creates a clean top border. You can then attach handles and closures, ensuring all ends are securely woven in for durability.
Personalization is one of the most enjoyable aspects of the Shell bag Crochet Pattern. Adding decorative buttons, tassels, or beads can elevate the design. However, always ensure embellishments are securely attached to prevent damage during use.
Color blocking is another creative option. You can change yarn colors between shell rows to create stripes or gradient effects. This technique highlights the shell texture and makes your bag unique. Experimenting with color combinations adds personality to your project.
If you plan to sell your handmade bag, finishing details matter greatly. A neat lining, reinforced straps, and carefully woven ends enhance perceived value. Presentation plays an important role in handmade markets.
Proper care ensures longevity. Most cotton crochet bags can be gently hand-washed and laid flat to dry. Avoid harsh wringing, as it may distort the shell stitches. Always check yarn care labels before washing.
Storage also matters. Keeping your bag stuffed with tissue paper helps maintain its shape. Avoid hanging heavy bags for long periods, as this can stretch the handles over time.
The Shell bag Crochet Pattern offers endless opportunities for adaptation. From beach-ready totes to elegant evening purses, the core technique remains the same while allowing room for creativity. With practice, you can confidently experiment and design variations that reflect your personal style.
What skill level is required for the Shell bag Crochet Pattern?
The pattern is generally suitable for beginners with basic knowledge of chain, single crochet, and double crochet stitches. The shell stitch is repetitive and easy to memorize after a few rows.
How long does it take to complete a Shell bag Crochet Pattern?
Completion time depends on size and experience level. A small purse may take a few hours, while a larger tote could take a couple of days.
What is the best yarn for the Shell bag Crochet Pattern?
Cotton yarn is highly recommended due to its durability and structure. However, acrylic and blended yarns can also be used depending on the desired finish.
Can I adjust the size of the Shell bag Crochet Pattern?
Yes, you can customize the width by adjusting the foundation chain and modify the height by adding or reducing rows. The pattern is highly adaptable.
Do I need to add a lining to my crochet bag?
A lining is optional but recommended for added durability and practicality. It prevents small items from slipping through stitch gaps.
How can I make the bag sturdier?
Using a smaller hook for tighter stitches, reinforcing the base, and adding a fabric lining can significantly improve structure and strength.
Is the Shell bag Crochet Pattern suitable for selling?
Yes, handmade crochet bags are popular in craft markets. Ensure your finishing is neat and professional to increase value.
Can I use different stitches with this pattern?
While the shell stitch defines the design, you can incorporate other stitches for the base or edging to create unique variations.
In this comprehensive guide, we explored how to create a beautiful and functional Shell bag Crochet Pattern, from understanding the shell stitch texture to selecting materials, constructing the bag, and adding personalized finishing touches. We discussed preparation, step-by-step techniques, customization ideas, and essential care tips to ensure durability and elegance. The versatility of the Shell bag Crochet Pattern makes it a timeless choice for crocheters of all skill levels.
Now that you have learned the full process, it is your turn to bring this pattern to life. I would love to hear your honest opinion about this guide and your experience creating your own bag. Feel free to share your suggestions, ideas, and creative variations. Your feedback helps inspire even more beautiful crochet projects in the future.


