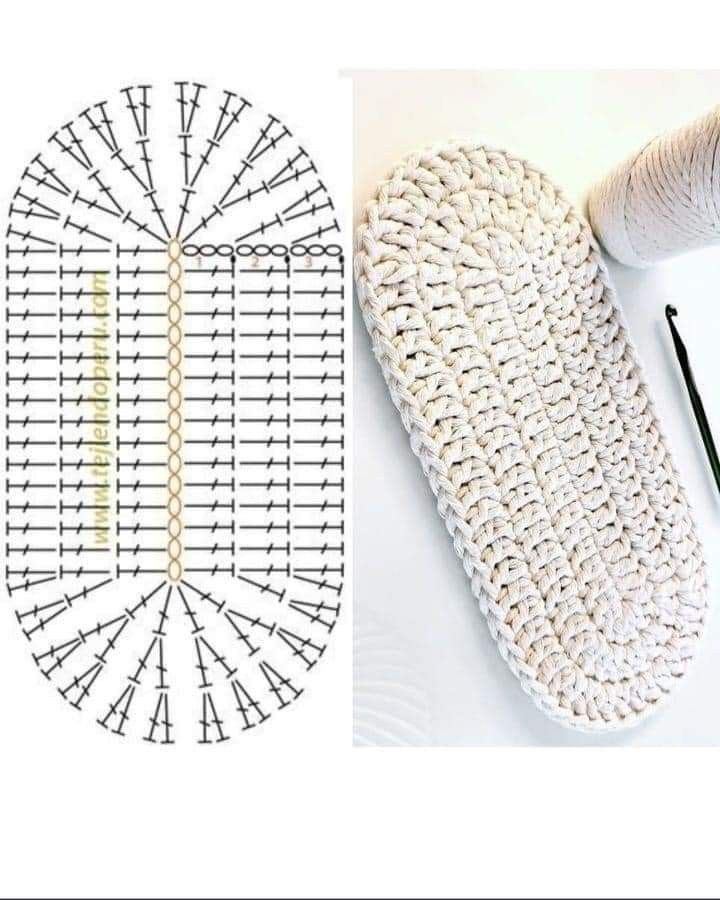
Crochet Oval Rug Base for Beginners Tutorial
If you’re looking for a fun and functional crochet idea, a Shoe project with granny squares is the perfect choice. This unique craft blends fashion with the charm of handmade crochet. In this detailed guide, you will learn how to create your own crochet shoes using colorful granny squares. Whether you’re an experienced crocheter or just starting out, this project is simple, affordable, and incredibly rewarding.
Creating a Shoe project with granny squares allows you to personalize your footwear while embracing sustainability. You can use leftover yarns and fabrics to reduce waste, all while making stylish shoes that reflect your personality. Handmade shoes made from granny squares are not only comfortable but also trendy, making them a fantastic addition to your DIY wardrobe.
This guide is designed to help you from start to finish. You’ll find detailed measurements, fabric cuts, and a step-by-step tutorial that follows the best SEO practices. Whether you are making these shoes for yourself, as a gift, or even to sell, you’ll find everything you need right here.

Let’s explore how a simple Shoe project with granny squares can turn into a fashionable statement. By the end of this article, you’ll have all the knowledge and confidence needed to complete this project successfully.
Before diving into the steps, make sure you have all the materials ready. From yarn selections to sole options, everything is covered. This project is not only beginner-friendly but also highly customizable, so feel free to experiment with colors and patterns.
Now, let’s start creating your very own Shoe project with granny squares that is comfortable, stylish, and completely handmade.
Starting a Shoe project with granny squares begins with gathering the right materials and knowing the correct measurements. Proper preparation ensures your shoes will fit well and last long.
First, you’ll need yarn. For this project, choose cotton yarn size 4 (medium worsted) because it’s durable and breathable. You can mix colors to create a vibrant or minimalist look, depending on your style.
For the soles, you can use pre-made espadrille soles, rubber shoe soles, or even crochet your own using double strands for extra sturdiness. Make sure to select a sole size that matches your foot perfectly. Standard sizes apply, but always check the exact measurements.
Each shoe will require four granny squares: two for the sides, one for the top, and one for the heel. The standard size for each granny square should be 4 inches (10 cm) by 4 inches (10 cm). Adjust the size slightly if needed for a better fit.
You’ll also need fabric for lining if you want extra comfort. Cut two pieces of cotton fabric measuring 4 inches (10 cm) by 4 inches (10 cm) for each granny square. This prevents stretching and provides durability.
Additionally, gather a tapestry needle, a 4mm crochet hook, fabric glue (optional), and a strong thread for sewing the squares together and attaching them to the sole. Safety pins or clips will help hold the pieces in place during assembly.
Having all these materials organized will make your Shoe project with granny squares smoother and more enjoyable. Double-check your measurements before starting to avoid any fitting issues.
The first step in your Shoe project with granny squares is learning how to crochet the perfect granny square. This basic crochet pattern forms the foundation of your stylish shoes.
Start with a slip knot and chain 4. Join with a slip stitch to form a ring. This will be the center of your granny square. This simple start creates the base from which all sides expand.
Round 1 begins with chaining 3 (counts as the first double crochet), then make 2 double crochets into the ring. Chain 2, then make 3 double crochets into the ring. Repeat this two more times to form four groups of three double crochets separated by chain 2 spaces. Slip stitch into the top of the beginning chain 3 to finish.
Round 2 starts by slip stitching to the next chain 2 corner space. Chain 3 (counts as the first double crochet), 2 double crochets in the same corner, chain 2, and 3 double crochets in the same space. In each side space between corners, make 3 double crochets. Repeat for all sides and corners, finishing with a slip stitch.
For Round 3, repeat the same pattern: 3 double crochets, chain 2 in each corner, and 3 double crochets in each side space. This round makes your square larger and sturdier.
Check the size. The finished granny square for your shoe should be 4 inches (10 cm). If it’s smaller, add one more round following the same pattern until it reaches the correct size.
Make a total of 8 granny squares (4 for each shoe). Mix and match colors if desired to give your Shoe project with granny squares a unique and personalized style.
Once your granny squares are complete, block them by pinning them to shape and spraying them lightly with water. Let them dry fully to keep the edges straight and make assembling easier.
Now that you have the granny squares ready, it’s time to assemble your Shoe project with granny squares. This part brings your crochet shoes to life.
Start by laying out your four granny squares for one shoe. Place one square at the toe, one at the heel, and one on each side. Check the alignment and how they will wrap around the foot.
Sew the side squares to the toe square along one edge. Use a whip stitch or slip stitch with a tapestry needle and matching yarn. Keep the stitches tight but flexible to allow some stretch.
Next, sew the heel square to the two side squares. This forms a full wrap around your foot. Check for fit by wrapping it around your foot or a shoe mold if you have one.
Once the upper part is connected, attach it to the sole. Pin or clip the edges to the sole first to check placement. Sew with strong thread or yarn, making sure to stitch evenly around the entire edge.
If you’re using fabric lining, attach the lining to the inside of each granny square before sewing it to the sole. Cut each lining piece to 4 inches (10 cm) and sew or glue it in place for added comfort.
Repeat the same steps for the second shoe. Take time to ensure both shoes are symmetrical, especially if using multi-colored squares for your Shoe project with granny squares.
The final step in your Shoe project with granny squares is all about finishing touches and making your shoes truly your own.
Check all the seams and stitches to ensure everything is secure. Reinforce any loose areas, especially around the toe and heel, which get the most wear during walking.
For added comfort, consider inserting foam or padded insoles inside the shoe. Cut the foam to match the shape of the sole for a custom fit.
Edge finishing is important for both style and durability. You can crochet a single crochet border around the top edge of the shoe to give it a neat, clean look. Use a contrasting color for a bold design or a matching color for a subtle finish.
Add embellishments like buttons, crochet flowers, or small pom-poms to personalize your shoes. This is where you can let your creativity shine and truly customize your Shoe project with granny squares.
If you prefer, you can also waterproof your shoes using a fabric-safe spray. This will protect your shoes from dirt and moisture, extending their lifespan significantly.
Finally, try on your shoes and admire your work. Whether you wear them at home, on the beach, or out shopping, your handmade crochet shoes will turn heads and show off your crafting skills.
A Shoe project with granny squares is a fun, eco-friendly, and fashionable DIY craft that anyone can enjoy. Not only do you get to recycle yarn and fabric, but you also end up with a pair of stylish handmade shoes that reflect your personality.
Throughout this guide, you’ve learned how to choose materials, crochet perfect granny squares, assemble the shoe, and add those final touches that make your project special. With clear measurements and easy steps, anyone can create these delightful shoes.
This project is perfect for gifts, selling at craft fairs, or simply enjoying a creative afternoon. The versatility of granny squares means endless design possibilities.
If you loved this Shoe project with granny squares, share it with your friends or on your social media. Your creativity might inspire others to start their crochet journey as well.
Thank you for following this guide! Leave your comments or suggestions below. Have you tried making a granny square shoe before? Share your tips and experiences—we’d love to hear from you.
Ready to try another project? Stay tuned for more crochet tutorials and DIY ideas coming soon!


