
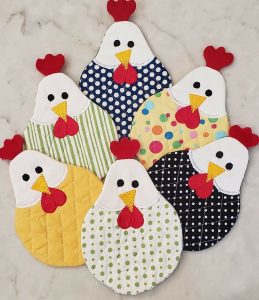
Braided Gloves Crochet Pattern
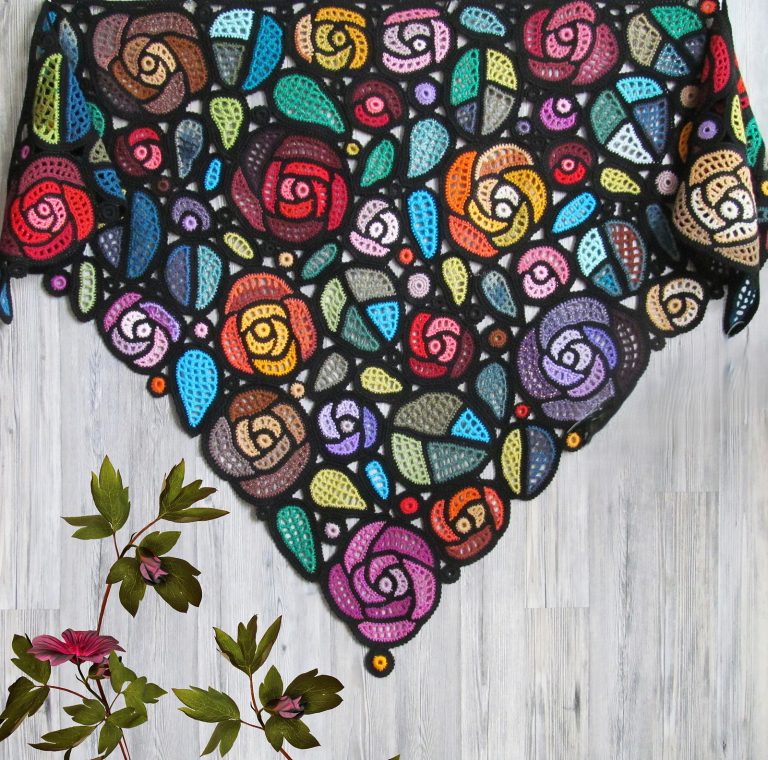
Stained Glass Crochet Roses Pattern is a breathtaking technique that combines the delicate beauty of crochet roses with the dramatic visual contrast of stained glass design.
If you are looking for a project that feels artistic, timeless, and deeply satisfying, this pattern might become your next favorite creation. The magic of the Stained Glass Crochet Roses Pattern lies in its ability to transform simple yarn into something that resembles colorful glass panels framed by bold outlines.
When crocheters search for a project that stands out, they often want something more than just texture—they want dimension, contrast, and visual storytelling. That is exactly what the Stained Glass Crochet Roses Pattern offers. By combining layered rose motifs with darker framing stitches, this technique creates a luminous effect similar to cathedral windows. Even though the result looks complex, the process can be broken down into manageable and enjoyable steps.

Another reason why the Stained Glass Crochet Roses Pattern has become so popular is its versatility. You can use it for blankets, pillow covers, wall hangings, table runners, or even wearable pieces like shawls. The design adapts beautifully to different color palettes, allowing you to create soft vintage looks or bold modern statements. Whether you are an experienced crocheter or an advanced beginner ready for a challenge, this pattern invites creativity and personal expression.
The foundation of the Stained Glass Crochet Roses Pattern begins with understanding the stained glass effect. In traditional stained glass art, colored glass pieces are separated by dark lead lines. In crochet, this visual effect is recreated using bold outlines around floral motifs. The contrast between the rose colors and the dark framing yarn creates depth and drama.
Crochet roses are typically made using layered petals. In this pattern, the rose is not just decorative—it becomes the centerpiece of each “panel.” When arranged in repeated blocks, the roses resemble individual stained glass tiles. This repetition creates harmony while still allowing each flower to feel unique.
Color selection plays a crucial role in achieving the stained glass look. Jewel tones such as deep red, royal blue, emerald green, and rich purple work beautifully. When paired with black or dark brown outlines, the colors appear more vibrant and defined. However, softer palettes with cream or gray outlines can create a more delicate effect.
Texture is another important element. The raised petals of the crochet rose add a three-dimensional quality that enhances the illusion of glass panels. The interplay between flat background stitches and dimensional petals makes the pattern visually dynamic.
Lighting also influences how the finished piece appears. Just like real stained glass, crochet projects made with this technique seem to “glow” when natural light hits the contrasting colors. This makes the Stained Glass Crochet Roses Pattern especially striking when used as a decorative home accent.
Ultimately, the beauty of this pattern lies in its balance between structure and softness. The structured outlines give order and geometry, while the roses provide organic curves and movement. This balance is what makes the design so captivating.
Choosing the right materials is essential for achieving the best results with the Stained Glass Crochet Roses Pattern. Medium-weight yarn (worsted weight) is often ideal because it provides enough structure to highlight the outlines while still allowing the petals to remain soft and flexible. Cotton yarn offers crisp stitch definition, while acrylic blends provide warmth and durability.
A crochet hook that matches your yarn weight ensures even tension. Maintaining consistent tension is especially important in this pattern because uneven stitches can distort the geometric framing effect. Many crocheters recommend practicing a small swatch before beginning a large project.
Color planning should happen before you start crocheting. Decide whether you want a repeating rose color scheme or a variety of shades across panels. Sketching a simple layout can help you visualize how the roses will be arranged and framed within the stained glass design.
Blocking is another preparation step that should not be overlooked. Once each rose square or panel is complete, gentle blocking helps the outlines lie flat and enhances the clean “glass panel” appearance. Proper blocking ensures that all squares align perfectly when joined.
When joining panels, you can use slip stitches or a whip stitch seam. Some crocheters prefer joining with the dark outline color to reinforce the stained glass effect. This method keeps the design cohesive and visually consistent.
Finally, consider the final purpose of your project. A blanket may require softer yarn for comfort, while a wall hanging might benefit from a sturdier fiber. Preparing with intention allows the Stained Glass Crochet Roses Pattern to truly shine in its final form.
The Stained Glass Crochet Roses Pattern typically begins with creating the central rose motif. This often starts with a magic ring or chain loop foundation. The first round forms the base petals, and subsequent rounds build layered petals that create fullness and dimension.
After completing the rose center, the background stitches are added. These stitches form the square or panel shape around the flower. Double crochet and chain spaces are commonly used to expand the motif evenly into a geometric frame.
Once the square shape is established, the “stained glass” outline is added. This is usually done by crocheting around the edges in a contrasting dark color. Some patterns incorporate surface slip stitches to create bold lines that mimic lead framing.
Maintaining stitch consistency is key during this phase. Clean corners and even sides ensure that panels align neatly when joined together. Counting stitches at the end of each round helps avoid uneven shapes.
After individual squares are completed, they are arranged into rows. Planning the arrangement beforehand ensures balanced color distribution. Alternating rose colors can create a mosaic-like effect, while repeating the same color creates uniform elegance.
The final assembly stage involves joining all panels and adding an optional border. A simple dark border enhances the stained glass illusion and frames the entire project beautifully. This finishing touch ties the design together and gives the piece a polished appearance.
One of the most exciting aspects of the Stained Glass Crochet Roses Pattern is its adaptability. You can experiment with gradient yarn for the roses to create a subtle color shift within each flower. This adds depth and visual interest without complicating the technique.
Another variation involves changing the shape of the panels. Instead of traditional squares, you can explore hexagonal motifs. Hexagons create a honeycomb effect that feels modern while still maintaining the stained glass look.
You may also incorporate metallic or slightly shimmering yarn for the outlines. While subtle, this can enhance the illusion of glass reflecting light. Be sure to keep the shimmer minimal to maintain a refined and elegant finish.
For seasonal themes, adjust the rose colors accordingly. Soft pinks and yellows work beautifully for spring-inspired projects. Deep burgundy and forest green evoke autumn warmth. White roses framed in dark outlines can create a timeless winter aesthetic.
Advanced crocheters can experiment with adding leaves between panels. Small green motifs placed strategically can soften the geometric framing and add botanical realism to the design.
Finally, consider scale. Enlarging each rose panel can transform the pattern into a statement piece like a bedspread or tapestry. Alternatively, mini panels can be combined into smaller accessories such as cushion covers or tote bags. The versatility of the Stained Glass Crochet Roses Pattern allows endless creative exploration.
What skill level is required for the Stained Glass Crochet Roses Pattern?
This pattern is best suited for intermediate crocheters because it combines layered floral motifs with structured framing techniques. However, confident beginners who are comfortable with basic stitches and following patterns can also succeed with patience and practice.
What type of yarn works best for achieving the stained glass effect?
Yarn with clear stitch definition, such as cotton or smooth acrylic, works best. The key is strong contrast between the rose colors and the outlining yarn to enhance the stained glass illusion.
Can I use this pattern for wearable items?
Yes, the Stained Glass Crochet Roses Pattern can be adapted into shawls, cardigans, and scarves. Choose softer yarns for garments to ensure comfort and flexibility.
How do I keep my squares even and aligned?
Counting stitches at the end of each round and blocking finished squares are essential steps. Blocking helps maintain uniform size and improves the final assembly process.
Is this pattern suitable for large projects like blankets?
Absolutely. In fact, repeating rose panels across a blanket creates a stunning visual impact. Planning color placement in advance helps maintain balance and harmony across a larger surface.
How can I make the colors look more vibrant?
Use deep, saturated hues for the roses and pair them with a bold outline color such as black or dark brown. Strong contrast enhances the stained glass effect significantly.
The Stained Glass Crochet Roses Pattern beautifully blends artistic inspiration with traditional crochet techniques. Throughout this article, we explored how the stained glass effect is achieved through bold outlines, layered rose motifs, and thoughtful color planning. We discussed essential materials, step-by-step structure, and creative variations that allow you to personalize your design.
By understanding the balance between geometric framing and soft floral texture, you can confidently create a project that feels both elegant and unique. Whether you are crafting a blanket, decorative panel, or wearable piece, the Stained Glass Crochet Roses Pattern offers endless creative possibilities.
Now it is your turn to bring this design to life. Have you tried this technique before, or are you planning your first stained glass-inspired crochet project? Leave your honest opinion and share your suggestions. Your creativity and experience can inspire others in the crochet community.

