
Easter Bunny Basket - Crochet Pattern
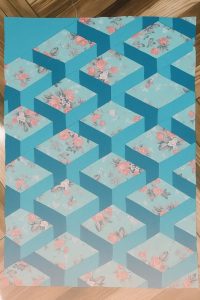
Twinkle Twinkle Little Star is more than just a beloved nursery rhyme; it’s also an enchanting quilt pattern that brings warmth and charm to any space. In this article, we’ll explore how to create your own Twinkle Twinkle Little Star quilt step by step, including fabric cuts and measurements, to help you bring this magical design to life. By following this guide, even beginners can craft a beautiful quilt that truly shines.
At its heart, the Twinkle Twinkle Little Star quilt pattern celebrates the classic star block, transforming simple shapes into something truly special. Whether you’re making it for a baby, as a thoughtful gift, or to add a touch of whimsy to your home décor, this pattern offers endless creative possibilities. Plus, the repetitive star design makes it a relaxing yet rewarding project.
In the following sections, we’ll break down everything you need to know: from selecting fabrics and cutting them to piecing the quilt top and finishing touches. By the end, you’ll have a complete Twinkle Twinkle Little Star quilt pattern to follow, along with helpful tips to make your quilting journey a success.

The magic of the Twinkle Twinkle Little Star quilt starts with your choice of fabric. Aim for a mix of light and dark prints to ensure the stars stand out beautifully. You can select soft pastels for a baby quilt or bold, contrasting colors for a striking modern look. Remember, fabric choice shapes the personality of your quilt.
Start by deciding on your quilt size. For a baby quilt around 36” x 48”, you’ll need about 1 yard each of your main star fabric and background fabric. Add ½ yard for borders and ½ yard for binding. For larger quilts, adjust fabric amounts accordingly.
Next, let’s talk about the cuts. For each star block, you’ll need five squares:
If your quilt has 20 star blocks, multiply these cuts accordingly. Cutting all pieces at once helps keep your workflow smooth and organized.
Use a rotary cutter and quilting ruler to achieve precise cuts. Accuracy here is crucial; even small measurement errors can affect how your blocks fit together. Always double-check your measurements before cutting.
Don’t forget about border and binding strips. For a quilt measuring 36” x 48”, cut:
Finally, press all your fabric pieces before you begin sewing. This step helps ensure your pieces lie flat and sew together neatly, leading to a polished final quilt.
Creating the star blocks is where the Twinkle Twinkle Little Star pattern truly comes alive. Each block combines a mix of background and star fabric to create the iconic twinkling look. Take your time during this step to keep your seams neat and your points sharp.
Begin by preparing the star points. Take two of the 2.5” x 4.5” rectangles and place them right sides together on opposite corners of the star center square. Sew diagonally across the rectangles, trim excess fabric, and press open.
Repeat the same process for the remaining two rectangles on the other two corners of the star center square. This creates the classic star shape in the center of the block. Your points should align cleanly; use pins to help if needed.
Next, sew the 4.5” x 4.5” background squares to each side of the star points. This creates the surrounding frame that helps the star “twinkle” against the background. Keep your seams at a consistent ¼”.
After finishing all your star blocks, press them carefully. Pressing toward the darker fabric usually prevents shadows from showing through the lighter background. This keeps your quilt looking crisp.
Lay out your blocks on a flat surface to plan your final quilt top design. Arrange them in rows, making sure the stars look balanced and the colors are distributed evenly. Don’t rush this part—it’s worth taking the time to create a pleasing overall effect.
Finally, sew the blocks together into rows, and then join the rows to complete your quilt top. Your Twinkle Twinkle Little Star quilt is starting to take shape beautifully!
With the star blocks assembled, it’s time to add borders to give your quilt a finished, cohesive look. Borders frame the quilt and keep the design from feeling incomplete. They also add a bit of extra size.
For the Twinkle Twinkle Little Star quilt, attach the shorter border strips (3” x 36”) to the top and bottom first. Use a ¼” seam allowance and press the seams outward. Then, attach the longer border strips (3” x 48”) to the sides.
Adding borders can sometimes cause slight fabric stretching, so use pins generously to keep everything lined up. Measure carefully and trim if needed before sewing.
Once the borders are on, it’s time to quilt your project. You can choose simple straight-line quilting following the seams, or opt for free-motion quilting to add swirling, starry designs that echo the Twinkle Twinkle Little Star theme.
If you’re new to quilting, straight lines spaced about 2” apart work well and keep the quilt soft. Mark your quilting lines lightly with a washable fabric marker to keep them even.
Quilting not only adds beauty but also holds the layers together: the quilt top, batting, and backing. Once quilting is finished, trim the excess batting and backing to match the edges of the quilt top.
Lastly, prepare and attach your binding. Sew the 2.5” strips together end to end to make one long strip, fold it in half lengthwise, and sew it around the quilt edges. Finish by hand or machine for a neat edge.
Now that your Twinkle Twinkle Little Star quilt is complete, it’s time to give it those final special touches. These small details can truly elevate your finished project and make it a treasured keepsake.
Add a personalized quilt label to the back. Include your name, the date, and maybe a sweet message or dedication. This turns your quilt into a lasting memory, perfect for gifting.
Consider adding hand-stitched accents or small embroidered stars in the background. These can make the stars look even more “twinkly” and give your quilt a charming handmade feel.
Before using or gifting your quilt, wash it gently in cold water with a mild detergent. This softens the fabric and helps set the stitches. Use a low-heat dryer or air-dry flat to prevent shrinkage.
Store your quilt carefully when not in use. Avoid folding it the same way each time to prevent permanent creases. Rolling or loosely folding it with acid-free paper helps keep it in perfect condition.
If you plan to hang your quilt as a wall decoration, sew a sleeve to the back so it can slide onto a rod. This keeps your quilt safe and flat while showing off your beautiful work.
Lastly, share your quilt! Post pictures online, enter it in local quilt shows, or simply snuggle under it on a chilly night. The joy of quilting comes not just from making, but from sharing and enjoying your creation.
Crafting a Twinkle Twinkle Little Star quilt pattern brings creativity, warmth, and timeless beauty together in one project. From choosing your fabrics and cutting precise pieces to assembling star blocks, adding borders, and finishing with care, each step builds towards a quilt you’ll treasure.
Remember, quilting is as much about the journey as the finished piece. Take your time, enjoy the process, and don’t worry about small imperfections—they add character and show your unique touch.
We hope this detailed guide inspires you to try the Twinkle Twinkle Little Star quilt pattern yourself. If you do, share your creations and stories—we’d love to see them! Happy quilting, and may your stars always twinkle brightly.


