
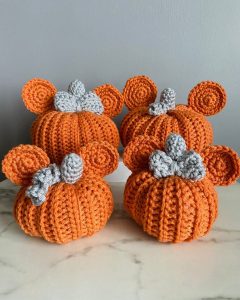
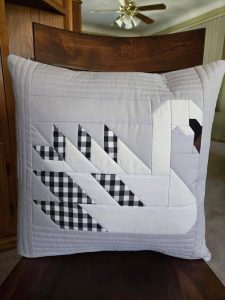
Bird Quilt Block Pattern
The Antique Tile Quilt Block Pattern is a beautiful and timeless design that continues to captivate quilters of all skill levels. Inspired by the intricate patterns of historic ceramic tiles, this quilt block blends symmetry, contrast, and creativity in a way that stands out in any project.
Whether you’re new to quilting or looking for a classic pattern to revisit, the Antique Tile Quilt Block Pattern offers a perfect balance between simplicity and sophistication.
In this article, we’ll walk you through how to create your own Antique Tile Quilt Block Pattern step by step. From fabric selection and cutting to assembling each section, you’ll learn everything needed to confidently craft this traditional block. Plus, we’ve structured this guide with SEO best practices in mind, ensuring it’s both informative and easy to follow—ideal for those searching for well-optimized, AdSense-compliant quilting content.

With four comprehensive sections, this guide includes exact fabric cut sizes, layout instructions, and expert tips to help your Antique Tile Quilt Block Pattern turn out beautifully. Let’s dive into the artistry of antique tiles and transform them into a cozy textile masterpiece.
Choosing the right fabrics is the first and most essential step in creating your Antique Tile Quilt Block Pattern. Because this pattern relies on contrast, it’s important to select fabrics that clearly stand apart in tone and color.
Start by choosing three types of fabric: one dark, one medium, and one light. This contrast will help highlight the tile effect that gives the Antique Tile Quilt Block Pattern its charm. Solids, small prints, or reproduction fabrics work well here.
Prewash your fabrics to avoid shrinkage or color bleeding later. Press thoroughly to ensure accurate cutting, which is vital for maintaining symmetry in the block.
For each 12″ finished quilt block, you’ll need:
Use a rotary cutter and ruler to make precise cuts. Accurate measurements are the foundation of a polished Antique Tile Quilt Block Pattern.
Lay out your cut pieces before sewing to visualize the block and ensure fabric placement is correct. This helps prevent assembly mistakes later.

The heart of the Antique Tile Quilt Block Pattern lies in its symmetrical center. This part serves as the visual focal point and sets the tone for the entire block.
Start with your 4.5” dark square. This will be the central “tile” and anchor of the design. Place it at the center of your layout board or table.
Sew two medium 2.5” x 4.5” rectangles to the sides of the center square. Press seams outward. This forms a vertical unit with the dark square in the middle.
Next, sew two more medium 2.5” x 4.5” rectangles to the top and bottom of the new center unit. Make sure to press seams away from the center. You now have a bordered square.
Take the four 2.5” x 2.5” light squares and attach one to each end of two 2.5” x 6.5” light rectangles. Press seams toward the squares. These will become your top and bottom rows.
Attach these new strip units to the top and bottom of your center unit. Align seams carefully and pin if needed to keep everything straight.
Press the final block flat. You now have a completed Antique Tile Quilt Block Pattern center, ready for the outer pieces or for joining with other blocks in a quilt.
With the main units created, it’s time to stitch them into full rows and then assemble the entire Antique Tile Quilt Block Pattern. Precision and pressing are key to this stage.
Lay out your three rows: top (light-medium-light), middle (constructed square), and bottom (light-medium-light). Make sure all seams are aligned properly.
Begin by sewing the top row to the middle section. Use a 1/4” seam allowance and take your time. Matching seams will keep the tile illusion sharp and neat.
After sewing, press the seam toward the center block. This helps the finished block lie flat and improves the overall look of your Antique Tile Quilt Block Pattern.
Now sew the bottom row to the unit. Again, match seams carefully and press toward the center once sewn. Your quilt block should now measure 12.5” square.
Trim any excess threads or uneven edges. Keeping the block square is essential, especially if you’re assembling multiple blocks for a quilt top.
Repeat the same construction process for each additional block you plan to include in your quilt. The beauty of the Antique Tile Quilt Block Pattern is that it scales beautifully across entire quilts.
Once you’ve made multiple blocks, it’s time to think about assembling them into a finished quilt. The Antique Tile Quilt Block Pattern works beautifully in full quilts, table runners, or wall hangings.
Arrange your finished blocks in rows or columns, alternating orientations if desired for a more dynamic layout. This can help create movement within your Antique Tile Quilt Block Pattern quilt.
Use sashing or borders to separate blocks and enhance the visual appeal. Choose complementary fabrics that echo the tones used within your blocks.
Once your layout is finalized, sew the rows together, pressing seams as you go. Consider pinning at seam intersections to avoid misalignment.
Layer your quilt top with batting and backing. Choose a light or neutral backing to showcase the front without overpowering the pattern.
Quilt as desired—straight-line quilting works well to emphasize the tile layout, while free-motion designs can add texture and personality.
Finally, bind your quilt with a fabric that complements the overall design. This final touch frames your Antique Tile Quilt Block Pattern and brings the project to completion.
What size is the finished Antique Tile Quilt Block Pattern?
The finished block typically measures 12″ x 12″, with raw edges measuring 12.5″ square before joining to other blocks.
Can I use scrap fabric for this quilt block?
Yes! The Antique Tile Quilt Block Pattern is perfect for using scraps, especially in the 2.5″ size range. Just ensure there’s contrast between fabrics.
What’s the best fabric type to use?
100% cotton quilting fabric is recommended. It’s easy to sew, durable, and holds its shape well in quilt blocks like the Antique Tile Quilt Block Pattern.
Is this pattern beginner-friendly?
Absolutely. With simple shapes and straightforward seams, the Antique Tile Quilt Block Pattern is great for new quilters looking to build skills.
How many blocks do I need for a full quilt?
For a throw-size quilt (around 60″ x 72″), you’ll need 30 blocks (5 blocks across by 6 blocks down). Adjust based on your desired finished size.
Can I chain piece these blocks?
Yes, chain piecing is an efficient way to speed up the construction of the Antique Tile Quilt Block Pattern, especially when making multiple blocks.
The Antique Tile Quilt Block Pattern brings together tradition, elegance, and simplicity in a timeless design. With its clear structure and high contrast, this pattern transforms basic fabric pieces into something that feels both historic and handcrafted. By following the step-by-step guide above, including detailed fabric cuts and sewing instructions, you’ll be well on your way to creating a classic piece of quilted art.
Whether you’re making a full quilt or just a few blocks for a smaller project, the Antique Tile Quilt Block Pattern offers endless versatility and satisfaction. We hope this guide inspired you to pick up your rotary cutter and start stitching. Have questions or want to share your results? Drop a comment below—we’d love to hear your thoughts and see your creations!
If you’d like more quilt block tutorials like this, let us know what patterns you’d like to see next. Happy quilting!


