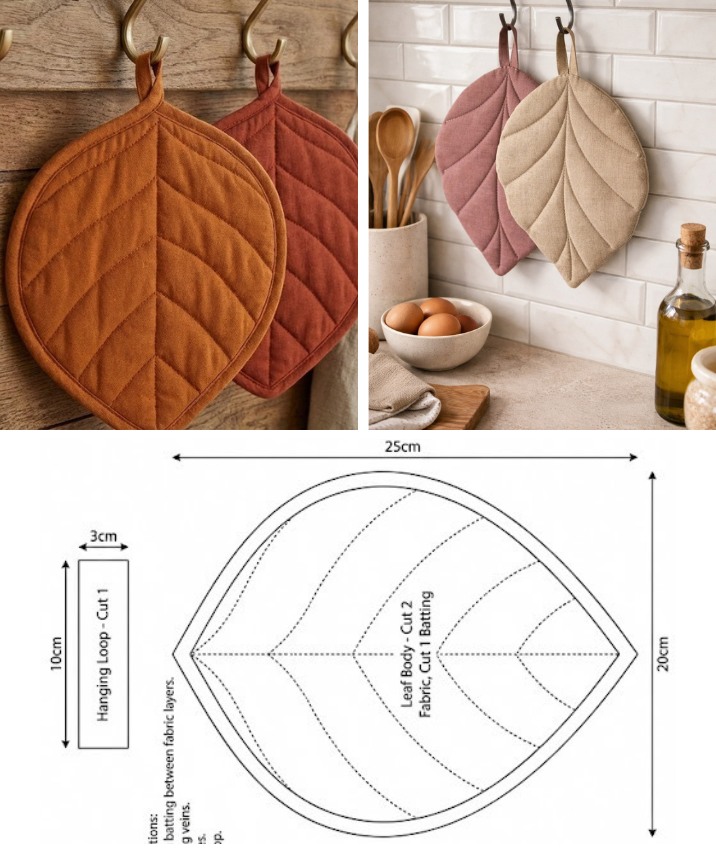
Padding leaf-shaped pot holder Pattern
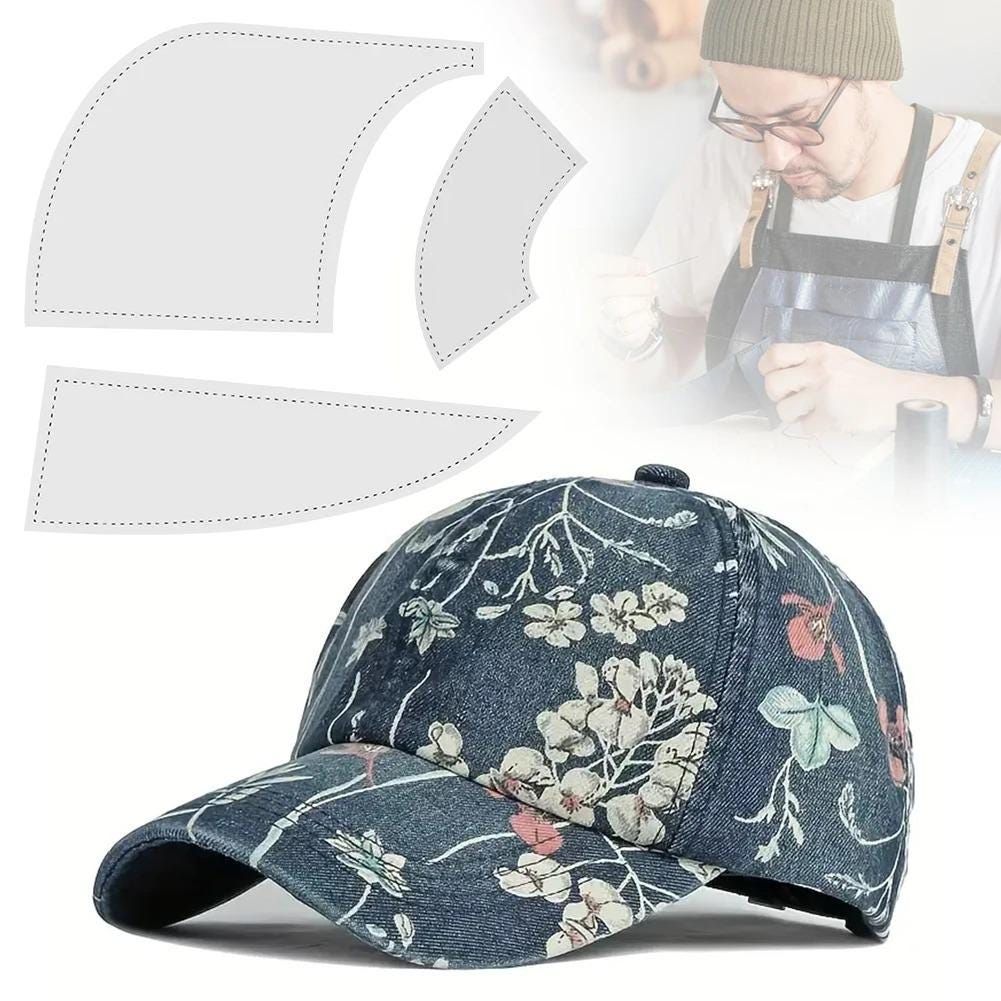
Creating your own Baseball Cap Hat fabric pattern is one of the most satisfying sewing projects you can take on—whether you’re a beginner looking for a simple yet stylish project or an experienced sewer ready to customize every detail of your hat. A baseball cap is a timeless fashion accessory that never goes out of style. It’s functional, fashionable, and offers endless possibilities for personalization through fabric choices, patterns, and embellishments. When you make your own, you can control every detail—from the color and texture of the fabric to the shape of the brim and the fit of the cap.
The Baseball Cap Hat fabric pattern process involves understanding the structure of the hat, cutting out precise fabric pieces, and assembling them carefully to ensure a professional finish. This project is also a wonderful way to use up leftover fabric scraps from other sewing projects. Whether you prefer denim, canvas, or cotton, the right fabric will determine how your hat feels and fits. Choosing the correct fabric pattern is key, as it ensures both comfort and durability.
Many people assume sewing a baseball cap is complicated, but with a well-designed Baseball Cap Hat fabric pattern, it becomes a manageable and fun challenge. You’ll only need some basic sewing skills, a few materials, and patience. By learning how to make a baseball cap from scratch, you’ll also gain valuable experience in pattern-making, seam alignment, and topstitching—skills that apply to a wide range of other sewing projects.
Before cutting your Baseball Cap Hat fabric pattern, it’s essential to understand how the hat is constructed. A classic baseball cap consists of several parts: the crown, brim (or visor), button, and adjustable strap. Each of these components contributes to the overall shape and functionality of the cap.
The crown is made of six triangular panels that meet at the top, forming the rounded shape of the hat. These panels can be made from a single fabric type or a combination of complementary prints to create a unique look. When cutting these panels, accuracy is crucial to ensure the hat fits properly and the seams align neatly.
The brim gives the hat its signature sporty look and helps shield the eyes from sunlight. It’s usually made from two layers of fabric with a stabilizer or stiff interfacing inside to keep it firm. When working with your Baseball Cap Hat fabric pattern, make sure your brim pattern includes seam allowances and enough structure to hold its shape.
Another important element is the adjustable strap or closure, which ensures the cap fits various head sizes. You can make this from Velcro, snapbacks, elastic bands, or even a metal slider. Adding these small details can greatly enhance both the practicality and the aesthetic appeal of your hat.
Finally, the top button and inner lining complete the hat’s design. The button covers the intersection of the panels and adds a polished touch, while the lining hides raw seams, increasing comfort and durability. Paying attention to these finishing details helps elevate your handmade hat from amateur to professional quality.
The type of fabric you choose for your Baseball Cap Hat fabric pattern directly influences its comfort, style, and durability. Lightweight cotton and twill fabrics are excellent options for casual, breathable caps, while canvas or denim fabrics offer more structure and a rugged look.
When selecting your fabric, consider the pattern or print. Stripes, florals, plaids, or solid colors can give your cap a distinct personality. For instance, a floral baseball cap can look playful and summery, while a neutral linen cap gives a minimalist and sophisticated vibe. If you’re making multiple hats, try experimenting with various fabric patterns to find what best fits your personal style.
Interfacing is another material that’s essential for shaping your Baseball Cap Hat fabric pattern. Fusible interfacing can be applied to both the crown panels and the brim for extra stability. The type of interfacing you use should match the fabric’s weight—lightweight interfacing for soft fabrics and heavy interfacing for thick or structured fabrics.
For the lining, lightweight cotton or breathable mesh fabrics work best, especially if you plan to wear the hat in warm weather. The lining adds comfort and helps absorb sweat, keeping the inside of the cap fresh. Don’t skip this step—it makes your handmade baseball cap more comfortable and long-lasting.
In addition to fabric and interfacing, you’ll need some small but vital supplies: coordinating thread, bias tape (for finishing inner seams), and a fabric marking pen. These details might seem minor, but they contribute greatly to achieving clean, professional results.
Lastly, remember that the color of your thread can impact the final look. Use matching thread for a subtle, seamless finish, or choose contrasting thread to highlight topstitching details and make your Baseball Cap Hat fabric pattern stand out even more.
Now that you’ve chosen your fabric and materials, it’s time to start assembling your Baseball Cap Hat fabric pattern. Begin by printing or drawing your pattern pieces—six panels for the crown, two brim pieces, and one strap piece. Cut the fabric carefully, following the grain line indicated on the pattern.
Next, sew the crown panels together. Start by joining two panels right sides together and stitching along one edge. Continue attaching the remaining panels until all six are connected. Press the seams open as you go to keep everything flat and tidy. Topstitching the seams will reinforce them and give your hat a polished finish.
Once the crown is complete, it’s time to prepare the brim. Place the two brim fabric pieces right sides together with the interfacing in between. Stitch around the curved edge, turn it right side out, and press. Topstitch several rows along the brim to add strength and a decorative touch.
Attach the brim to the crown carefully, ensuring the center of the brim aligns with the front seam of the crown. Pin in place and sew slowly around the base. This part can be tricky, so take your time and adjust as needed to maintain a smooth curve.
Next, add the lining to the inside of the hat. Sew the lining panels the same way as the outer crown, then attach it to the inside with a bias tape or a clean edge finish. This step hides the seams and gives your hat a professional interior look.
Finally, attach the closure or strap. If you’re using Velcro, sew it neatly onto the ends of the back opening. For a snapback or buckle, follow the manufacturer’s instructions. Add the top button as the final touch, and your handmade Baseball Cap Hat fabric pattern is complete.
Once you’ve mastered the basics of the Baseball Cap Hat fabric pattern, you can begin to experiment with customization. This is where your creativity truly shines. You can add embroidery, appliqués, or fabric paint to personalize your cap. Monogramming your initials or adding small embroidered designs can make your cap one-of-a-kind.
You can also play with fabric combinations. Try mixing denim panels with printed cotton for a trendy patchwork look. Adding lace overlays or metallic fabrics can give your hat a more feminine or bold aesthetic. Customization allows you to align your design with your wardrobe and personality.
Another fun way to enhance your Baseball Cap Hat fabric pattern is by experimenting with the brim shape and size. You can create a wider brim for more sun protection or a shorter, curved brim for a retro vibe. By altering the pattern slightly, you’ll have endless design possibilities.
Decorative stitching is also an effective way to elevate the appearance of your hat. Try contrasting thread or double topstitching along the seams for a professional touch. Using metallic or colorful threads can add an extra pop of style.
For a sporty or streetwear-inspired cap, consider adding eyelets for ventilation or a mesh back panel. These small adjustments not only look great but also improve the cap’s comfort.
Lastly, don’t forget packaging if you’re making these for sale or gifts. Folding your cap neatly and presenting it in eco-friendly wrapping can add a touch of professionalism that reflects the care you’ve put into your Baseball Cap Hat fabric pattern.
1. What is the best fabric for a baseball cap?
Cotton twill, canvas, and denim are the best choices for making a Baseball Cap Hat fabric pattern. They’re durable, easy to sew, and maintain shape well.
2. Do I need interfacing for the brim?
Yes, interfacing helps the brim hold its shape. You can use fusible or sew-in interfacing depending on your fabric’s thickness.
3. Can I make a baseball cap without a sewing machine?
While it’s possible to hand-sew, a sewing machine provides stronger seams and a cleaner finish, especially for the curved crown and brim.
4. How can I adjust the size of my cap?
You can modify the pattern slightly by enlarging or reducing the crown panels. Adding an adjustable strap at the back also helps fit different head sizes.
5. What type of thread should I use?
Use polyester thread for strength and flexibility. It works well with most fabrics used in Baseball Cap Hat fabric pattern projects.
6. Can I wash my handmade baseball cap?
Yes, but it’s best to hand wash and air dry it to maintain its shape and prevent fabric shrinkage.
Making your own Baseball Cap Hat fabric pattern is a creative and rewarding experience that allows you to design a custom piece of wearable art. You now know how to select fabrics, assemble the pieces, and add your personal touches for a professional finish. From choosing durable materials to mastering stitching techniques, every step contributes to a unique handmade hat that fits your style perfectly.
We hope this guide inspires you to try your hand at making a Baseball Cap Hat fabric pattern. Have you ever made your own cap before? Share your honest opinion and suggestions below—we’d love to hear your experiences, ideas, and tips for making the perfect handmade baseball cap!


