
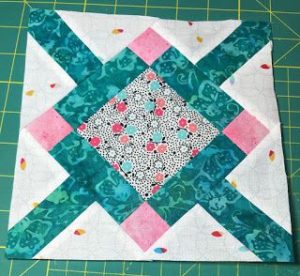
Bird Quilt Block Pattern
If you’re looking for a charming and timeless pattern to add to your quilt collection, the Flower Basket Quilt Block is a beautiful choice. Known for its traditional appeal and visual interest, this block brings elegance and character to any quilt.
Whether you’re new to quilting or a seasoned pro, learning how to sew a Flower Basket Quilt Block is both rewarding and fun.This article will walk you through everything you need to know about creating a Flower Basket Quilt Block , from fabric selection to cutting, piecing, and finishing.
By the end of this post, you’ll have a complete understanding of how to create this classic block, complete with accurate measurements and clear guidance. Let’s dive into the world of basket-inspired quilting!

The first step in making a Flower Basket Quilt Block is gathering your materials and preparing your fabric. Choosing the right fabrics will help bring your basket design to life and ensure your quilt block is crisp, neat, and eye-catching.
For one Flower Basket Quilt Block, you will need three different fabrics: one for the basket, one for the background, and one for the handle (optional). For a standard 12.5″ x 12.5″ unfinished block, you can use fabric scraps or fat quarters for each of these.
Start by cutting the following fabric pieces:
Be sure your fabric is pressed before cutting to avoid distortion. Accurate cutting is essential when piecing together a block with angled shapes like triangles.
Label your pieces with sticky notes or chalk so that you can easily follow along during construction. Organizing your pieces before sewing saves time and helps avoid confusion.
If you’re making multiple blocks for a quilt, consider batch cutting. This technique speeds up the process and keeps your blocks consistent in size and shape, which is key for a clean finish.
Now that your fabric pieces are ready, it’s time to start assembling your Flower Basket Quilt Block. This step-by-step process will guide you through creating a precise and beautiful block with minimal frustration.
Begin by constructing the triangle portion of the basket. Sew the large triangle of background fabric to the 6.5″ square of basket fabric, aligning along the diagonal edge. Press the seam toward the basket fabric to avoid bulk.
Next, make the side triangles by sewing the 3.5″ background squares to the 3.5″ basket squares. Draw a diagonal line across the back of the background square, place it right sides together with the basket square, sew on the line, and trim 1/4″ away from the seam. Press open.
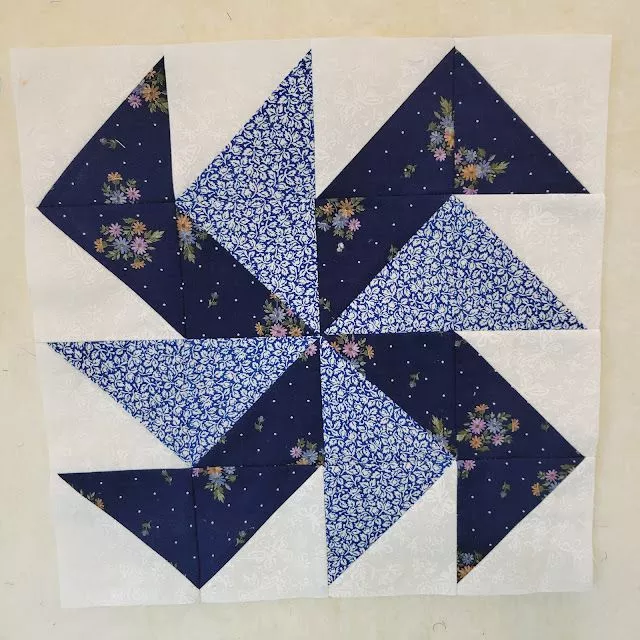
Once you’ve completed your side units, lay out all the components of the Basket Quilt Block before sewing them together. Make sure the triangles are positioned correctly to form the basket shape.
If you’re including a handle, now is the time to add it. Use your handle strip and curve it into position across the background fabric, then stitch it down with a small zigzag or invisible stitch. This step adds extra charm and traditional appeal to your block.
Finally, piece the units together row by row. Sew the rows, then sew the rows together to complete your block. Press all seams flat or to one side, depending on your preference.
One of the challenges when sewing a Flower Basket Quilt Block is getting clean points and crisp seams, especially where the triangle units meet. Here are some helpful tips to ensure a professional-looking result.
Always use a 1/4″ quilting foot when sewing. Accurate seam allowances are crucial to maintaining the size and alignment of your block components.
Pin carefully at intersecting points. Where triangle points meet, insert a pin directly through the intersection and check alignment before stitching.
Press as you go. After each seam, press with a hot iron to keep your block flat and seams crisp. Avoid stretching the fabric, especially around bias edges, as this can distort the shape of your block.
Use starch or a fabric stabilizer when working with triangles or bias-cut pieces. This adds structure and reduces fraying or warping while sewing.
Test your finished block for size. Your Basket Quilt Block should measure 12.5″ x 12.5″ unfinished. Trim only if needed, and always trim evenly to maintain your points.
If something is off, don’t be afraid to seam rip and redo. It’s better to fix small errors right away than to be frustrated with a block that doesn’t fit into your final quilt top.
The Basket Quilt Block offers endless possibilities for customization and creativity. You can personalize your blocks through fabric choice, orientation, and embellishments to create a truly unique quilt.
Try experimenting with fabric prints and colors. Floral patterns for the basket fabric bring a springtime feel, while solid colors create a modern, minimalist look. Backgrounds in cream or white give a classic look, while darker backgrounds offer a dramatic effect.
Vary the size of your blocks for different projects. Use smaller 6.5″ Basket Quilt Blocks for baby quilts or table runners, or scale up for bold, statement-making wall hangings.
You can also explore adding appliqué or embroidery to the handle section. This adds a handcrafted feel and gives the block a more detailed and dimensional look.
For a vintage aesthetic, use reproduction fabrics or aged muslin for the background. Pair with calicos or homespun textures to evoke the warmth of traditional American quilts.
Don’t forget to label and date your blocks if you’re creating them for a quilt-along or memory quilt. Documenting your progress makes the finished piece even more meaningful.
The Basket Quilt Block is a joy to make and opens the door to many quilt layouts and ideas. Whether you make one as a feature or several for a full quilt, each block tells a story.
What size is a standard Basket Quilt Block?
The most common size for a Basket Quilt Block is 12.5 inches unfinished (12 inches finished). However, the block can be resized as needed for different quilt designs.
Can beginners sew a Basket Quilt Block?
Yes! While the angles may seem tricky at first, this block is suitable for confident beginners. Just be sure to cut carefully and press as you go.
What fabrics are best for the Basket Quilt Block?
Cotton quilting fabrics are best. Choose contrasting fabrics for the basket and background so the design stands out clearly.
How do I add a handle to the block?
You can create a handle with a bias-cut strip of fabric sewn in a curved shape across the background. This is optional but adds a traditional touch.
Can I use scraps for this block?
Absolutely! The Flower Basket Quilt Block is scrap-friendly and a great way to use small pieces of treasured fabric.
How many Basket Quilt Blocks do I need for a quilt?
That depends on your quilt size. For a throw-sized quilt (60” x 72”), you’d need 30 blocks (5 blocks across, 6 down) using 12″ finished blocks.
The Flower Basket Quilt Block is a timeless design that adds elegance and charm to any quilt project. With its clear lines, creative potential, and easy assembly, it’s a favorite among quilters of all levels. By following the steps outlined in this tutorial, including accurate cutting and careful piecing, you’ll be well on your way to mastering this classic block.
Remember to experiment with fabrics, play with scale, and enjoy the process. Each block you create is a part of your unique quilting journey. If you’ve made a Flower Basket Quilt Block, we’d love to hear from you! Share your tips, favorite fabric combos, or questions in the comments below. Happy quilting!


