
Tulip Pot Holder Pattern
Looking for a Basket Sewing Tutorial that is easy to follow and delivers beautiful results? You’re in the right place. Whether you’re a beginner or an experienced sewer, making a fabric basket is a rewarding project. It’s perfect for organizing craft supplies, toys, or even for use as a gift basket. In this tutorial, you’ll learn how to make a structured, fabric basket from scratch using clear instructions and exact fabric cuts.
This Basket Sewing Tutorial is designed to be practical and beginner-friendly, with all the steps broken down into manageable tasks. From choosing fabrics to assembling the final product, we’ll guide you every step of the way. Follow along and create your own custom basket that is both functional and stylish.
Using just basic sewing tools and a few pieces of fabric, you can craft a beautiful fabric basket that adds charm and order to any room. This guide also includes fabric measurements, interfacing instructions, and assembly tips to ensure a professional finish. Let’s dive into the complete Basket Sewing Tutorial and get started on your next sewing project!
The first step in this Basket Sewing Tutorial is selecting the right fabrics and cutting them to size. Choose 100% cotton fabrics for durability and structure. For a more stable basket, consider using canvas or home décor fabric for the exterior layer.
You’ll need three types of fabric: outer fabric, lining fabric, and interfacing. Fusible fleece is recommended for adding sturdiness to the basket. Pick matching or contrasting fabrics depending on your style preference.
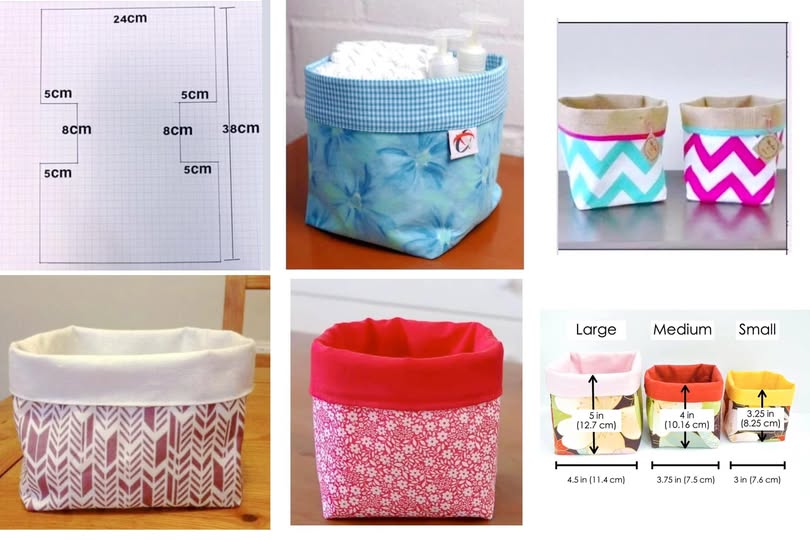
Here are the cutting measurements for one medium-sized fabric basket:
Iron the fusible fleece to the wrong side of each outer fabric piece. Center the fleece so there’s a 0.25” seam allowance around all sides. This keeps the seams less bulky during sewing.
Double-check all your cuts before proceeding. Neat and accurate cuts will result in a more professional-looking fabric basket. This part of the Basket Sewing Tutorial is essential for setting up your project for success.
Now that your fabric pieces are cut and prepped, it’s time to start sewing. Begin with the outer pieces and the handles. This section of the Basket Sewing Tutorial focuses on constructing the base of your fabric basket.
To prepare the handles, fold each strip in half lengthwise, wrong sides together, and press. Open and fold each long edge to the center crease, press again, then fold in half once more and topstitch both long sides. Repeat for the second handle.
Pin the handles to the right side of one outer fabric piece. Position them 2.5 inches from each side edge and let the raw edges align at the top. Baste them in place using a 1/8″ seam allowance. This step secures the handles before final assembly.
Place the second outer fabric piece on top, right sides together. Pin around the sides and bottom, leaving the top edge open. Sew with a 1/4″ seam allowance and backstitch at the start and end.
Box the corners for depth: flatten one corner so the side and bottom seams align, forming a triangle. Measure 2” from the tip and draw a line. Stitch along the line and cut off the excess. Repeat on the other corner.
Turn the outer basket right side out and press the seams. You’ve completed the outer shell! This Basket Sewing Tutorial ensures your basket takes shape beautifully.
Next in this Basket Sewing Tutorial, we’ll work on assembling the lining. This part is nearly identical to sewing the outer basket but with one important difference: you need to leave an opening for turning the basket later.
Place the two lining pieces right sides together and sew along the sides and bottom using a 1/4″ seam allowance. Make sure to leave a 3” gap on the bottom seam for turning the basket right side out.
Just like you did with the outer basket, box the corners of the lining. Align the seams, draw a 2” line from the tip of each triangle, sew along the line, and trim the excess.
Now place the outer basket inside the lining, right sides together. Make sure the handles are tucked inside and that the side seams match up. Pin all around the top edge.
Sew around the entire top edge with a 1/4″ seam allowance. Backstitch at the beginning and end to secure your stitching. This will join the outer basket and lining together seamlessly.
Reach through the gap in the lining and carefully pull the basket right side out. Tuck in the raw edges of the opening and stitch it closed, either by hand with a ladder stitch or with a short topstitch. You’re almost done with the Basket Sewing Tutorial!
The final steps in this Basket Sewing Tutorial involve finishing the top edge and adding your personal flair. Press the top seam neatly and topstitch around the entire opening for a polished look.
Use a coordinating thread color for a subtle finish or a contrasting color for a decorative touch. Topstitching reinforces the top edge and secures the lining in place.
You can customize the size of your basket by adjusting the cutting dimensions. For a larger basket, increase the width and height proportionally. To make mini baskets, reduce all measurements by half and use lighter interfacing.
Add labels, appliqué, or embroidery to personalize your basket. Fabric baskets make excellent gifts for baby showers, holidays, or birthdays. They’re also practical for organizing makeup, office supplies, or craft tools.
Stack a few fabric baskets in different sizes for an eye-catching and functional storage solution. Use coordinating fabrics to create a cohesive look across your room or sewing space.
Congratulations! You’ve completed this Basket Sewing Tutorial with style and success. With just a few materials and some basic sewing skills, you’ve created a handmade item that’s both beautiful and practical.
Q: What kind of fabric is best for a fabric basket?
A: Cotton, canvas, or home décor fabric work best for structure. Heavier fabrics make the basket sturdier.
Q: Can I sew this fabric basket without a sewing machine?
A: It’s possible, but a sewing machine will give cleaner and stronger seams, especially on boxed corners and handles.
Q: How do I make my basket more rigid?
A: Use fusible fleece or add layers of interfacing. For extra stiffness, consider adding a layer of Peltex or cardboard inside the base.
Q: Can I make this basket reversible?
A: Yes! Use the same technique and finish cleanly; just avoid adding labels or decorative elements to one side.
Q: Is it safe to wash the basket in a washing machine?
A: Yes, if you use washable fabrics and interfacing. Air dry to maintain shape.
Q: Can I add pockets to the inside?
A: Absolutely! Sew pockets onto the lining fabric before assembling the basket for added functionality.
This complete Basket Sewing Tutorial has guided you step-by-step through making a custom fabric basket, from selecting fabrics and cutting measurements to sewing and final touches. With clear instructions and helpful tips, even beginners can succeed in creating a useful and decorative item for their home or to gift.
Fabric baskets are incredibly versatile, and once you make one, you’ll want to sew more in different sizes and colors. This pattern can easily be adapted for seasonal décor, baby gifts, or organizing small items.
Following this Basket Sewing Tutorial, you’ve learned how to box corners, create sturdy handles, and add professional-looking topstitching. The process is simple, satisfying, and ideal for using up fabric scraps creatively.
We hope you enjoyed this project! If you tried this Basket Sewing Tutorial, leave a comment below and let us know how it turned out. We’d love to hear your ideas and see your creations.
Ready to tackle more sewing tutorials? Stay tuned for more step-by-step guides and creative inspiration to level up your sewing skills!


