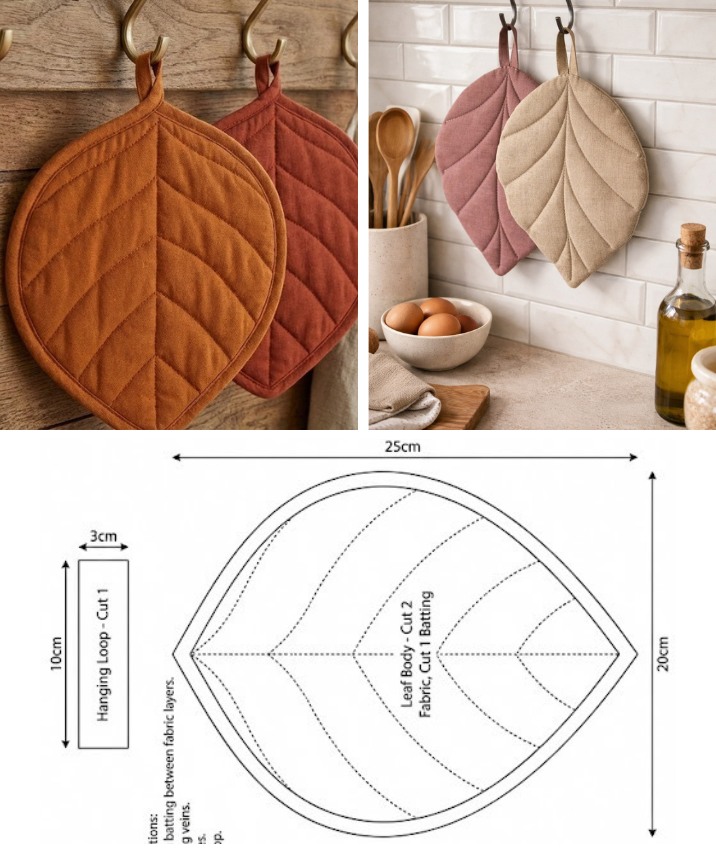
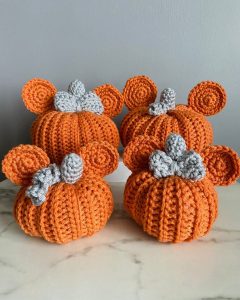
Padding leaf-shaped pot holder Pattern
The Bear Paw quilt block is a beloved and classic design that has been cherished by generations of quilters.
Known for its striking geometric layout and historic roots, the Bear Paw block is both visually compelling and surprisingly easy to assemble.
In this article, we will explore the origins, techniques, and a detailed step-by-step guide on how to create a Bear Paw quilt block, making sure to highlight essential elements of quilt patterns that will help you bring your project to life.

The Bear Paw quilt block carries deep historical significance. This pattern dates back to the early 1800s and is often associated with pioneer traditions. It is believed that settlers used the Bear Paw design to guide others through treacherous terrain, symbolizing strength and direction.
Many quilters are drawn to the block not just for its visual appeal but also for the story it tells. Its shape resembles the paw of a bear, often interpreted as a sign of protection and guidance, especially during uncertain times.
Over the years, this block has become a staple in traditional and modern quilt making. It has retained its relevance by adapting to new fabric trends while preserving its iconic structure. This enduring popularity underscores its versatility in both simple and intricate quilt patterns.
The Bear Paw design is a popular choice in teaching new quilters, due to its relatively straightforward construction. Despite its intricate appearance, the block comprises simple units—squares, half-square triangles, and rectangles.
Moreover, its flexible layout allows for endless variations. You can experiment with color combinations, rotate the blocks, or even alter the sizes for a unique twist on a traditional favorite. Whether you are making a baby quilt, wall hanging, or full-size quilt, the Bear Paw block fits perfectly.
Before diving into construction, gather all the necessary tools and fabrics for your quilt project. For a single Bear Paw quilt block that finishes at 14″ x 14″, you will need the following materials and fabric cuts:
Cut the following pieces for one block:
Accuracy in cutting is crucial for achieving clean seams and precise alignment. Always press your fabric before cutting to ensure straight edges. Stack fabrics with similar cuts to speed up the process and ensure consistency.
Using pre-cut fabric bundles like fat quarters is highly recommended for beginners. They simplify color coordination and reduce waste. Additionally, high-quality cotton fabric ensures durability and ease during sewing.
Once your fabric pieces are ready, organize them by color and shape. This makes the assembly process much more efficient and minimizes the chances of errors. Labeling each piece can also help you stay organized throughout your project.
Now, let’s walk through how to make a Bear Paw quilt block step-by-step. Each section of the paw is constructed individually before assembling the full block.
Step 1: Make the Half-Square Triangles (HSTs) Pair four background squares with four paw fabric squares. Draw a diagonal line on the back of each background square. Sew a 1/4″ seam on both sides of the line. Cut along the line and press open to create eight HSTs, each 2.5″ x 2.5″.
Step 2: Assemble the Paw Units Each paw unit is a 2×2 grid composed of two HSTs, one paw fabric square, and one background square. Arrange and sew them to form a square. Repeat this four times to make the four paws of the block.
Step 3: Add the Rectangles Attach a 2.5″ x 6.5″ background rectangle to each paw unit. Ensure the rectangle is sewn on the correct side to form an L-shape that reflects a bear’s paw layout.
Step 4: Create the Center Use the 6.5″ x 6.5″ paw fabric square as the center of the block. This large square anchors the design and gives the block its focal point.
Step 5: Assemble the Block Lay out your block in a 2×2 grid: one paw unit in each corner with the large center square in the middle. Make sure all paws are oriented outward. Sew the top two units together, then the bottom two, and finally sew the rows together.
Step 6: Press and Square Up Press all seams flat. Use a quilting ruler to square up your block to 14″ x 14″ if necessary. Now your Bear Paw quilt block is ready to be part of a larger quilt or to stand alone as a mini quilt pattern.
One of the joys of quilting is customization. The Bear Paw quilt block offers many opportunities for personalization. You can adjust fabric colors to suit seasonal themes or special occasions. For instance, rich browns and oranges work beautifully for autumn-inspired quilts.
Modern quilters often experiment with negative space, asymmetrical designs, and bold color blocking. The Bear Paw block adapts well to these styles while still retaining its classic charm. Use solids or batiks to give your project a contemporary flair.
You can also experiment with scale. Miniature Bear Paw blocks make excellent mug rugs or coasters, while oversized versions can serve as striking focal points in bed quilts or wall hangings.
Combine multiple Bear Paw blocks for a cohesive quilt top. You could alternate them with other traditional blocks or sash them with solid fabrics for a modern touch. Try rotating the blocks or arranging them in diagonal rows for added interest.
Appliqué techniques can further enhance the Bear Paw block. Consider adding embroidered bear tracks or initials to personalize your project. These small details make your quilt patterns truly unique.
Finally, don’t hesitate to use digital tools. Quilt design software allows you to preview color schemes and block arrangements before you even cut your fabric. This ensures your final quilt looks exactly as you imagined.
To achieve a perfect Bear Paw quilt block, precision is key. Always use a 1/4″ seam allowance and double-check your measurements. This consistency ensures your blocks align correctly and your overall quilt lays flat.
Ironing is just as important as stitching. Press seams in the direction that reduces bulk and enhances the design. Use a steam iron and consider pressing seams open when multiple layers converge.
Choose a high-quality thread in a neutral color for piecing. This helps the stitches blend in and reduces the risk of thread breakage over time. Avoid using thread that’s too thick, as it can cause bulk at the seams.
Always test your layout before sewing final seams. Laying out your entire block allows you to catch mistakes in fabric placement and ensure your design matches your vision.
When incorporating the Bear Paw block into a larger quilt pattern, consider using borders, sashing, or cornerstones to give the quilt a finished look. A simple border can frame your block beautifully.
In conclusion, the Bear Paw quilt block is a perfect project for quilters of all skill levels. Its rich history, striking design, and endless adaptability make it a treasured element in the world of quilt patterns. Whether you’re a beginner or an experienced quilter, adding the Bear Paw to your portfolio is sure to bring satisfaction and style to your craft.


