
Bird Quilt Block Pattern
The Bird Quilt Block is a charming and timeless design that brings life, nature, and creativity into your quilting projects. In this article, you’ll discover how to create your own Bird Quilt Block step by step, with all the fabric cuts and measurements you need to get started. Whether you’re a beginner or an experienced quilter, this guide is here to inspire you and help you craft something truly special.
The Bird Quilt Block is more than just a pattern – it’s a piece of art that tells a story through color, shape, and texture. Using simple geometric shapes, you can create a beautiful silhouette of a bird that looks stunning on pillows, wall hangings, and full-sized quilts. The combination of traditional quilting techniques and the unique visual appeal of the Bird Quilt Block makes it an essential addition to your quilting repertoire.
In this detailed tutorial, we’ll explore everything you need to know about the Bird Quilt Block, from choosing your fabrics to assembling the pieces. You’ll also learn how to adjust the pattern to fit your personal style and how to make the most of your quilting skills to create a block that truly stands out.
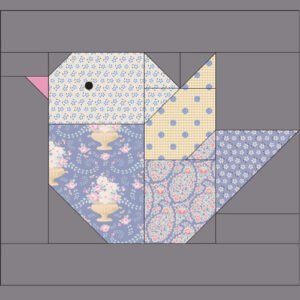
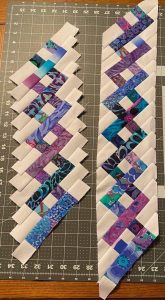
Creating a Bird Quilt Block starts with understanding the design’s foundation and how the shapes work together. This block typically features a bird silhouette made from triangles and rectangles, with each piece carefully measured and cut.
The magic of the Bird Quilt Block lies in the way it combines simplicity with striking visual impact. By arranging geometric pieces thoughtfully, you can create the impression of a bird perched or in flight. Choosing contrasting fabrics for the bird and background helps the shape stand out beautifully.
To begin, decide on the size of your finished Bird Quilt Block. For this tutorial, we’ll create a block that measures 12 inches by 12 inches when finished. This size works well for combining multiple blocks into a larger quilt or using a single block as a centerpiece.
The block’s structure relies on half-square triangles (HSTs), rectangles, and small squares. These shapes come together to form the bird’s body, wing, beak, and background. The careful arrangement ensures the final block has a balanced and recognizable bird silhouette.
Selecting fabrics is a creative part of the process. Consider a bold print or solid color for the bird itself and a softer or contrasting fabric for the background. This contrast helps highlight the design, making your Bird Quilt Block visually appealing.
Finally, planning your cuts in advance is crucial. Lay out your pieces before sewing to ensure you’re happy with the placement and color balance. Once satisfied, you’ll be ready to cut and sew your block.
Follow this step-by-step guide to create your own Bird Quilt Block, complete with precise fabric cuts and measurements. Let’s get started.
Materials Needed:
Fabric Cuts and Measurements (for a 12″ finished block):
Step 1: Create Half-Square Triangles (HSTs)
Step 2: Assemble the Bird’s Body
Step 3: Add the Beak
Step 4: Build the Top Section
Step 5: Final Assembly
Step 6: Trim and Finish
When making a Bird Quilt Block, fabric selection can transform your design from ordinary to extraordinary. Here are some tips to help you choose.
Start by picking a fabric for the bird itself. Solid colors create a bold silhouette, while subtle prints add texture and interest. A darker color often works well to contrast against a lighter background.
For the background fabric, choose something that complements your bird fabric without overpowering it. Soft neutrals, pastels, or low-volume prints are excellent choices to highlight the bird shape.
If you want your Bird Quilt Block to feel whimsical or modern, experiment with unexpected color combinations. Bright colors can bring playful energy, while earth tones create a classic, nature-inspired look.
Consider the overall color palette of your quilt. If your Bird Quilt Block is part of a larger quilt, make sure the fabrics coordinate with other blocks to create harmony.
Textures can also add depth. A mix of cotton solids, linen, or even lightweight denim can make your Bird Quilt Block more dynamic.
Finally, don’t hesitate to test your layout before sewing. Place your cut pieces on a design wall or table to see how they work together. This step helps you adjust color placement and ensures your finished block matches your vision.
The versatility of the Bird Quilt Block makes it a favorite among quilters. Here are a few creative ideas for using your finished block.
Turn your Bird Quilt Block into a decorative pillow. Add borders to increase the block size, quilt it with batting and backing, then sew it into a pillow cover.
Combine multiple Bird Quilt Block designs into a full quilt top. Vary the bird colors to create a flock effect, giving your quilt movement and visual interest.
Frame a single block to create wall art. This is a beautiful way to highlight your craftsmanship and bring handmade charm into your home.
Use your Bird Quilt Block as the center of a table runner or placemat. Add coordinating blocks or sashing around it to complete the look.
Incorporate the block into a tote bag or pouch. Quilted accessories make thoughtful gifts and showcase your quilting skills.
Finally, experiment by resizing the pattern. Make smaller blocks for miniature quilts or larger blocks for dramatic, oversized wall hangings.
The Bird Quilt Block is a delightful project that combines creativity, skill, and storytelling. By following this guide, you can craft a beautiful quilt block that captures the elegance and charm of birds in flight.
With clear fabric cuts, thoughtful design, and the right color choices, your Bird Quilt Block can become the highlight of your next quilting project. Whether you use it in a pillow, quilt, or wall hanging, it’s sure to bring joy to your creative journey.
Have you tried making a Bird Quilt Block? Share your experiences, photos, and tips – we’d love to see your creations and hear your ideas!


