
Bird Quilt Block Pattern
If you’re a fan of delicate, nature-inspired quilt blocks, the Butterfly Charm block Paper Piecing design is a must-try. This beautiful block combines the elegance of butterfly wings with the precision of paper piecing, making it perfect for quilters who love symmetry, accuracy, and charm in their projects. Whether you’re just starting out or are a seasoned quilter, mastering this block will add a touch of whimsical sophistication to your quilts.
The Butterfly Charm block Paper Piecing pattern uses foundation paper piecing (FPP) techniques to achieve clean lines and intricate shapes that would be difficult to piece using traditional methods. This technique allows for detailed visual effects, making each butterfly block uniquely captivating. Best of all, you can play with colors, fabrics, and textures to create vibrant, fluttering designs that pop off your quilt top.
In this tutorial, we will walk you through how to create your own Butterfly Charm block Paper Piecing masterpiece. From fabric cuts and measurements to step-by-step instructions, you’ll learn everything you need to confidently create this eye-catching quilt block. Let’s dive into the details and bring some butterflies to life on your fabric canvas.
The magic of the Butterfly Charm block Paper Piecing starts with fabric selection. For a vibrant look, choose fabrics with bold colors or delicate prints that mimic the textures of butterfly wings. Batiks, tone-on-tone, or solid cotton fabrics are excellent choices because they hold their shape well and enhance visual clarity in the block.
You will need a total of four fabric colors: two for the butterfly wings (contrast helps), one for the butterfly body, and one background fabric. Keep in mind that fabric with too much pattern can obscure the delicate lines of the butterfly shape created by paper piecing.
Make sure your fabrics are pre-washed and pressed, which helps maintain accuracy when sewing. Pressed fabric also lays flatter on the paper templates, reducing distortion in the final block. It’s recommended to starch lightly for better handling during stitching.
Here are the suggested fabric cuts and measurements for one 6.5″ x 6.5″ unfinished block:
Also gather your paper piecing template, printed on foundation paper or freezer paper, along with basic sewing tools: a rotary cutter, small ruler, sewing machine, thread (preferably 50wt cotton), and an iron for pressing between steps.
Before starting, trim your fabrics to slightly larger than needed for each section on the template. This ensures full coverage as you sew. Keep your layout organized by labeling each fabric type and stacking them neatly.
Now let’s dive into creating your Butterfly Charm block Paper Piecing pattern using foundation paper piecing. This method ensures precision and crisp angles, making the butterfly wings and body align perfectly.
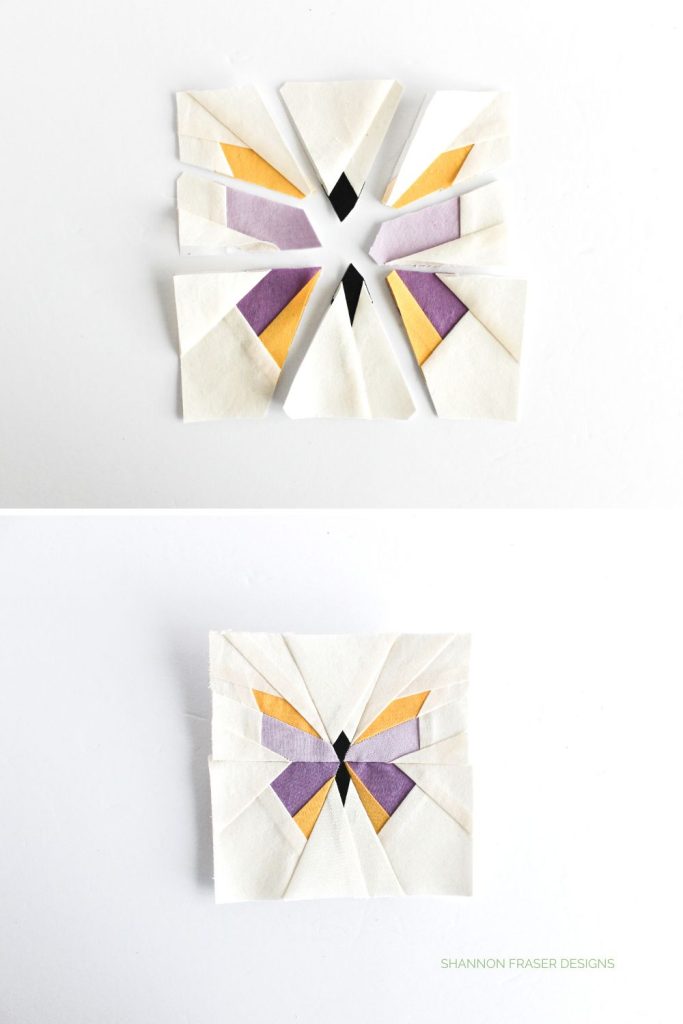
Step 1: Begin with Section A of your paper piecing template. Place the first fabric piece (wrong side to the paper) over the area marked A1, ensuring the fabric fully covers the area plus ¼” seam allowance on all sides. This is your anchor fabric.
Step 2: Place your second fabric piece (for A2) right sides together on top of A1. Line up the edges where they will be joined, then sew directly on the printed line between A1 and A2. Shorten your stitch length to 1.3–1.5 for easier paper removal later.
Step 3: Fold back the paper along the stitch line and trim the seam to ¼”. Press open the new piece. Continue in this manner, adding fabric to the sections in numerical order. Always trim, press, and check coverage before sewing the next piece.
Step 4: Once all sections are completed, trim each unit along the outer seam line of the template, leaving a ¼” seam allowance. Carefully remove the paper backing from the stitched pieces.
Step 5: Assemble the wing sections by joining top and bottom wing units. Make sure the seams align at the butterfly’s center. Then sew the wing units to the body section, creating the full Butterfly Charm block Paper Piecing unit.
Step 6: Press all seams flat and square up the block to 6.5″ x 6.5″. Your Butterfly Charm block Paper Piecing is now complete and ready to be incorporated into a larger quilt, pillow, or wall hanging project.
One key to mastering the Butterfly Charm block Paper Piecing is to always use a light box or hold your paper up to the light to ensure fabric placement before sewing. This helps prevent misaligned sections and saves time in the long run.
Try using a coloring sheet version of your template before you begin sewing. You can experiment with color placement and ensure the wings have a symmetrical or gradient effect depending on your vision.
If you’re making multiple blocks, consider using a chain piecing method with templates printed in batches. Prepare several blocks ahead of time by precutting and organizing fabric kits for each butterfly.
For a modern twist, experiment with ombre fabrics that shift color across the wings, giving the illusion of motion. Metallic thread can also add a shimmering effect to the wing seams and create extra interest.
This block is perfect for mini quilts, spring-themed table runners, or even as a feature in a baby quilt. The symmetry and charm of each butterfly make it a showstopper.
Lastly, don’t forget to save your trimmed scraps — small angled pieces are great for improv piecing or mini projects. Waste not, want not!
Once you’ve made a few Butterfly Charm block Paper Piecing units, you’ll want to think about layout options. These blocks can be used alone or repeated in a larger quilt layout to make a bold visual statement.
A simple sashing between blocks helps define each butterfly. Use 2″ strips (unfinished) between the blocks in a contrasting color to frame each butterfly and let it “fly” on its own.
Arrange your blocks in rows or try a radiating layout with butterflies pointing outward in a circle. This technique works beautifully as a quilt center medallion or wall hanging centerpiece.
You can alternate Butterfly Charm blocks with solid or simple patchwork blocks to add visual space and balance. This also allows your butterflies to stand out more individually.
Consider borders with floral or sky-inspired prints to enhance the nature theme. A piano key border using leftover wing fabrics creates continuity and uses scraps efficiently.
If you’re making a baby or lap quilt, four rows of four blocks (16 total) with sashing and borders results in a quilt around 40″ x 40″ — perfect for gifting or home décor.
Finish your quilt with simple quilting lines that trace the wings or emphasize flight. Echo quilting or gentle curves in the background fabric can give the illusion of butterflies floating on air.
What size is the finished block?
The Butterfly Charm block Paper Piecing finishes at 6″ x 6″ when sewn into a quilt, or 6.5″ x 6.5″ unfinished (before seam allowances are trimmed).
Do I need special paper for paper piecing?
Yes, use lightweight foundation paper, vellum, or freezer paper that is easy to sew through and remove afterward. Avoid thick printer paper.
Can I use scraps for this pattern?
Absolutely! This block is scrap-friendly, especially for the wings. Just ensure each piece covers its template section with ¼” extra.
Is this suitable for beginners?
With patience and accurate cutting, yes! The Butterfly Charm block Paper Piecing pattern is great for beginners learning foundation paper piecing.
How many blocks do I need for a baby quilt?
A layout of 16 blocks (4 x 4) makes a lovely baby quilt when paired with sashing and borders. Adjust based on your desired size.
Where can I get the template?
There are many free and paid FPP butterfly templates available online. Search specifically for “Butterfly Charm block Paper Piecing template” or design your own.
The Butterfly Charm block Paper Piecing pattern is a delightful way to add elegance, charm, and vibrant color to your quilting projects. With its detailed wings and precise construction, this block showcases the beauty of nature in a handcrafted form. By mastering this pattern, you’ll not only expand your quilting skills but also create timeless pieces filled with personality and charm.
Give this block a try and bring your quilt to life with fluttering beauty. What colors will your butterflies be? Let us know in the comments below or share your project photos — we’d love to see your creations take flight!


