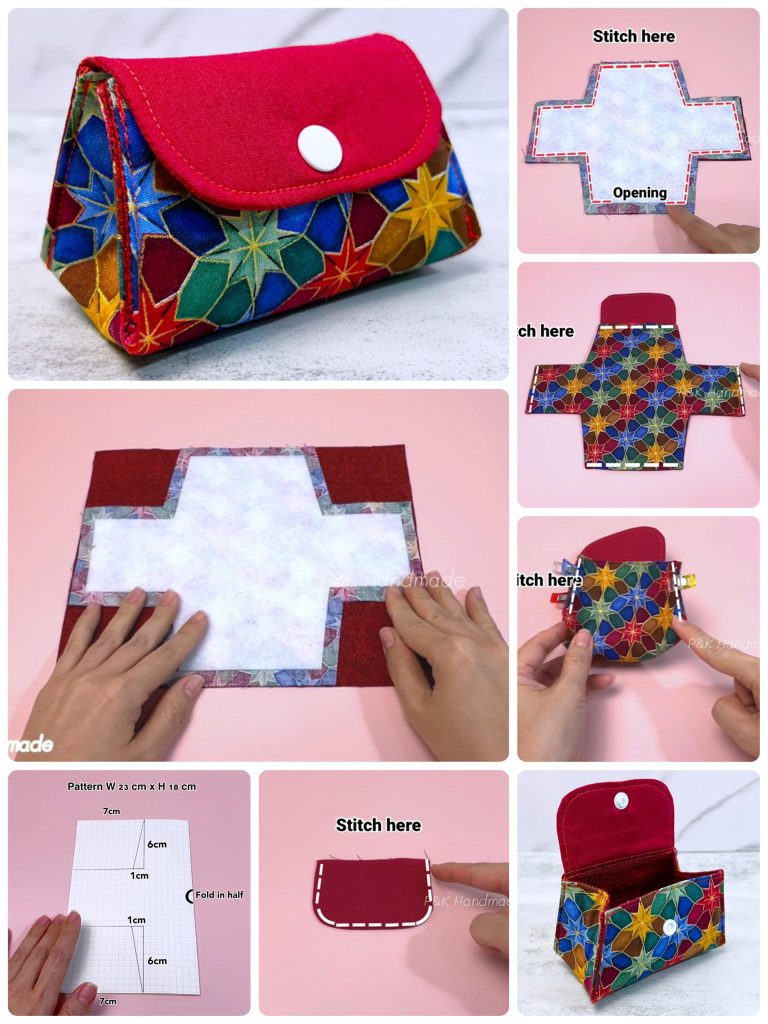
How to Make a Fabric Coin Purse Pattern
Butterfly patchwork is a timeless and delightful quilting technique that brings charm, color, and movement to any fabric project. Whether you’re crafting a baby quilt, wall hanging, or decorative pillow, these beautiful butterfly designs transform simple scraps into intricate, fluttering creations. In this guide, we’ll explore the magic of making a butterfly patchwork, from fabric selection to cutting measurements, and share a step-by-step pattern so you can start sewing your own butterfly masterpieces.
The beauty of butterfly patchwork lies in its versatility. You can mix bold prints, soft pastels, or even batik fabrics to create unique butterflies every time. With the right pattern, even beginners can achieve professional-looking results, making it a perfect project for all skill levels. Using scraps is not only economical but also an eco-friendly way to give new life to leftover fabrics.
In this article, we’ll cover everything you need to know: choosing fabrics, cutting instructions with exact measurements, detailed sewing steps, and tips to assemble the butterflies into a quilt block. Let’s get started on your butterfly patchwork journey and bring these elegant shapes to life on fabric.

Selecting fabrics for your butterfly patchwork is the first creative step, and it’s where your project truly comes to life. Choose fabrics that contrast well so the butterfly wings stand out beautifully against the background. Consider mixing floral prints, geometric shapes, or solid colors to highlight each butterfly’s delicate design.
Always use 100% cotton quilting fabric for durability and ease of sewing. Cotton holds its shape and creates crisp seams, essential for patchwork patterns with multiple pieces. You might also explore batiks or hand-dyed fabrics for extra texture and visual interest.
When planning your butterfly patchwork, it’s wise to select a light-colored fabric for the background to make the wings pop. Soft cream, pale gray, or even sky blue backgrounds can evoke an outdoor, airy feeling perfect for butterflies. For the butterfly’s body, choose darker tones to anchor the design visually.
Think about coordinating fabrics for the butterfly’s upper and lower wings. Using complementary colors helps the butterfly appear balanced and natural. Alternatively, go bold with contrasting fabrics for a modern, artistic look.
If you’re using scraps, sort them by color family. Even the smallest leftover pieces can become part of your butterfly patchwork, turning what might be waste into something beautiful. Try laying out your fabrics before cutting to see how they work together.
Finally, wash and press your fabrics before cutting. Pre-washing helps avoid shrinkage later, and pressing makes accurate cuts easier, which is essential for a clean and professional-looking butterfly patchwork.
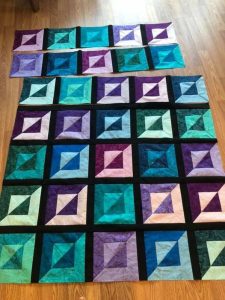
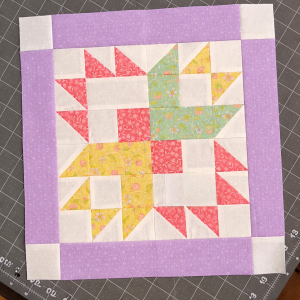
Precise cutting is crucial in butterfly patchwork, as even small inaccuracies can affect the final design. Here’s a step-by-step guide to cut your fabrics with the right measurements to create one butterfly quilt block measuring approximately 8″ x 8″.
Start by preparing the background fabric. Cut two rectangles measuring 3″ x 4″. These will frame the butterfly wings and complete the block.
For the butterfly’s upper wings, cut two pieces of patterned fabric measuring 2.5″ x 4″. These are the large wings that catch the eye, so choose your favorite prints for these parts.
The lower wings require two rectangles of patterned fabric, each measuring 2″ x 2.5″. These smaller pieces add detail and balance to your butterfly patchwork design.
Next, cut the butterfly’s body from a darker or contrasting fabric. You’ll need a narrow strip measuring 1″ x 4″. This central piece ties the design together.
Finally, prepare small corner squares (four in total) from background fabric, each measuring 1.5″ x 1.5″. These squares help shape the wings by creating angled edges.
Remember to label your pieces with sticky notes or fabric markers to keep them organized. Lay out all the pieces on your table or design board before sewing to visualize the final butterfly patchwork.
Use a rotary cutter and a quilting ruler for clean, straight edges. Accurate cutting makes the piecing process smoother and the final butterfly block more precise.
Keep your fabric grain in mind: cut parallel to the selvage whenever possible to maintain fabric stability. This step helps the butterfly wings lay flat without distortion when pieced together.
Now it’s time to bring your butterfly patchwork to life. Follow these detailed steps to assemble your butterfly quilt block:
Begin with the upper wings. Take the two 2.5″ x 4″ rectangles and sew a 1.5″ x 1.5″ background square to one corner of each rectangle, right sides together. Stitch diagonally across the square, then trim away the excess fabric, leaving a 1/4″ seam allowance. Press open to create the angled edge.
Repeat the same process for the lower wings using the 2″ x 2.5″ rectangles and the remaining background squares. This step creates the butterfly’s distinctive curved wing shape.
Next, sew the upper wings to the sides of the butterfly’s body strip. Align the pieces carefully and stitch with a 1/4″ seam allowance. Press the seams outward for a smooth finish.
Attach the lower wings below the body strip in the same way, keeping the seams even. At this point, your butterfly patchwork should look like a complete butterfly.
Sew the two 3″ x 4″ background rectangles to the left and right of the butterfly to complete the quilt block. Press the seams flat.
Finally, square up your block to ensure it measures about 8″ x 8″. Trim any excess fabric carefully for a clean, professional look. Your butterfly patchwork quilt block is ready to join other blocks or be used as a stand-alone decoration.
Take your time during these steps; accurate sewing ensures your butterfly shape appears balanced and symmetrical. Use pins or fabric clips to keep pieces aligned, especially along angled seams.
Once you’ve made one butterfly patchwork block, you can easily create more and combine them into larger quilting projects. Here are some creative ideas and tips:
Sew multiple butterfly blocks together to make a beautiful lap quilt or baby blanket. Arrange the butterflies in different directions for added movement and interest.
Add sashing (strips of fabric between blocks) to frame each butterfly. Use light or dark sashing, depending on the look you want. This technique also makes the blocks appear larger.
Combine butterfly blocks with floral or geometric patchwork blocks for a varied, garden-inspired quilt. Mixing patterns creates visual depth and keeps the project fun.
Use a single butterfly block as the centerpiece for a pillow cover. Add borders around the block to reach the desired pillow size.
Create a wall hanging with three to five butterfly blocks stacked vertically. This makes a lovely decoration for a hallway, bedroom, or nursery.
Finish your project with careful quilting. You can outline the butterfly shapes with free-motion quilting or add delicate swirls and loops around them to suggest flight.
When binding your quilt or wall hanging, choose a color that complements your butterflies. A contrasting binding can add a modern frame, while a matching color keeps the focus on the butterflies.
Your finished butterfly patchwork project will showcase your creativity and skill, making it a special handmade piece to keep or gift.
Creating a butterfly patchwork is more than sewing; it’s an artful expression of color, texture, and imagination. With just a few fabric pieces and simple cuts, you can craft quilt blocks full of charm and life.
By choosing fabrics thoughtfully, cutting accurately, and sewing with care, even beginners can create stunning butterfly quilt blocks. These blocks can become part of larger quilts, pillows, or wall hangings—each piece unique and full of personality.
Whether you’re quilting for relaxation, decoration, or gifting, butterfly patchwork brings joy and creativity to your sewing space. Now that you know the steps and measurements, it’s your turn to start cutting, sewing, and creating your own fluttering designs.
Enjoy the process, experiment with colors, and most importantly, have fun bringing your butterfly visions to life through patchwork. Happy quilting!
