
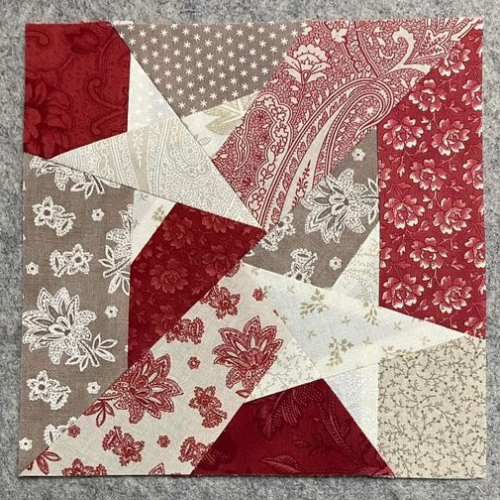
Bird Quilt Block Pattern
The Candy Striped Holly Star – Quilt Pattern is a festive and charming design that brings a touch of holiday magic to your quilting projects. With its combination of bright candy-like stripes and elegant star motifs, it’s the perfect choice for both beginners and experienced quilters who want to create something unique. This pattern captures the warmth and coziness of the holiday season while allowing you to explore creative fabric choices and precise piecing techniques.
Working with the Candy Striped Holly Star – Quilt Pattern means more than just sewing fabric together. It’s about crafting a meaningful piece that can be displayed year after year, passed down through generations, or gifted to someone special. The interplay of colors, the balance of geometric shapes, and the joyful theme make it a timeless addition to any quilt collection. By following the right steps, you can create a quilt that’s both stunning to look at and durable enough to last for decades.
One of the best things about this pattern is how adaptable it is. Whether you want a bold, modern look with bright candy cane stripes or a softer, vintage feel with muted holiday tones, the Candy Striped Holly Star – Quilt Pattern can be customized to your taste. The star design adds elegance, while the striped background brings movement and texture to the finished quilt. With patience, planning, and the right techniques, you can transform simple fabrics into a holiday masterpiece.
When starting your Candy Striped Holly Star – Quilt Pattern, selecting the right fabrics is crucial for achieving the desired effect. Opt for fabrics that reflect the festive theme—reds, greens, whites, and even metallic gold or silver tones can create a warm and celebratory look. Striped prints mimic the classic candy cane feel, while solid fabrics help balance the design.
Consider mixing textures to add dimension. Cotton is the most common quilting fabric because it’s easy to work with and durable, but you can also include linen or flannel for a cozier touch. Pay attention to the scale of your prints—small patterns work well for the detailed star shapes, while larger stripes can be used for the background to make them stand out.
Fabric quality plays a significant role in the longevity of your quilt. Pre-washing your fabrics prevents shrinking after your quilt is complete and ensures colors won’t bleed. This is especially important when working with reds and greens, as holiday tones tend to be more vibrant and can sometimes transfer color during washing.
Color placement is key for this pattern. Arrange your fabrics before cutting to ensure you’re happy with how the stripes and star points align. A design wall or even a large table can help you visualize the final layout. Don’t rush this step—proper planning saves time later during assembly.
If you want a more modern take on the Candy Striped Holly Star – Quilt Pattern, you can experiment with non-traditional colors. Think turquoise, pink, and silver for a whimsical holiday quilt, or deep burgundy and cream for a sophisticated winter theme. Your choice of fabrics is where your personality shines through.
Finally, remember to purchase a little extra fabric. This gives you room for mistakes and ensures you have enough material for matching stripes or adjusting the design if needed. Being prepared avoids last-minute shopping trips that could interrupt your creative flow.
The Candy Striped Holly Star – Quilt Pattern involves precise cutting to achieve crisp lines and perfect points in your star design. Start by carefully measuring and cutting your fabric strips for the candy stripe effect. Using a rotary cutter, quilting ruler, and self-healing mat will make this process faster and more accurate.
For the star shapes, use templates or carefully marked cutting guides to ensure consistency. Even a small variation can make it harder to piece the blocks together evenly. If your pattern provides exact measurements, follow them closely—accuracy here will save you frustration during sewing.
Labeling your pieces as you cut them can help keep you organized. Group similar shapes and colors together, and keep them in a flat, clean area until you’re ready to sew. This prevents mix-ups and keeps your fabric from fraying unnecessarily.
Before sewing, it’s important to check your fabric alignment, especially for the candy stripes. Misaligned stripes can disrupt the overall look of the quilt, so take time to ensure that each piece is cut with the stripes running in the correct direction.
If you’re new to quilting, you might find it helpful to cut and assemble one block first before cutting all your fabric. This allows you to adjust measurements if needed and gives you a preview of the finished look.
For a more polished finish, consider starching your fabric before cutting. This makes the pieces easier to handle, especially with intricate shapes, and helps maintain their shape during the sewing process.
Once your pieces are cut, it’s time to start assembling your Candy Striped Holly Star – Quilt Pattern blocks. Begin by sewing the star points together, ensuring that the tips align perfectly. Pinning your pieces before sewing can help keep them in place and prevent shifting.
Press your seams carefully after each step. Pressing, rather than ironing, helps set the stitches without stretching the fabric. Press seams toward the darker fabric to prevent shadowing, where darker colors show through lighter fabrics.
Next, assemble the candy stripe background pieces. Make sure the stripes match at the seams for a clean, professional look. This step might require some adjusting, so don’t be afraid to take your time.
Join the star blocks to the background sections, checking alignment as you go. Using a quarter-inch seam allowance throughout the project will ensure that your pieces fit together properly.
If you notice any slight misalignments, don’t panic. Small adjustments can often be made during pressing or when adding the border. Perfection is wonderful, but small imperfections are part of what makes a handmade quilt special.
As you complete each block, lay it out with the others to check for overall balance in colors and stripe directions. This helps you catch inconsistencies before the quilt is fully assembled.
After assembling the quilt top, layer it with batting and backing fabric to prepare for quilting. For the Candy Striped Holly Star – Quilt Pattern, simple quilting lines can highlight the star shapes and stripes without overwhelming the design.
Basting the layers together is an essential step. You can use safety pins, spray adhesive, or hand basting stitches to keep everything in place. Smooth out any wrinkles before beginning to quilt.
When choosing a quilting design, consider following the lines of the stars for emphasis or creating diagonal lines that echo the candy stripe effect. A walking foot attachment can help you quilt evenly without puckering.
Once quilting is complete, trim the edges evenly and prepare your binding. Binding fabric can either match the border for a seamless look or provide contrast for a bold finish. Carefully sew the binding to the front of the quilt, then fold it over to the back and stitch it down by hand or machine.
Don’t forget to add a label to your quilt with the date, your name, and any special message. Labels add a personal touch and preserve the story behind the quilt for future generations.
Finally, give your finished quilt a gentle wash to remove any markings or starch and to soften the fabric. Once dry, it’s ready to be displayed, gifted, or enjoyed on a cozy winter evening.
Q: Is the Candy Striped Holly Star – Quilt Pattern suitable for beginners?
A: Yes, with careful cutting and patience, beginners can successfully complete this pattern, especially if they follow detailed instructions.
Q: Can I make this quilt in non-holiday colors?
A: Absolutely! While the pattern is festive, it works beautifully in any color palette you prefer.
Q: How long does it take to finish this quilt?
A: The time varies depending on your sewing speed, but most quilters can complete it in a few weeks working part-time.
Q: Do I need special tools for this pattern?
A: Basic quilting tools—rotary cutter, ruler, cutting mat, sewing machine, and iron—are all you need.
Q: How do I make sure my stripes align perfectly?
A: Careful cutting, pinning, and checking alignment before sewing will help keep stripes consistent.
Q: What is the best batting for this quilt?
A: A medium-weight cotton batting works well for warmth without adding too much bulk.
The Candy Striped Holly Star – Quilt Pattern is a delightful project that blends traditional holiday charm with endless customization possibilities. From choosing fabrics and cutting precise pieces to assembling blocks and adding the finishing touches, every step is an opportunity to create something beautiful and lasting. Whether you stick to classic Christmas colors or experiment with unique palettes, the result will be a quilt filled with warmth and personality. I’d love to hear your thoughts—share your honest opinion and suggestions so we can keep inspiring each other in the quilting world.


