
Bird Quilt Block Pattern
The Carpenter Star Quilt is a stunning and timeless quilt pattern that combines simplicity and elegance. This classic design creates a bold, interwoven star effect that looks intricate but is surprisingly achievable, even for beginners. With the right fabric selection and precise cutting, you can craft a masterpiece that adds warmth and beauty to any space.
Creating a Carpenter Star Quilt involves careful planning, accurate cutting, and strategic piecing. Whether you are an experienced quilter or just starting, this guide will walk you through each step, from choosing fabrics to assembling your quilt. By following this detailed step-by-step tutorial, you will learn how to cut and sew the perfect quilt blocks for a stunning finish.
In this tutorial, we will cover everything you need to know, including fabric measurements, cutting instructions, and assembly techniques. By the end, you’ll have a beautiful Carpenter Star Quilt that showcases your quilting skills. Let’s dive into the process!
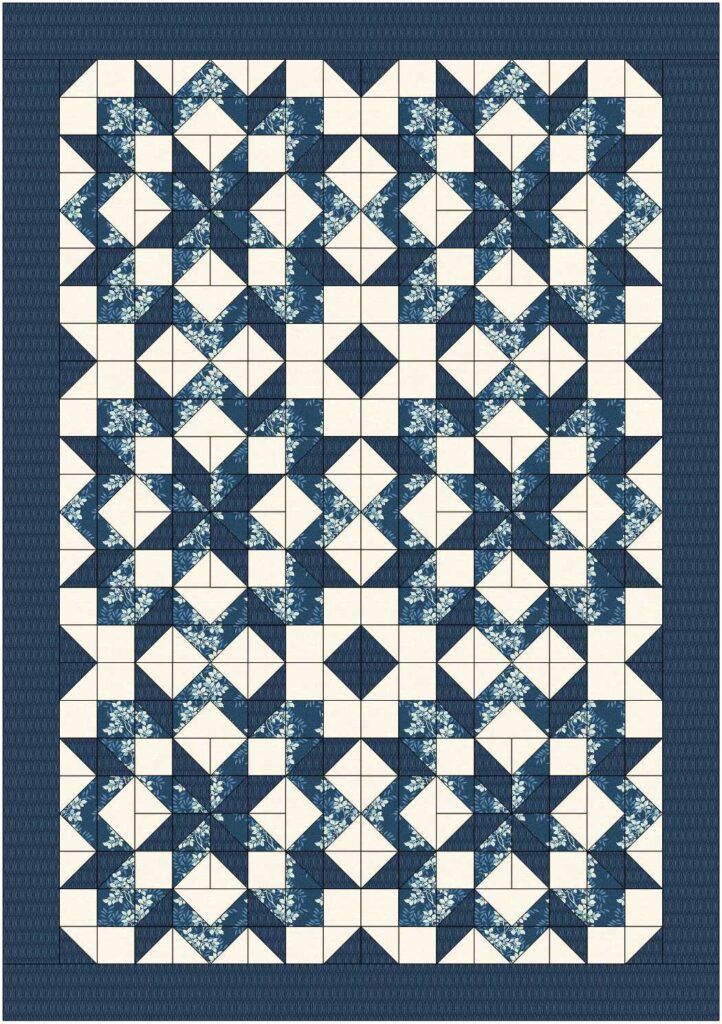
Selecting the right fabric is the first step in creating a stunning Carpenter Star Quilt. The contrast between light and dark fabrics enhances the star effect, making the pattern more visually appealing. You can choose solid colors for a modern look or printed fabrics for a more traditional feel.
To make a Carpenter Star Quilt, you’ll need a mix of light, medium, and dark fabrics. Here’s what you need to cut:
Once you have all your pieces cut, the next step is to organize them based on color and pattern. Keeping everything neatly arranged will make piecing the quilt much easier. Using a rotary cutter and ruler ensures accuracy, which is crucial for seamless assembly.
The Carpenter Star Quilt pattern requires precise alignment. Even slight deviations can impact the final design. Pressing your fabric before cutting helps maintain accuracy. Additionally, labeling your pieces can prevent confusion during assembly.
Half-Square Triangles (HSTs) are essential to forming the Carpenter Star Quilt pattern. They create the sharp, clean edges of the star design and bring the quilt together seamlessly.
To make an HST, take one light and one dark fabric square. Place them right sides together and draw a diagonal line from corner to corner. Sew a 1/4-inch seam on both sides of the drawn line.
After sewing, use a rotary cutter to slice along the drawn line. This will create two HSTs. Press them open with the seam facing towards the darker fabric to reduce bulk.
Trim the HSTs to ensure they measure exactly 6.5 inches square. Accuracy is crucial, as inconsistent sizes can cause misalignment when assembling the quilt.
Repeat this process until you have all the necessary HSTs. Depending on your fabric choices, you may want to mix and match different shades to create depth and contrast in your quilt pattern.
Once all HSTs are trimmed and pressed, arrange them in the correct orientation before moving on to piecing the quilt top. This helps visualize the final design and ensures no mistakes before stitching the blocks together.
Now that you have your squares and HSTs prepared, it’s time to assemble the Carpenter Star Quilt. The key to success is arranging your pieces carefully before sewing.
Lay out your squares and HSTs on a large surface to see how the design comes together. You should have a symmetrical pattern with the star shape in the center and supporting squares surrounding it.
Start by sewing small sections together. For example, sew four HSTs into larger blocks before joining them with full squares. This method helps maintain accuracy and prevents misalignment.
Press seams as you go, either open or towards the darker fabric. Pressing seams correctly reduces bulk and ensures a smooth finish.
Once smaller sections are sewn, join them to form larger units. Continue this process until the entire quilt top is assembled. Check for alignment before finalizing seams.
After completing the quilt top, give it a final press to smooth out any wrinkles. Your Carpenter Star Quilt pattern should now be fully visible, ready for the finishing touches!
With your quilt top assembled, the final steps involve layering, quilting, and binding to complete the project. This stage brings your Carpenter Star Quilt to life, ensuring durability and a professional finish.
Layer your quilt top with batting and backing fabric. Smooth out any wrinkles and secure the layers with safety pins or basting spray. This prevents shifting while quilting.
Choose a quilting design that complements the Carpenter Star Quilt pattern. Straight-line quilting along the seams enhances the geometric design, while free-motion quilting adds texture and movement.
Begin quilting from the center outward to prevent fabric distortion. Take your time and use even stitching to maintain a polished look.
After quilting, trim the excess batting and backing fabric. Ensure all edges are even before attaching the binding.
For the final touch, add a fabric binding to frame your quilt. Cut 2.5-inch strips of fabric, fold in half, and sew around the quilt’s edges. Miter the corners for a neat finish.
Your Carpenter Star Quilt is now complete! Whether displayed as a decorative piece or used as a cozy cover, this timeless quilt pattern showcases your craftsmanship beautifully.


