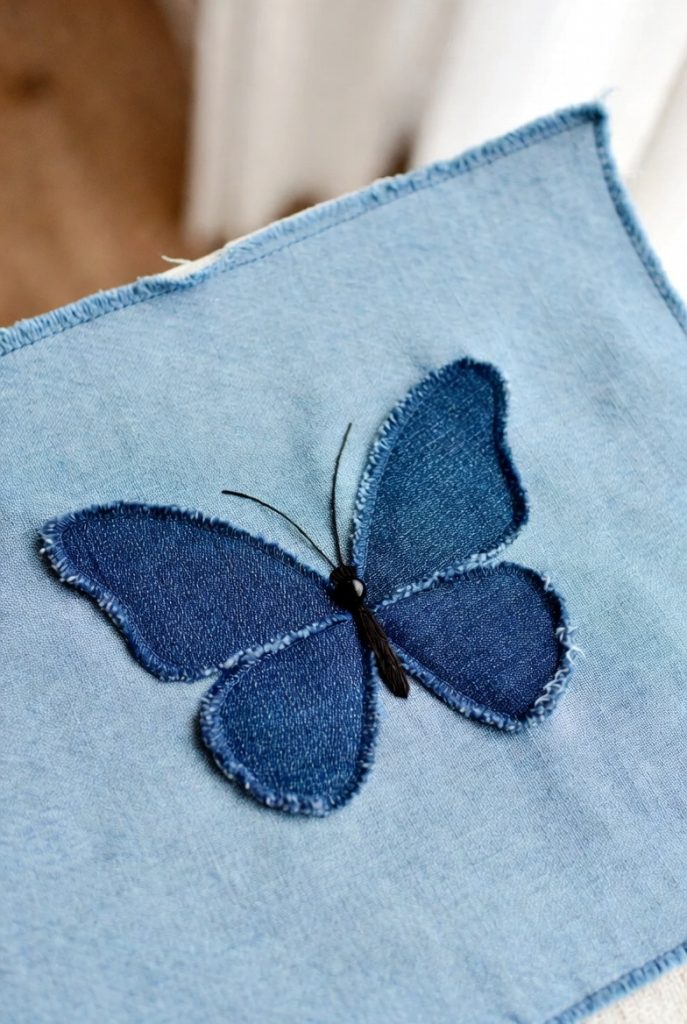
DIY Butterfly Denim Applique
The Carpenter Star Step-by-Step Quilt Pattern is one of the most admired and timeless designs in the world of quilting.
Quilters of all experience levels appreciate its striking geometric layout and the way it transforms simple fabric pieces into a stunning star that radiates across the quilt top.
Whether you are a beginner looking for a rewarding project or an experienced quilter seeking a classic design to showcase beautiful fabrics, this pattern offers a perfect balance between challenge and creativity.
One of the reasons the Carpenter Star Step-by-Step Quilt Pattern remains so popular is its versatility. This pattern can be made with traditional fabrics, modern prints, or even scrappy fabric collections, making it suitable for many styles and preferences. The large central star becomes the focal point of the quilt, and with thoughtful color placement, the design can appear bold, dramatic, soft, or elegant depending on the fabrics chosen.
Learning how to create the Carpenter Star Step-by-Step Quilt Pattern also helps quilters build valuable sewing skills. Through the process of cutting, arranging, and stitching fabric pieces together, you develop precision, patience, and a deeper understanding of quilt construction. This project not only results in a beautiful finished quilt but also strengthens the techniques that can be used in many other quilting patterns.
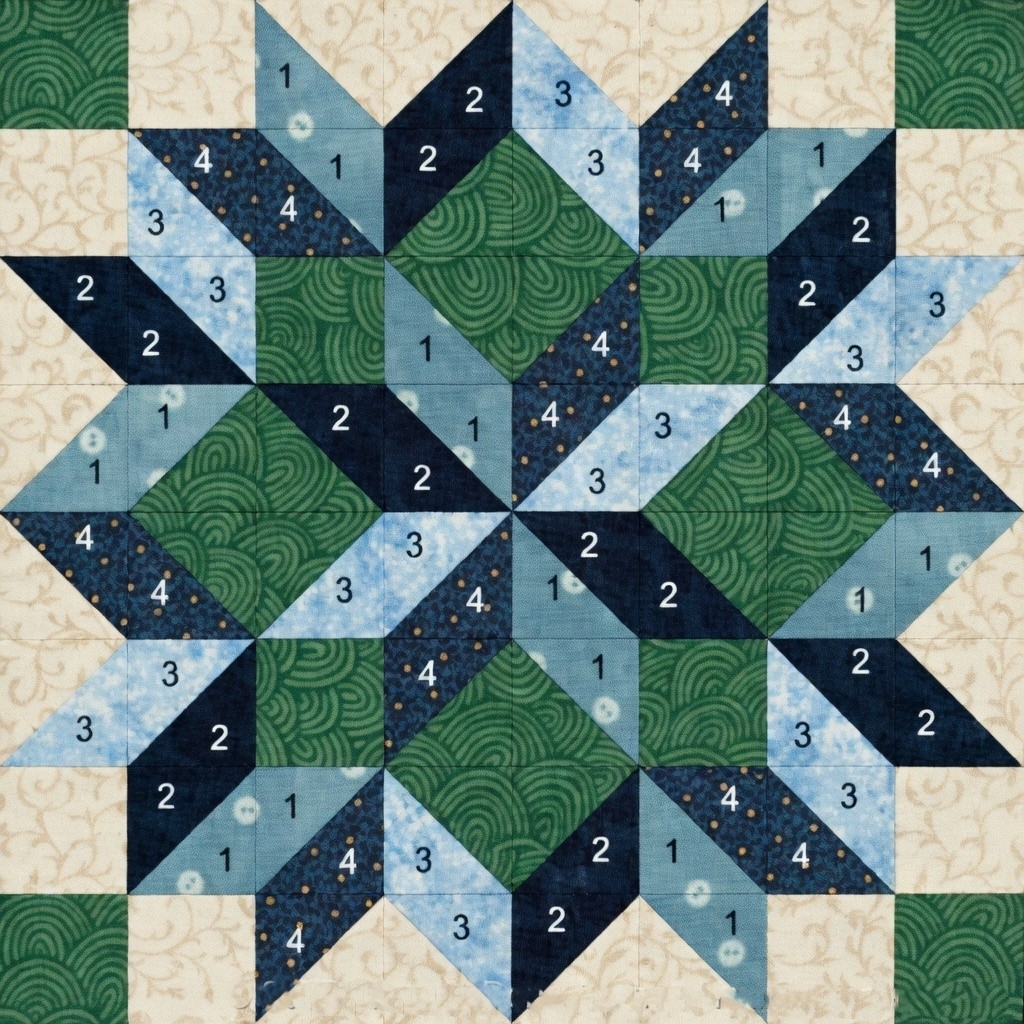
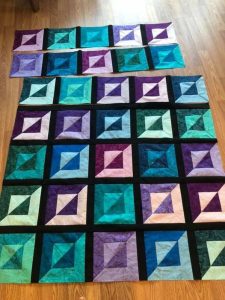
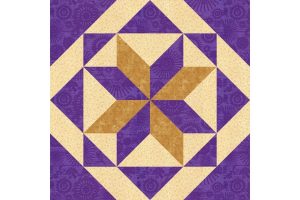
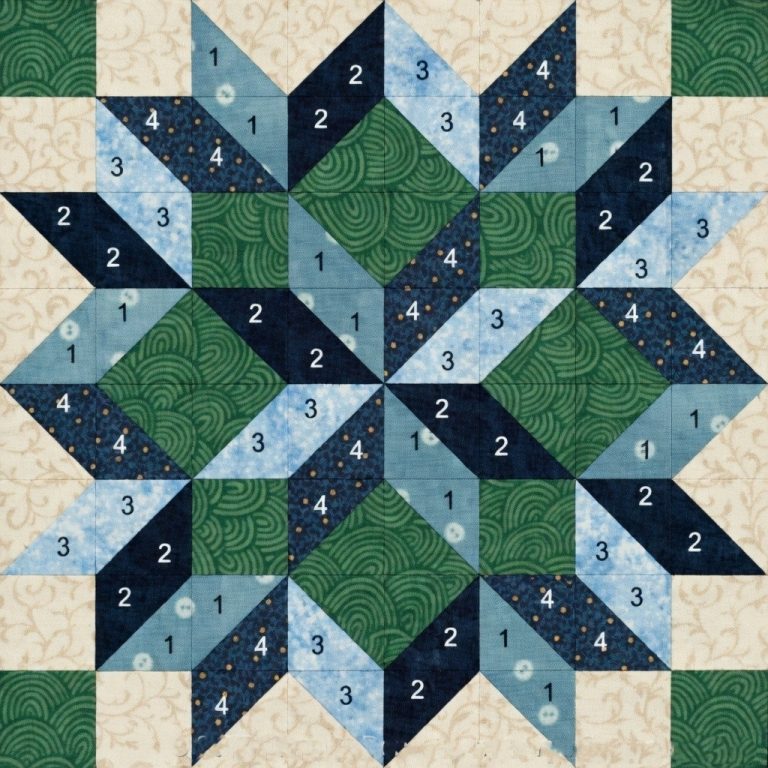
The Carpenter Star Step-by-Step Quilt Pattern is known for its large star that spreads across the quilt top using layered diamond shapes. Unlike smaller star blocks that repeat across a quilt, the Carpenter Star typically forms one large centerpiece, making it visually striking and elegant. This design has been cherished for generations and remains a favorite among modern quilters.
At the heart of the Carpenter Star Step-by-Step Quilt Pattern is a structure based on half-square triangles and carefully arranged fabric units. These shapes work together to create the illusion of depth and movement in the star. When the colors are arranged strategically, the star appears to glow or radiate outward from the center.
Many quilters enjoy experimenting with different color gradients in the Carpenter Star Step-by-Step Quilt Pattern. For example, using darker fabrics toward the center and lighter fabrics toward the edges can create a three-dimensional effect. This technique gives the quilt an eye-catching look that highlights the star’s dramatic structure.
Another appealing aspect of the Carpenter Star Step-by-Step Quilt Pattern is its adaptability to different quilt sizes. By simply adjusting the size of the squares and triangles used, you can create anything from a small wall hanging to a large bed quilt. This flexibility makes the pattern ideal for many quilting projects.
The symmetrical design of the star also makes it perfect for showcasing special fabrics. Many quilters choose fabrics with subtle prints or gradients that enhance the star’s geometry without overwhelming the design. The simplicity of the shapes allows the fabric itself to become part of the artwork.
Overall, understanding the structure of the Carpenter Star Step-by-Step Quilt Pattern helps quilters appreciate the balance between geometry and creativity. Once the basic layout is understood, it becomes easier to personalize the design with unique colors, fabrics, and quilting styles.
Before starting the Carpenter Star Step-by-Step Quilt Pattern, it is important to gather the right materials. Proper preparation helps ensure that the quilt pieces fit together accurately and that the finished project looks polished and professional. Careful planning at the beginning can make the entire quilting process smoother and more enjoyable.
The most essential materials for the Carpenter Star Step-by-Step Quilt Pattern include quilting cotton fabric, a rotary cutter, a cutting mat, quilting rulers, pins, and a sewing machine. High-quality cotton fabric is often recommended because it is durable, easy to sew, and holds its shape well during quilting.
Choosing the right fabric colors is an exciting step when creating the Carpenter Star Step-by-Step Quilt Pattern. Since the star relies on contrast to stand out, selecting fabrics with noticeable differences in color or value is helpful. A strong contrast between light, medium, and dark fabrics will emphasize the star shape.
Pre-washing fabric is another step many quilters consider when preparing for the Carpenter Star Step-by-Step Quilt Pattern. Washing the fabric before cutting can prevent shrinkage later and remove excess dye. This step can help maintain the quilt’s shape and prevent color bleeding during future washes.
Accurate cutting is essential for success with the Carpenter Star Step-by-Step Quilt Pattern. Using a rotary cutter and ruler allows quilters to create precise squares and triangles, which are crucial for keeping the star symmetrical. Taking extra time during this stage helps avoid alignment issues later in the sewing process.
Organizing fabric pieces before sewing can also simplify the process. Many quilters arrange their cut pieces into labeled stacks so that they can quickly identify which units belong together. This small step can save time and reduce confusion while assembling the quilt block.
Creating the Carpenter Star Step-by-Step Quilt Pattern involves assembling several units that eventually form the star’s points and center. While the design may look complex at first glance, breaking it down into manageable steps makes the process much easier to follow.
The first step in constructing the Carpenter Star Step-by-Step Quilt Pattern is cutting the fabric pieces. Most versions of the pattern begin with large squares that are later divided into triangles or half-square triangle units. Accurate cutting ensures that all pieces align properly during sewing.
Next, the half-square triangles are created, which form the foundation of the star points. These triangles are typically made by sewing two squares together diagonally and then cutting them apart. Once pressed, these units become the building blocks of the star’s geometric design.
After the triangle units are completed, they are arranged into rows that begin to reveal the shape of the star. At this stage of the Carpenter Star Step-by-Step Quilt Pattern, laying out the pieces on a flat surface is very helpful. This allows quilters to preview the design and make adjustments before sewing.
The rows are then sewn together carefully, ensuring that seams line up precisely. Accurate seam allowances are extremely important in the Carpenter Star Step-by-Step Quilt Pattern, as even small variations can affect the alignment of the star points.
Once the quilt top is assembled, it can be layered with batting and backing fabric. This quilt sandwich is then quilted using straight-line quilting, free-motion designs, or other decorative stitching techniques that enhance the overall look of the quilt.
Finally, the edges are finished with quilt binding, completing the Carpenter Star Step-by-Step Quilt Pattern. This final step frames the quilt and provides durability, allowing the quilt to be used and enjoyed for many years.
When working on the Carpenter Star Step-by-Step Quilt Pattern, a few helpful tips can make a significant difference in the final result. Even experienced quilters rely on small techniques that improve accuracy and create cleaner quilt blocks.
One of the most important tips for the Carpenter Star Step-by-Step Quilt Pattern is maintaining consistent seam allowances. A standard quarter-inch seam is commonly used in quilting, and keeping this measurement consistent helps ensure that all pieces fit together perfectly.
Pressing seams properly is another key technique. Instead of ironing back and forth, many quilters prefer to press seams gently to one side. This approach reduces fabric distortion and helps maintain the crisp shape of the star points.
Using pins or quilting clips can also improve accuracy when assembling the Carpenter Star Step-by-Step Quilt Pattern. Pinning intersections before sewing keeps the seams aligned and prevents shifting during stitching.
Lighting and workspace organization can also influence quilting results. Working in a well-lit area with enough space to spread out the quilt pieces helps quilters clearly see the layout and maintain precision throughout the process.
Taking time to square up blocks before assembling them is another valuable practice. Trimming units to the correct size ensures that each section fits together smoothly, which is especially important for patterns with strong geometric shapes like the Carpenter Star.
Most importantly, patience and enjoyment are essential when making the Carpenter Star Step-by-Step Quilt Pattern. Quilting is both a craft and an art form, and allowing yourself time to enjoy the creative process can make the finished quilt even more meaningful.
Is the Carpenter Star quilt pattern suitable for beginners?
Yes, the Carpenter Star Step-by-Step Quilt Pattern can be suitable for beginners who are comfortable with basic sewing techniques. While it involves precise cutting and piecing, the pattern becomes manageable when broken down into simple steps.
What size quilt can be made using the Carpenter Star pattern?
The Carpenter Star Step-by-Step Quilt Pattern can be adapted to many sizes. By adjusting the dimensions of the fabric pieces, you can create small decorative quilts, baby quilts, throw quilts, or full bed quilts.
What fabrics work best for the Carpenter Star quilt?
Quilting cotton is the most commonly used fabric for the Carpenter Star Step-by-Step Quilt Pattern because it is durable, easy to sew, and widely available in many colors and prints.
How do I make the star stand out more in the quilt?
Choosing fabrics with strong contrast is the best way to highlight the star in the Carpenter Star Step-by-Step Quilt Pattern. Using light fabrics next to dark fabrics creates a bold and visually striking effect.
Do I need special tools for this quilt pattern?
Basic quilting tools such as a rotary cutter, quilting ruler, cutting mat, and sewing machine are typically sufficient for completing the Carpenter Star Step-by-Step Quilt Pattern.
How long does it take to complete a Carpenter Star quilt?
The time required depends on the quilt size and the quilter’s experience level. Some quilters complete the Carpenter Star Step-by-Step Quilt Pattern in a few days, while others may take longer to carefully assemble and quilt the design.
The Carpenter Star Step-by-Step Quilt Pattern is a beautiful and rewarding project that combines geometric precision with creative fabric choices. Throughout this article, we explored the structure of the pattern, the materials needed, the step-by-step construction process, and practical tips for achieving professional results. With careful planning, accurate cutting, and thoughtful color selection, this timeless quilt design can become a stunning centerpiece in any quilting collection.
Beyond its visual appeal, the Carpenter Star Step-by-Step Quilt Pattern also provides an excellent opportunity to practice essential quilting techniques and build confidence in piecing complex designs. Whether you create it as a gift, a decorative quilt, or a treasured handmade heirloom, the process of making this quilt can be both relaxing and inspiring.
If you enjoyed learning about the Carpenter Star Step-by-Step Quilt Pattern, feel free to share your honest opinion and suggestions. Your feedback and experiences help inspire other quilters and keep the creativity of the quilting community growing.


