
Stairway To Heaven Quilt Pattern
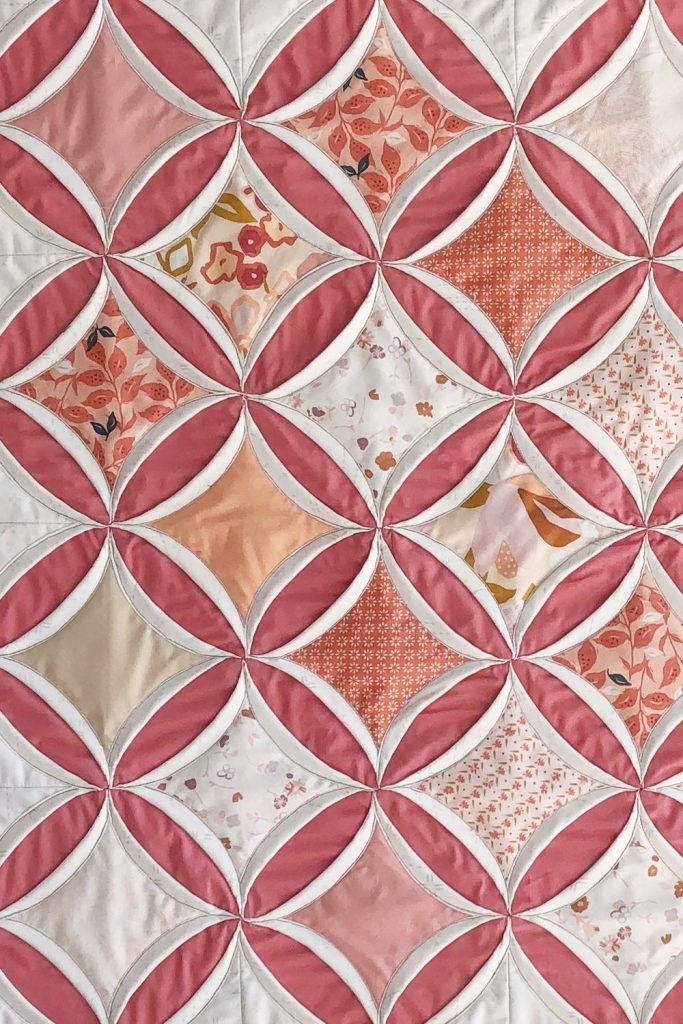
Cathedral Window Quilt Tutorial is one of the most fascinating and elegant techniques in the quilting world, and if you have ever admired quilts that look like stained glass windows, you are about to discover how they are made.
This timeless method creates a dimensional design that folds fabric into graceful frames, showcasing colorful centers just like cathedral glass panels. In this complete guide, you will learn everything you need to know about the Cathedral Window Quilt Tutorial, from fabric preparation to finishing touches, using safe, family-friendly, and AdSense-compliant content.
The beauty of the Cathedral Window Quilt Tutorial lies in its unique construction. Unlike traditional quilts that rely heavily on batting and layered stitching, this technique uses strategic folding and hand or machine stitching to create its signature look. It may seem complex at first glance, but with patience and clear step-by-step guidance, even confident beginners can achieve stunning results. Understanding the structure behind the folds is the key to mastering this quilt style.
If you are looking to expand your quilting skills or add a show-stopping project to your portfolio, learning the Cathedral Window Quilt Tutorial is an excellent choice. Not only does it enhance your craftsmanship, but it also allows you to explore fabric combinations, textures, and color contrasts in a very artistic way. Throughout this article, we will break down each essential stage, explain important quilting concepts, and provide practical tips to help you succeed.
The foundation of the Cathedral Window Quilt Tutorial begins with understanding its folded patchwork construction. Instead of sewing traditional blocks together, this method uses fabric squares that are folded and stitched in a way that creates soft, rounded window frames. These frames are then used to hold smaller, contrasting fabric pieces in the center.
Each large square is typically folded into quarters and pressed carefully to create crisp creases. These creases act as visual guides and stitching lines later in the process. Precision in folding is essential because the symmetry of the entire quilt depends on consistent measurements and neat edges.
One of the defining characteristics of the Cathedral Window Quilt Tutorial is that it does not require batting in the traditional sense. The multiple fabric folds create natural thickness and structure. This makes the quilt lighter in some ways while still maintaining a dimensional appearance.
The window effect is formed when curved edges are folded inward and stitched down over a contrasting square. These curved flaps resemble the arches seen in cathedral architecture, which is where the name originates. The visual result is intricate but surprisingly methodical once you understand the pattern logic.
Fabric selection plays a major role in the final outcome. Solid or subtle prints are often used for the folded frames, while vibrant or patterned fabrics shine in the center windows. This contrast enhances the stained-glass illusion that makes the Cathedral Window Quilt Tutorial so iconic.
Accuracy during the layout stage prevents distortion. Before stitching permanently, many quilters arrange all folded units on a flat surface to preview the design. This step ensures color balance and alignment across the entire quilt top.
Choosing the right materials is essential when starting a Cathedral Window Quilt Tutorial. High-quality cotton fabric is the most common choice because it folds crisply and holds its shape well. Pre-washing fabric is recommended to prevent shrinkage and color bleeding later.
For beginners, starting with squares that measure 9 to 10 inches works well. Larger squares are easier to handle and fold accurately. As your confidence grows, you can experiment with smaller dimensions for more intricate designs.
A reliable iron is one of the most important tools for this project. Pressing each fold firmly ensures sharp edges and professional-looking results. Consistent pressing at every stage will dramatically improve the final appearance of your quilt.
Thread selection should complement your design. Many quilters prefer neutral thread for subtle stitching, while others choose decorative thread to highlight the curved window frames. Either option works as long as the stitches are neat and secure.
Pins or fabric clips are helpful for holding curved edges in place before stitching. Because the folded edges are layered, securing them properly prevents shifting during sewing. Precision here reduces puckering and uneven curves.
Finally, a design wall or large flat surface makes arranging the quilt layout easier. The Cathedral Window Quilt Tutorial benefits from thoughtful color placement, so taking time to plan the arrangement ensures a cohesive and visually pleasing result.
The first step in the Cathedral Window Quilt Tutorial process is folding each large square. Fold the fabric in half vertically, press, then fold in half horizontally and press again. After unfolding, bring each corner toward the center crease and press firmly to create a smaller square with folded edges.
Next, fold the square in half again, creating a layered unit. Stitch along the raw edges using a small seam allowance to secure the structure. Repeat this process for all squares that will form the quilt top.
Once multiple folded units are prepared, arrange them in rows. Stitch the units together along their edges, carefully aligning seams. This creates a grid that will later transform into the window layout.
After sewing the grid, gently open the curved flaps formed at each intersection. Insert a contrasting fabric square underneath each curved opening. This square becomes the decorative “window” center.
Carefully fold the curved edges over the center square and secure them with pins. Using small, neat stitches, sew along the curved edge to attach the frame to the center fabric. This step defines the cathedral window shape.
Continue this process across the entire quilt top. Although repetitive, it becomes rhythmic and enjoyable. Patience and consistency ensure that every window maintains the same shape and proportion throughout the design.
After all windows are stitched, inspect the quilt for loose threads or uneven curves. Trimming stray threads improves the polished look of your Cathedral Window Quilt Tutorial project. Attention to detail at this stage makes a significant difference.
Because the quilt is constructed using folded layers, backing is optional. Some quilters leave it as is for a lighter decorative quilt, while others add a backing layer for extra durability. If adding backing, secure it with careful stitching around the edges.
Binding the quilt edges completes the project. You can choose a coordinating binding fabric that complements the window frames or select a bold contrast for added definition. Accurate binding application frames the entire design beautifully.
Creative variations allow you to personalize your Cathedral Window Quilt Tutorial. For example, experimenting with gradient color schemes creates a modern effect. Seasonal fabrics can transform the quilt into a holiday decoration.
Mini cathedral window blocks can also be incorporated into pillows, table runners, or baby quilts. Scaling down the technique opens new possibilities while maintaining the same structural concept.
With practice, you may explore machine stitching instead of hand stitching for the curved edges. While hand sewing provides a traditional look, careful machine stitching can save time and still produce excellent results when done with precision.
What makes the Cathedral Window Quilt Tutorial different from traditional quilting
The main difference is the folded construction technique. Instead of layering batting between fabric pieces, this method relies on folded squares to create thickness and dimension.
Is the Cathedral Window Quilt Tutorial suitable for beginners
It can be suitable for confident beginners who are comfortable with precise folding and sewing. Starting with larger squares makes the process easier to manage.
Do I need batting for a cathedral window quilt
Traditional cathedral window quilts do not require batting because the folded layers create natural structure. However, some quilters add backing for extra durability.
How long does it take to complete a Cathedral Window Quilt Tutorial project
The timeline depends on the quilt size and your experience level. Smaller projects may take a few days, while larger quilts can take several weeks due to detailed stitching.
Can I use patterned fabrics for the window frames
Yes, but many quilters prefer solid fabrics for the frames and patterned fabrics for the center windows to enhance contrast and definition.
Is hand stitching required
Hand stitching is traditional and offers precise control over curves, but careful machine stitching is also possible with practice.
In this comprehensive Cathedral Window Quilt Tutorial, we explored the structure, materials, step-by-step construction, finishing methods, and creative variations of this elegant quilting technique. You learned how folded fabric squares form graceful window frames, how careful pressing ensures symmetry, and how thoughtful fabric selection enhances the stained-glass effect. By understanding the logic behind each fold and stitch, the once-intimidating design becomes an achievable and rewarding project.
Mastering the Cathedral Window Quilt Tutorial not only improves your quilting skills but also allows you to create heirloom-quality pieces filled with dimension and artistic charm. Whether you choose traditional hand stitching or modern machine techniques, patience and precision will guide you to beautiful results.
I would truly love to hear your honest opinion about this guide. Have you tried the Cathedral Window Quilt Tutorial before, or are you planning to start one soon? Share your thoughts, experiences, and suggestions. Your feedback helps inspire future quilting tutorials and creative ideas.


