
Bird Quilt Block Pattern
The Christmas Tree Star Quilt Pattern is one of the most charming and symbolic designs to create during the holiday season. It beautifully combines the festive spirit of Christmas with the timeless art of quilting. Whether you’re an experienced quilter or a beginner looking for a seasonal project, this pattern captures the joy and warmth of Christmas in every stitch. With its star-shaped design and Christmas tree layout, this quilt becomes the perfect centerpiece for your holiday décor, radiating coziness and tradition.
Creating a quilt like the Christmas Tree Star Quilt Pattern allows you to express your creativity while celebrating the essence of Christmas. The combination of vibrant greens, reds, golds, and whites reflects the classic palette of the season. This pattern not only brings joy to your home but also makes for a heartfelt handmade gift. Imagine wrapping your loved ones in a quilt that embodies love, care, and festive spirit—it’s an heirloom they’ll treasure for years.
One of the most wonderful aspects of the Christmas Tree Star Quilt Pattern is its versatility. It can be adjusted in size to fit a wall hanging, table runner, or full-sized throw. The geometric alignment of stars forming the shape of a Christmas tree gives it a stunning three-dimensional appeal. In this article, you’ll learn how to bring this pattern to life—from fabric selection to final assembly—so you can craft a quilt that shines as bright as the holiday star itself.
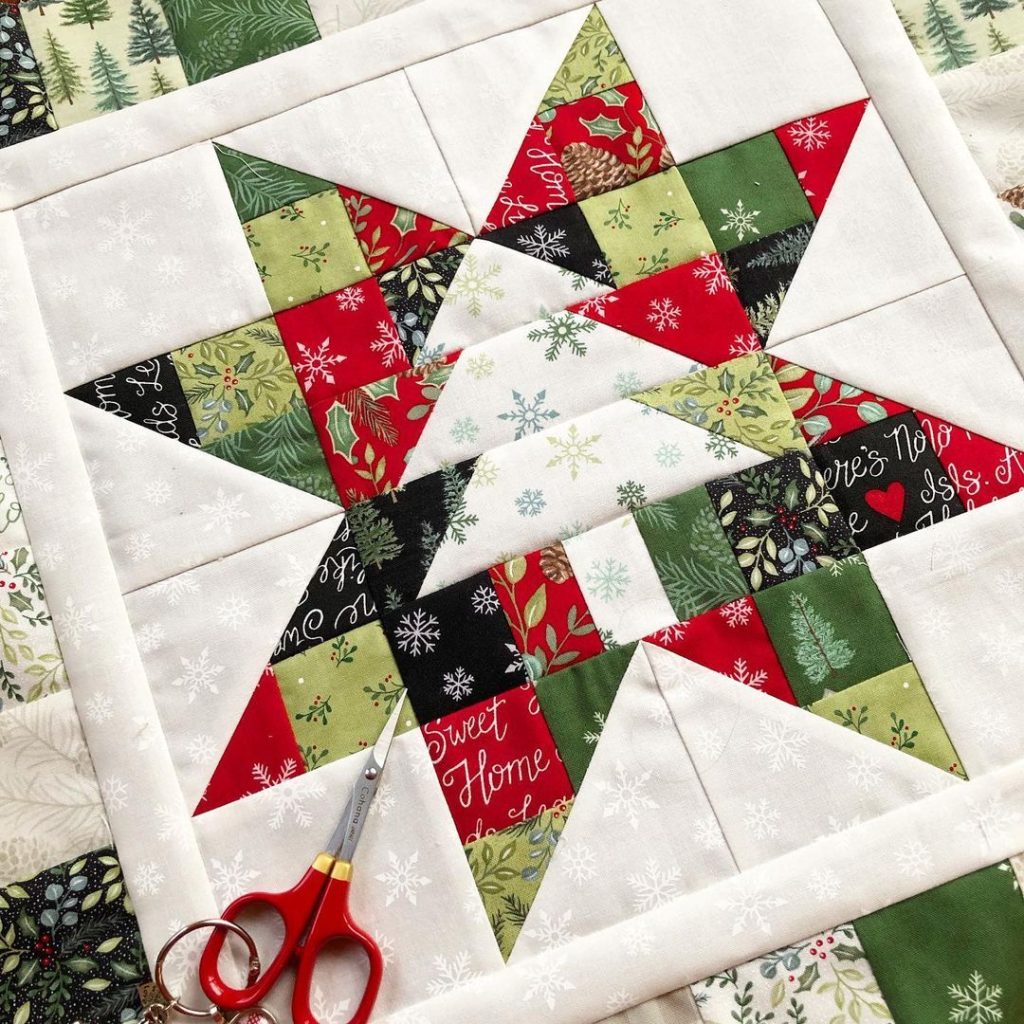
Selecting the right fabrics is the first and most important step in making your Christmas Tree Star Quilt Pattern stand out. The magic of this quilt lies in its festive color palette. Traditional choices include shades of green for the tree, red for accent stars, and gold or white for the background. These hues evoke warmth and nostalgia, creating a sense of celebration.
When choosing fabrics, go for high-quality cotton quilting fabric. It’s durable, easy to sew, and maintains its vibrant colors even after washing. You may also experiment with metallic or shimmer fabrics to highlight the star points and add a festive sparkle. Combining solids with holiday-themed prints—like snowflakes, holly leaves, or ornaments—adds depth and personality to your quilt.
The layout of the Christmas Tree Star Quilt Pattern depends heavily on contrast. A light background allows the tree and stars to pop, while darker shades make the design look more dramatic. You can even add a touch of silver or gold fabric for the star at the top of the tree to give it that perfect finishing glow. The choice of fabrics defines the overall mood—traditional, modern, or rustic.
For beginners, pre-cut fabric bundles known as fat quarters are a great option. They save time and ensure color coordination. Experienced quilters can mix and match scraps to create a more organic look. The key is balance—use different shades and textures while keeping a consistent Christmas theme. Remember, the Christmas Tree Star Quilt Pattern should feel both festive and cohesive.
Don’t forget about the backing and binding fabrics. A cozy flannel or festive print can make your quilt extra soft and visually appealing. Coordinating your binding color with your stars or background ties the whole project together. Every choice you make—from thread color to fabric tone—plays a role in enhancing the beauty of your finished quilt.
Finally, before cutting, always pre-wash your fabrics to prevent shrinking or color bleeding later. Iron them thoroughly for smooth and precise cuts. Proper preparation ensures your Christmas Tree Star Quilt Pattern comes out crisp, clean, and professional-looking.
Once your fabrics are ready, it’s time to cut and assemble the pieces for your Christmas Tree Star Quilt Pattern. Precision is key to creating sharp points and clean lines in the star design. Using a rotary cutter, self-healing mat, and clear quilting ruler ensures accuracy with every cut.
Start by cutting squares and triangles according to your desired quilt size. Each star typically consists of eight points, arranged symmetrically to form the shape of a star. The Christmas tree layout is created by stacking smaller stars near the top and larger ones at the bottom, mimicking the natural shape of a tree. It’s both mathematical and artistic, resulting in a stunning layered effect.
To maintain order, label each fabric piece with masking tape or fabric clips. This prevents confusion as you sew. Always sew with a ¼-inch seam allowance, which is standard in quilting. Chain piecing—sewing multiple units in a continuous line—saves time and keeps your stitches consistent.
Press each seam as you go, alternating directions between rows to reduce bulk and make matching points easier. Ironing is a crucial part of quilting that keeps your Christmas Tree Star Quilt Pattern neat and professional. Take your time aligning the points of the stars; this attention to detail makes your design shine.
After assembling each star block, lay them out on a flat surface to visualize the final composition. Adjust color placement if needed until your Christmas tree shape looks balanced. Once satisfied, sew the rows together and then join them vertically. The moment your stars come together to form the tree, you’ll see the pattern truly come to life.
Finish this stage by adding borders around the quilt top. Borders frame your Christmas Tree Star Quilt Pattern, giving it structure and enhancing its visual impact. Choose a fabric that complements your color scheme—perhaps a festive red or shimmering gold—to make the stars stand out even more.
After completing the quilt top, it’s time for quilting and finishing details. Layer your quilt by placing the backing fabric face down, followed by batting, and then the quilt top right side up. Baste the layers using pins or temporary spray adhesive to prevent shifting during stitching.
You can quilt your Christmas Tree Star Quilt Pattern by hand or machine. For a classic look, try simple straight-line quilting that follows the tree’s shape. For a more intricate finish, use free-motion quilting with swirls or snowflake patterns. Both methods enhance the texture and add dimension to your quilt.
The thread color you choose will influence the final look. Metallic gold or silver thread can add a festive glimmer, while matching tones blend seamlessly. Always test your stitches on a scrap piece first to ensure proper tension and appearance before quilting the main piece.
Once the quilting is complete, trim the edges evenly and prepare your binding. The binding is the final frame that encases your quilt. Use double-fold binding for durability, and sew it with care to maintain smooth corners and edges. It’s the final touch that gives your Christmas Tree Star Quilt Pattern a polished, professional finish.
If desired, add embellishments like small fabric ornaments, embroidery, or buttons to accentuate the Christmas theme. These personal touches make your quilt truly unique. Finally, give your quilt a gentle press and admire the festive masterpiece you’ve created—a true reflection of craftsmanship and holiday joy.
Once your Christmas Tree Star Quilt Pattern is complete, it deserves to be showcased. Displaying it as a wall hanging above the fireplace, draping it over a couch, or using it as a festive table cover brings instant warmth and cheer to any room. The radiant star design makes it a perfect holiday centerpiece.
If you plan to give it as a gift, consider adding a personalized label with the date, your name, and a short message. This turns your quilt into a memorable keepsake that carries a personal story. Handmade gifts like this often become treasured family heirlooms, passed down from generation to generation.
Proper care ensures your Christmas Tree Star Quilt Pattern lasts for many Christmases to come. Always wash it gently using cold water and mild detergent. Avoid bleach or harsh chemicals that can fade the fabric’s color. Air drying or tumble drying on low heat preserves the texture and integrity of the quilt.
When not in use, store your quilt in a breathable cotton bag rather than plastic to prevent moisture buildup. Refold it occasionally to avoid permanent creases. These small steps help maintain its beauty and craftsmanship over time.
If your quilt includes metallic or delicate fabrics, spot clean only when necessary. These materials can be sensitive to frequent washing. Treat your quilt with care—it’s not just fabric and thread; it’s a creation filled with effort, passion, and holiday spirit.
Displaying your Christmas Tree Star Quilt Pattern each year will become a beloved holiday tradition. Each time you unfold it, you’ll relive the joy of making it and the warmth it brings to your home.
1. What size should a Christmas Tree Star Quilt be?
The size depends on your purpose. A small wall hanging might measure 30×40 inches, while a full throw can be 60×80 inches or larger. Adjust the star block sizes accordingly.
2. Can beginners make the Christmas Tree Star Quilt Pattern?
Yes! While the design looks intricate, it’s beginner-friendly if you follow accurate cutting and sewing steps. Start with fewer stars and gradually expand as you gain confidence.
3. What fabrics work best for this quilt pattern?
100% cotton fabrics are ideal because they’re easy to cut and sew. You can also use festive prints or metallic accents to enhance the Christmas look.
4. How long does it take to complete this quilt?
Depending on size and complexity, it can take anywhere from a weekend for a small version to a few weeks for a large quilt. Patience and precision are key.
5. How can I make my quilt look more festive?
Use rich holiday colors, add metallic thread, or include embroidered snowflakes. You can also quilt with decorative patterns for extra charm.
The Christmas Tree Star Quilt Pattern is more than just a sewing project—it’s a heartfelt expression of creativity and the joy of the holiday season. From choosing fabrics to stitching the final binding, each step allows you to craft something special that embodies warmth, tradition, and love. Whether displayed proudly in your home or gifted to someone dear, this quilt radiates festive cheer and timeless beauty.
If you enjoyed this guide, share your thoughts and experiences! Leave your honest opinion and suggestions below—your feedback helps inspire more creative quilting projects for everyone who loves this cherished craft.


