
Bird Quilt Block Pattern
The Churn Dash Quilt Block is one of the most beloved and iconic blocks in the quilting world. Known for its simple geometry and vintage appeal, this block dates back to the early 1800s and remains a staple in both traditional and modern quilting designs. Whether you’re a beginner or a seasoned quilter, the Churn Dash Quilt Block offers endless possibilities for creativity and personalization.
What makes the Churn Dash Quilt Block truly special is its versatility. With just a few basic shapes—half-square triangles, rectangles, and a center square—you can create a visually striking block that works well in various quilt layouts. It’s often used as a standalone feature or repeated in rows to form stunning quilt tops.
This blog post will guide you through everything you need to know to create a Churn Dash Quilt Block, including fabric cuts, step-by-step instructions, design tips, and layout ideas. Whether you’re planning a baby quilt, wall hanging, or a full-sized heirloom quilt, this timeless block is a great place to start.

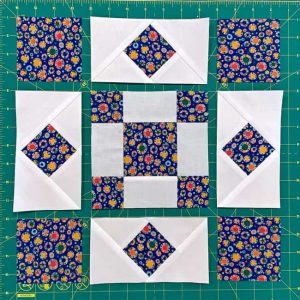
The Churn Dash Quilt Block is typically constructed using a 3×3 grid format, which means it consists of nine equally sized sections. This classic structure makes it easy to piece together and ideal for quilters at all levels of experience.
Each block features a center square, four outer rectangles, and four corner half-square triangles. When these pieces are assembled, they create a bold visual effect that resembles the blades of a butter churn, hence the name Churn Dash Quilt Block.
One of the reasons this block is a favorite among quilters is because of how it highlights fabric contrasts. Choosing light and dark fabrics for the triangles and rectangles gives the block a beautiful frame-like look that adds depth and interest to your quilt.
The design also lends itself well to color play. You can opt for a monochromatic color scheme for a subtle look or use bright, contrasting prints to make the Churn Dash Quilt Block pop. The possibilities are endless, which is why this block continues to be used in so many quilting patterns.
To maintain symmetry and proportion, accurate cutting and pressing are essential. Even though the Churn Dash Quilt Block looks simple, precision makes a big difference in the final result. Don’t rush the steps—each component deserves attention.
When you understand the structure, you’ll find this block to be one of the most enjoyable and satisfying ones to complete. Plus, it’s a great building block for sampler quilts and scrappy quilts, too.
Before beginning your project, it’s crucial to gather the correct fabric pieces and ensure you have accurate measurements. The following guide is based on a finished Churn Dash Quilt Block size of 12” x 12”.
Here are the fabric cuts you’ll need:
Begin by creating the half-square triangles (HSTs). Pair one main fabric square with a background fabric square, right sides together. Draw a diagonal line on the wrong side of the lighter fabric, stitch a ¼” seam on both sides of the line, then cut along the line to yield two HSTs. Repeat for the second set of squares.
Trim each half-square triangle to 4½” x 4½” for uniformity. Precision at this step ensures that your Churn Dash Quilt Block will come together neatly and without puckering or distortion.
Next, arrange your cut pieces into a 3×3 grid layout. Place the HSTs in the corners, the rectangles on the sides, and the square in the center. This layout is the hallmark of the Churn Dash Quilt Block and gives it its iconic appearance.
After checking your layout, sew the rows together using a ¼” seam allowance. Press each row and then join the rows to complete your block. The finished block should measure 12½” x 12½” before being sewn into a quilt top.
Let’s walk through the process of making your own Churn Dash Quilt Block, one step at a time. Follow these instructions carefully for the best results.
Step 1: Prepare the Half-Square Triangles
Take the 5” squares and pair them as described earlier. Stitch on either side of the diagonal line and cut to make four half-square triangles. Press seams open or to one side, depending on your preference.
Step 2: Trim and Square the Units
Use a square ruler to trim each HST to exactly 4½” x 4½”. Uniform sizing is essential for a block that fits perfectly with others in a quilt layout.
Step 3: Lay Out Your Pieces
Arrange the pieces in a 3×3 grid: HSTs in the corners, rectangles along the edges, and the center square in the middle. At this point, double-check your fabric orientation for visual consistency.
Step 4: Sew Rows Together
Piece each row, joining the three blocks horizontally. Press each row well. Use pins to match seams where the blocks meet to prevent shifting during sewing.
Step 5: Join Rows to Complete the Block
Sew the rows together, aligning all intersections neatly. Press the entire block to finish. You now have a completed Churn Dash Quilt Block!
Step 6: Repeat and Assemble Your Quilt
Make additional blocks in the same size or experiment with different colors and layouts. This block looks wonderful when repeated across an entire quilt or used as an accent with other classic blocks.
Once you’ve mastered the basic Churn Dash Quilt Block, the fun really begins! There are countless ways to add personality and flair to your quilts using this timeless pattern.
For a scrappy look, use different fabrics for each block or even within each block. Mixing prints, textures, and colors gives the quilt a vibrant and eclectic style that’s full of charm and character.
You can also play with scale by creating larger or smaller versions of the Churn Dash Quilt Block. Adjusting the fabric cuts proportionally allows you to create mini blocks for pillows or giant blocks for modern bed quilts.
Consider adding sashing and cornerstones between the blocks for a polished, grid-like appearance. This technique gives your quilt extra structure and makes each Churn Dash Quilt Block stand out individually.
For a more modern twist, try using negative space. Surround your blocks with solid background fabric or off-center your block placement. This creates a fresh, minimalist aesthetic while still honoring the traditional roots of the block.
The Churn Dash Quilt Block also lends itself well to themed quilts. Use holiday prints for festive decor, floral fabrics for spring-inspired throws, or children’s prints for playful baby quilts. Its simple design acts like a frame for your favorite fabrics.
Finally, this block is a wonderful teaching tool. If you’re introducing someone to quilting, the Churn Dash Quilt Block offers a manageable but satisfying first project that introduces several core quilting techniques.
The Churn Dash Quilt Block continues to be a favorite in the quilting world for good reason. Its balance of simplicity and visual impact makes it ideal for both beginner and experienced quilters alike. Whether you stick with a classic version or branch out with creative variations, this block will never go out of style.
By understanding the block structure, cutting fabrics with precision, and following a step-by-step method, you can create beautiful, professional-looking quilt blocks. From traditional layouts to bold, modern adaptations, the Churn Dash Quilt Block is as adaptable as it is attractive.
It’s also a fantastic option for building quilting skills. Mastering this block strengthens your piecing, pressing, and measuring techniques, setting a strong foundation for more complex quilting projects in the future.
Whether you’re quilting solo or as part of a group project, the Churn Dash Quilt Block is sure to bring satisfaction and joy. It’s a testament to how a few simple shapes, sewn with care, can turn into something truly beautiful.
We hope this guide has inspired you to try your own version of the Churn Dash Quilt Block. If you do, feel free to share your finished blocks or quilts in the comments—we’d love to see your creativity at work!


