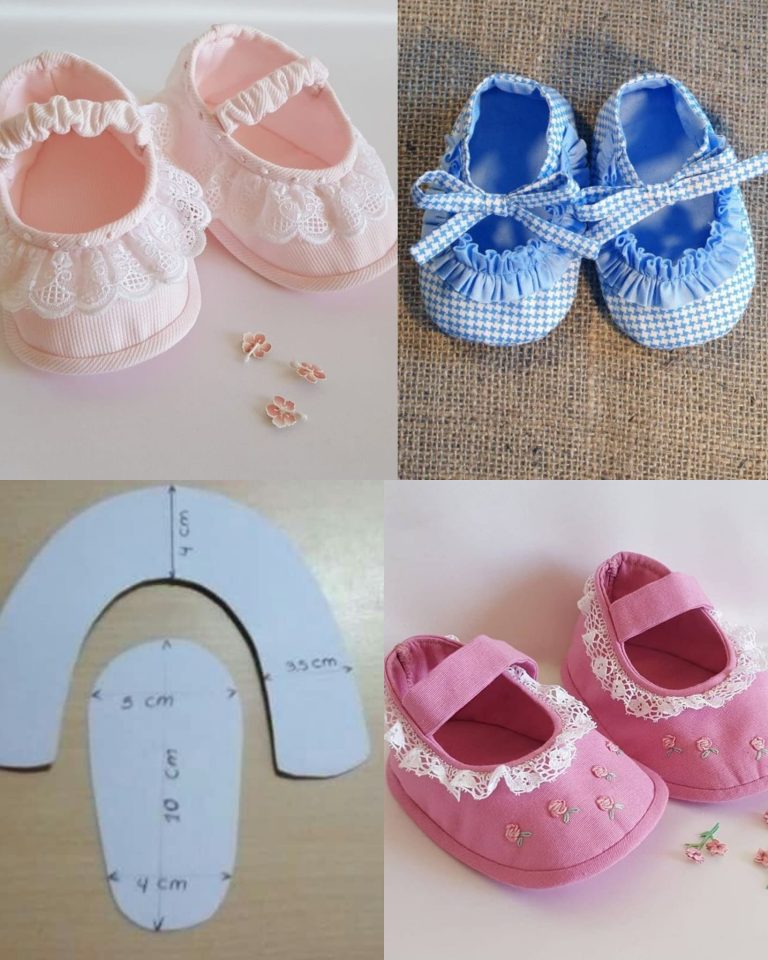
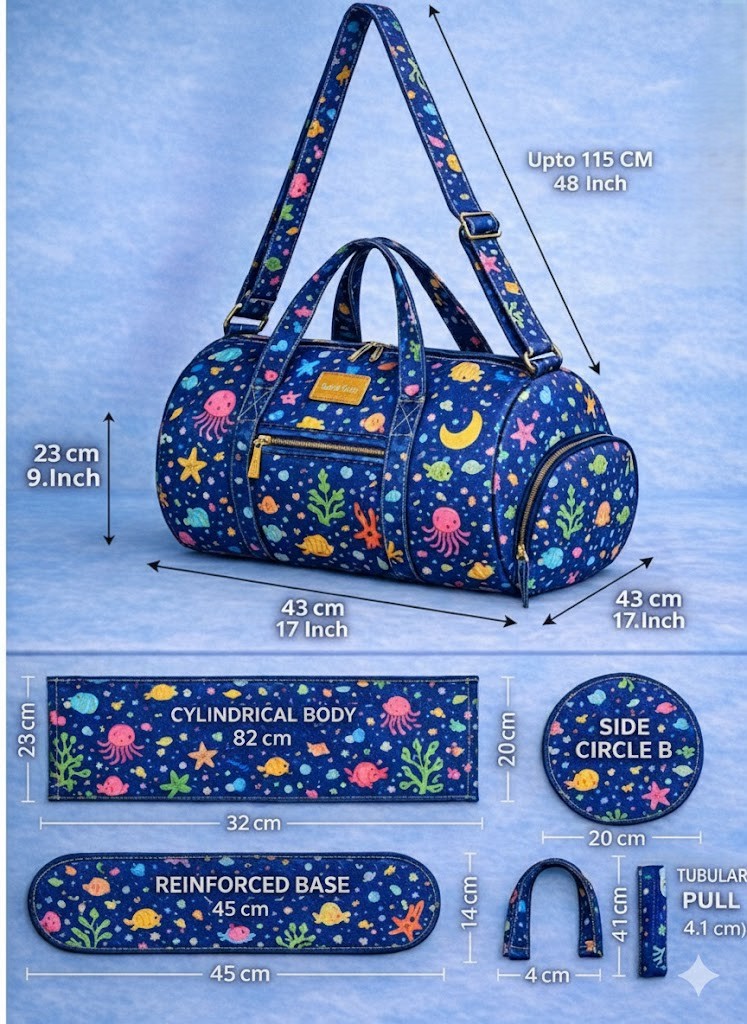
DIY baby booties Pattern
If you’re looking for a simple and rewarding sewing project, this COIN PURSE SEWING TUTORIAL is the perfect place to start. Making a handmade coin purse is a great way to use up fabric scraps and create something both practical and stylish. This step-by-step guide will walk you through every detail — from cutting fabric to assembling and finishing your coin purse.
In this tutorial, you’ll learn how to sew a coin purse using easy techniques that are ideal for beginners. We’ll guide you through the entire process, providing exact fabric cuts and measurements, so you know exactly what you need. Whether you’re sewing for yourself, making a gift, or planning to sell handmade items, this guide is for you.
This COIN PURSE SEWING TUTORIAL uses basic sewing tools and materials you likely already have. With just a little time and effort, you can complete this fun project in one afternoon. Best of all, you’ll have a functional coin purse that showcases your sewing skills.
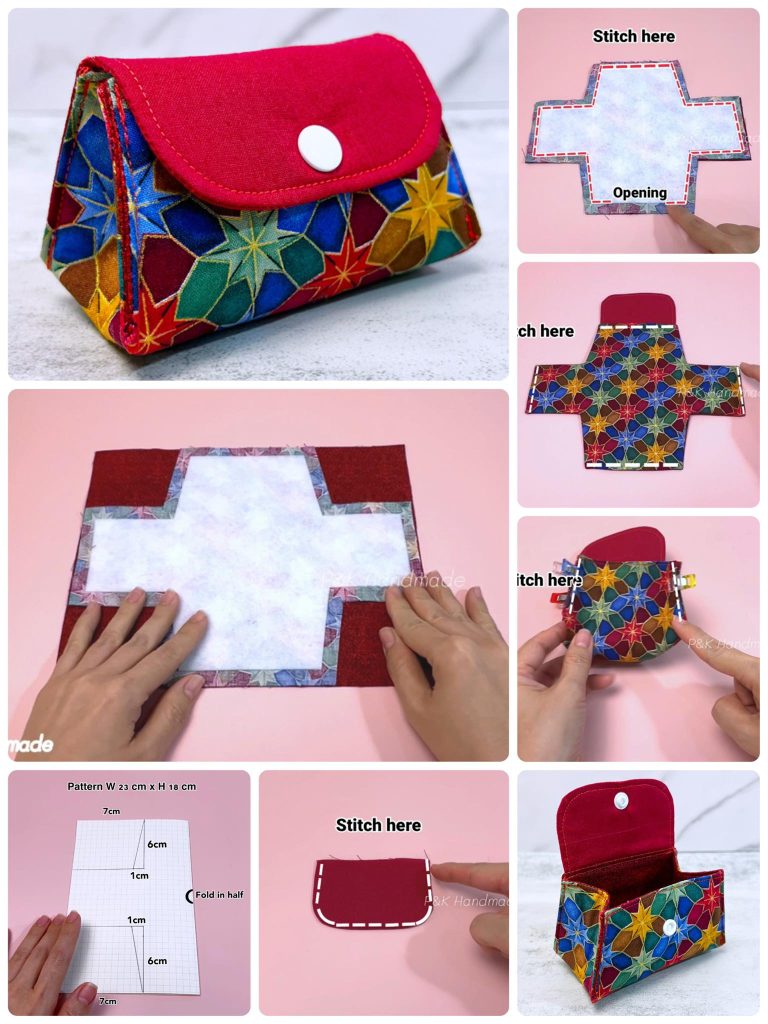
Throughout this article, we’ll keep the language simple and beginner-friendly. Each step is described clearly and thoroughly to help ensure your success. The COIN PURSE SEWING TUTORIAL also includes helpful tips and variations you can try once you’re comfortable with the basic version.
Before we get started, make sure to read through the entire tutorial first. This way, you’ll understand how all the steps connect and can prepare your materials in advance. Let’s dive into this delightful sewing project and create a charming coin purse from scratch!
To begin this COIN PURSE SEWING TUTORIAL, gather all your materials. Having everything prepared before sewing helps the process go more smoothly. This project is suitable for cotton fabrics, but you can also experiment with denim or linen for a sturdier option.
You will need two types of fabric: one for the exterior and one for the lining. Choose a cotton fabric that holds its shape well but is easy to sew. Avoid overly stretchy or slippery fabrics as they can complicate the process for beginners.
The interfacing gives the coin purse structure and helps it maintain its shape. Iron the interfacing to the wrong side of each outer fabric piece before sewing.
You will also need basic sewing supplies such as scissors or rotary cutter, sewing pins or clips, matching thread, a sewing machine, and an iron. Optional tools include a zipper foot and corner turner for clean finishes.
Once your pieces are cut, press them with an iron for crisp edges. This will make sewing easier and give your finished purse a professional appearance. You’re now ready to move on to the sewing steps
Let’s start sewing! The first phase in this COIN PURSE SEWING TUTORIAL is to attach the zipper and prepare the body of the purse. This step-by-step process is designed to help even total beginners succeed.
Place one outer fabric piece right side up on your work surface. Center the zipper face down along the top edge. Then place one lining piece right side down on top of the zipper, aligning all edges. Pin or clip everything together.
Using a zipper foot, sew along the top edge with a ¼-inch seam allowance. Be sure to sew slowly and carefully over the zipper teeth. Backstitch at the beginning and end to secure your seam.
Open up the sewn pieces and press the fabric away from the zipper, then topstitch close to the edge of the fabric for a neater finish. Repeat this process with the other side of the zipper and the remaining fabric pieces.
Now that both sides are attached, you’ll have a “fabric sandwich” with the zipper in the center. Make sure everything lines up and press all layers flat. It’s starting to look like a coin purse already!
Before sewing the full shape together, unzip the zipper halfway. This is important — it allows you to turn the purse right side out later. Don’t skip this step or you’ll struggle to finish the project.
Now we move on to assembling your purse. This part of the COIN PURSE SEWING TUTORIAL shows you how to stitch all the layers and form the actual body of the purse. Take your time and follow each step carefully.
Fold your fabric layers so that the outer fabrics are right sides together, and the lining pieces are also right sides together. Pin around the entire shape, matching seams and edges as closely as possible.
Sew around the perimeter using a ¼-inch seam allowance, but leave a 2-inch opening at the bottom of the lining fabric. This opening will be used to turn the coin purse right side out.
Clip the corners to reduce bulk, but be careful not to cut into your stitches. If your zipper is long, you can trim the excess at this stage too, but leave about ½ inch past the seam.
Now comes the fun part: reach into the lining opening and gently pull the fabric through to turn everything right side out. Use a corner turner or chopstick to gently push out the corners for a clean, sharp look.
Once the coin purse is fully turned, tuck in the raw edges of the lining opening and stitch it closed either by hand or using your machine with a narrow seam.
Push the lining into the outer shell and press everything flat. Zip and unzip the purse to check that everything works. You’ve now completed the main sewing steps in this COIN PURSE SEWING TUTORIAL!
Congratulations! You’ve reached the final part of this COIN PURSE SEWING TUTORIAL. Now it’s time to add finishing touches and think about ways to personalize your design.
If you want to add a wrist strap, you can sew a small fabric loop into the side seam before assembling the purse. This makes your coin purse even more convenient for on-the-go use.
Another way to customize your coin purse is to use decorative stitching or embroidery on the outer fabric before assembly. Monograms, small flowers, or even simple shapes can add a personal flair.
Want more structure? Consider using quilt batting instead of interfacing for a padded look and feel. This works great if you plan to carry small electronics or delicate items in the purse.
You can also experiment with different closures. Instead of a zipper, try using snaps, magnetic clasps, or even Velcro. However, zippers remain the most secure option, especially for coins and small valuables.
For those with advanced skills, try creating patchwork coin purses using small squares of fabric sewn together. This adds a colorful, textured element that makes each purse unique.
Finally, don’t forget to label or tag your creation if you plan to sell it or gift it. A small ribbon tag or sewn-in label adds a professional touch and makes your handmade item feel extra special.
Q: Can I sew this coin purse by hand?
A: Yes, you can sew the entire purse by hand using small, tight stitches, especially if you don’t have a sewing machine. It will take longer but still works beautifully.
Q: What type of fabric is best for this project?
A: Cotton is ideal for beginners. It’s easy to sew and holds its shape well. You can also use canvas, linen, or even denim for a more durable coin purse.
Q: How can I make a larger version of this coin purse?
A: Simply increase the size of your fabric pieces while keeping the proportions. For example, try 6” x 5.5” cuts and a 6” zipper for a slightly larger pouch.
Q: Can I use metal zippers?
A: While metal zippers can add a stylish look, they are harder to sew through. Beginners should stick to nylon zippers until they’re more confident.
Q: What is fusible interfacing and why is it needed?
A: Fusible interfacing is a material that adds structure. It’s ironed onto the fabric and makes the purse sturdier, helping it hold its shape over time.
Q: How do I wash my handmade coin purse?
A: Spot-cleaning is best for longevity. If machine-washing, use cold water and a gentle cycle, then air-dry to avoid shrinkage or damage.
We hope this detailed COIN PURSE SEWING TUTORIAL inspired you to create your own beautiful, functional coin purse from scratch. With clear steps, exact measurements, and helpful tips, this project is perfect for anyone ready to practice their sewing skills.
Remember, the joy of sewing comes from creating something useful with your own hands. And once you’ve made one purse, you’ll want to make more — for friends, family, or even to sell at local craft fairs.
This tutorial keeps everything beginner-friendly, but it also offers ideas for creative expansions. Use different fabrics, add embellishments, or play with closures. Let your imagination guide you.
Thank you for following along! If you enjoyed this COIN PURSE SEWING TUTORIAL, we’d love to hear from you. Leave a comment, share your thoughts, or tell us what kind of sewing tutorial you’d like next.
Your feedback helps us keep improving and offering more helpful content. Happy sewing — and may your coin purse be the first of many delightful creations!

