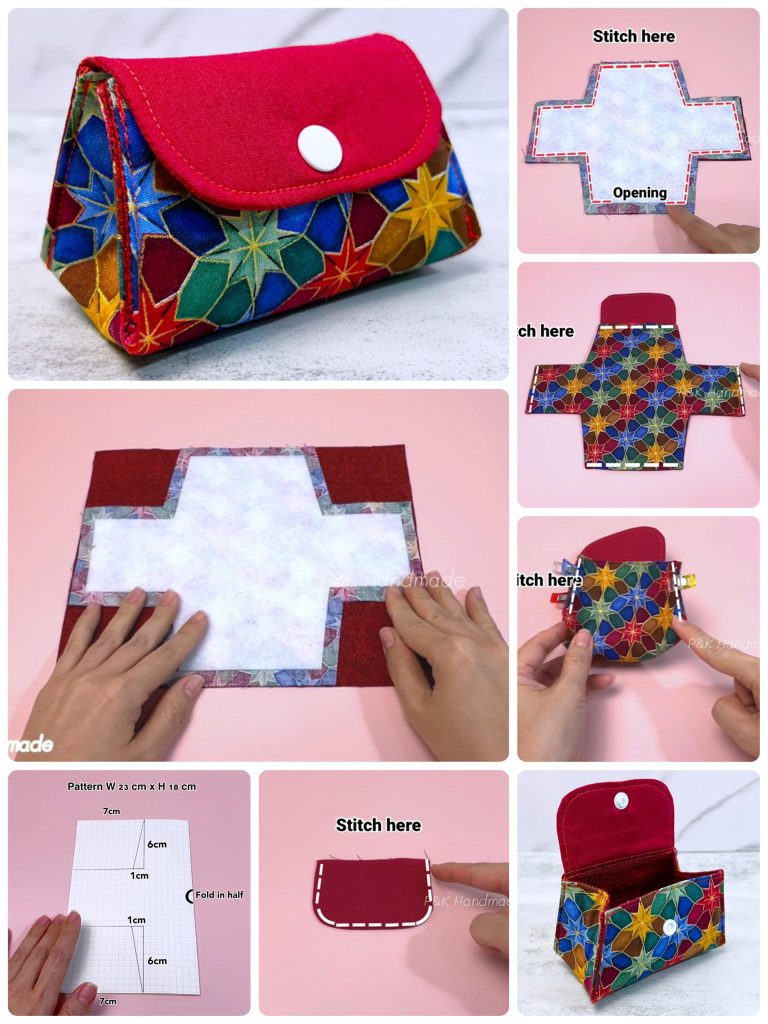
How to Make a Fabric Coin Purse Pattern
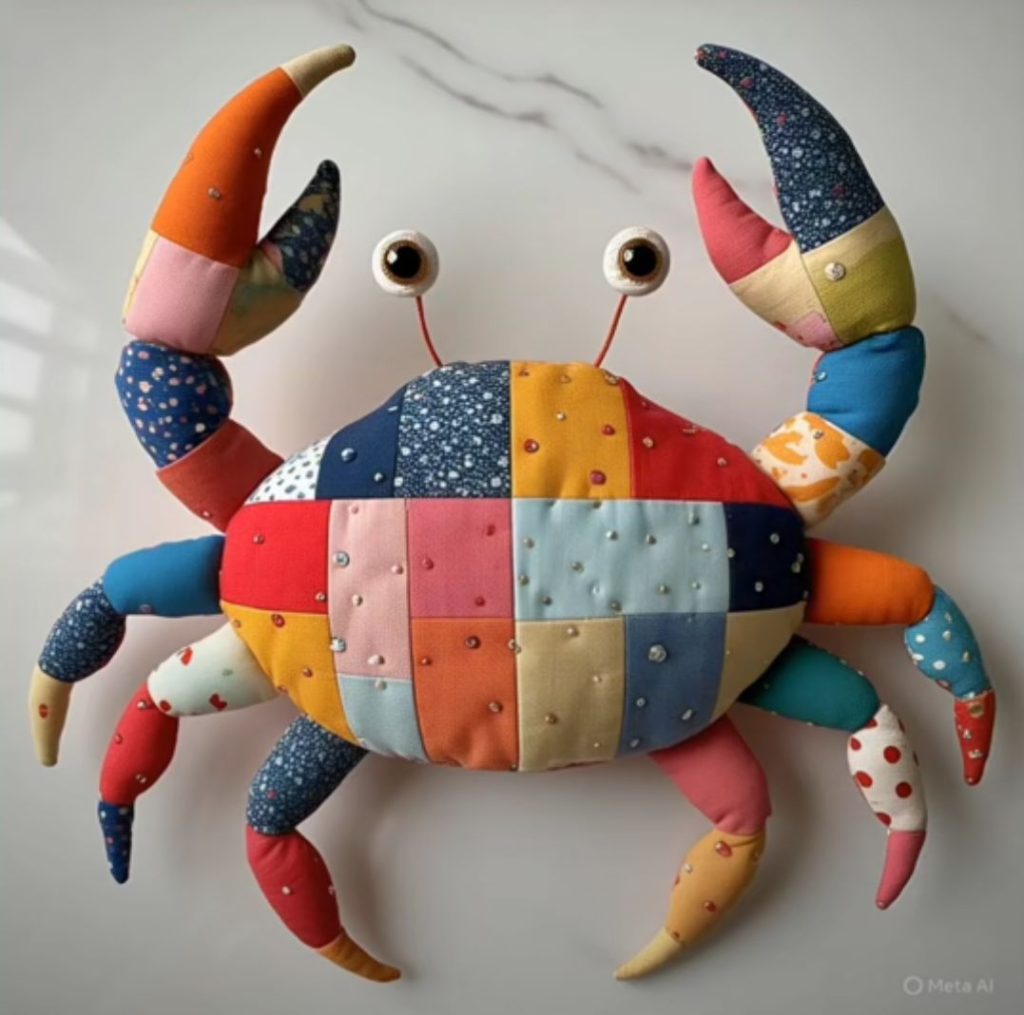
A Crab Pin Holder – Quilt Pattern is more than just a charming design—it’s a creative blend of function and artistry that quilters of all skill levels can enjoy. This delightful pattern combines whimsical crab shapes with practical pin-holding functionality, making it a must-have accessory in any quilting studio. Whether you’re looking to add a splash of coastal charm or searching for a small yet meaningful gift for a fellow crafter, the Crab Pin Holder – Quilt Pattern is a project full of fun and purpose.
This pattern isn’t just about looks. The unique crab shape serves a dual role: it adds personality to your quilting tools and also keeps pins organized and within reach. Designed with precision, this quilt block can be easily adapted into pincushions, wall décor, or even small pillow accents. The versatility makes it an ideal project for those who enjoy exploring multiple quilting formats using one charming template.
The Crab Pin Holder – Quilt Pattern offers both beginner-friendly simplicity and enough creative freedom for advanced quilters to customize details. From choosing vibrant fabric scraps to stitching each claw and leg, every step allows quilters to infuse their personal touch. If you’re ready to explore a joyful, sea-themed design that adds value to your sewing station, then this pattern will be a delightful addition to your quilting repertoire.
When starting your Crab Pin Holder – Quilt Pattern, choosing the right materials is crucial. High-quality cotton fabrics are the most recommended for this project due to their durability and ease of use. Opt for vibrant reds, oranges, and browns to mimic realistic crab tones, or have fun with bright, bold colors for a playful twist. Remember, your fabric choices can transform the entire aesthetic of your crab pin holder.
You’ll also need a good batting material for structure and volume. Since this pin holder will be frequently used, polyester fiberfill or wool batting can offer both softness and resilience. Consider a layer of fusible interfacing to add additional strength to the pincushion’s back and underbody.
For details like the crab’s eyes or claws, you can use small black buttons or embroider them for a more secure finish. Coordinating thread in similar or contrasting tones helps the stitching stand out or blend in, depending on your preference. Keep your sewing tools sharp, especially your fabric scissors and needles, to make clean and accurate cuts.
A rotary cutter and a small cutting mat will also simplify the cutting process, especially for the tiny pieces involved in creating the crab legs and body parts. These tools enhance precision and save time, especially for repetitive cuts. Also, keep some clips or pins handy to help hold pieces in place as you sew.
Lastly, consider using a heat erasable pen or fabric marker to draw your outlines before cutting. This step ensures clean lines and helps maintain proportion throughout the pattern. It’s a small step that can make a big difference in the final look of your Crab Pin Holder – Quilt Pattern.
To begin creating your Crab Pin Holder – Quilt Pattern, start by cutting out your main body pieces using a paper template or acrylic stencil. Cut two crab body shapes, one for the top and one for the bottom. Then move on to the smaller parts like legs and claws—cut in mirrored pairs to ensure symmetry.
Once your pieces are cut, begin assembling the front side. Sew the claws and legs to the top body piece using a quarter-inch seam allowance. Take your time here, as these smaller pieces require careful stitching. Press the seams flat with a warm iron for a neat finish.
Next, layer the back piece with the assembled front, right sides facing each other. Don’t forget to include your batting layer in between for that soft, cushioned effect. Pin or clip the layers securely, and stitch around the outer edge, leaving a small opening for turning.
After stitching, turn the crab right side out through the opening. Use a blunt tool like a chopstick to carefully push out all the edges and curves, making sure the claws and legs are fully turned. Now it’s time to stuff your pin holder with fiberfill—make sure it’s firm enough to hold pins securely, but not so tight that the seams stretch.
Close the opening with a ladder stitch or an invisible hand-sewn seam. If you’d like, you can add details like button eyes, embroidered mouthlines, or even some decorative topstitching around the body. This is your moment to personalize the Crab Pin Holder – Quilt Pattern and make it your own.
Your crab pin holder is now complete! Place it by your sewing machine, gift it to a crafty friend, or even make a few more to sell at local craft fairs. The versatility and charm of this project make it a rewarding experience from start to finish.
The Crab Pin Holder – Quilt Pattern offers a variety of opportunities for customization. One of the simplest ways to personalize your project is through fabric selection. Use novelty prints for a humorous twist or batik fabrics for a more artistic, ocean-inspired look. Seasonal fabrics can turn this design into holiday-themed gifts or decorations.
Add personality to your crab with expressive eyes. Googly eyes, felt cutouts, or embroidered expressions can bring your crab to life. Each eye style gives your project a different mood—from surprised to sleepy to playful. These small touches make your pin holder feel more like a character.
Another fun idea is to embellish the crab’s body with decorative stitching or quilting lines. You can echo the natural curves of a crab’s shell or create intricate patterns to add depth. Using metallic or glow-in-the-dark threads is a great way to add sparkle or fun to your design.
You might also explore alternative uses for your crab creation. Besides holding pins, it can be adapted into a keychain holder, a fridge magnet (using magnets in the back), or even a mini hand-warmer if you insert heat packs instead of stuffing. The shape and structure lend themselves well to functional creativity.
Children can get involved too. Let them help choose the fabrics, stuff the crab, or add their own finishing touches. This project can serve as a bonding activity between generations, introducing young ones to the joy of sewing while creating something fun together.
Ultimately, your crab can be anything you want it to be. By tweaking the size, fabric, and features, you can reinvent the Crab Pin Holder – Quilt Pattern in countless ways. Your imagination is the only limit to where this delightful little project can go.
Choosing to make and use a Crab Pin Holder – Quilt Pattern offers several practical benefits. First and foremost, handmade pin holders are customizable. Unlike mass-produced pincushions, yours can reflect your taste, color preferences, and crafting style. This creates a deeper connection with your tools.
They’re also better suited to your specific needs. Want it extra firm to hold long quilting pins? Prefer a flat bottom to prevent rolling? You’re in control of the design elements. You get functionality without sacrificing style, which enhances your overall sewing experience.
Another major benefit is sustainability. By making your own pin holder from fabric scraps and leftover batting, you reduce textile waste. This is a great way to upcycle remnants that would otherwise end up in landfills, supporting more eco-conscious crafting habits.
Handmade tools also bring a sense of accomplishment. There’s something fulfilling about creating your own sewing accessories, especially when they become part of your everyday practice. It adds joy and pride to the workspace—an often-overlooked benefit.
Gifting a handmade Crab Pin Holder – Quilt Pattern to a fellow quilter also spreads joy. It’s a thoughtful and practical gift that shows effort, care, and creativity. Whether as a birthday present or a thank-you gesture, it carries emotional value far beyond its function.
Lastly, these crab-shaped holders spark conversation. Visitors to your craft room or customers at a fair will notice the quirky shape and ask about it, giving you a chance to share your passion and maybe even inspire someone else to start quilting.
What is a Crab Pin Holder – Quilt Pattern used for?
It is a sewing accessory used to hold pins and needles, designed in the shape of a crab for both functionality and charm. It can also serve as a decorative element or small gift.
Is the Crab Pin Holder suitable for beginners?
Yes, the pattern is beginner-friendly and includes basic quilting techniques like cutting, piecing, and stuffing. It’s an excellent starting point for new quilters.
What materials do I need to make one?
You’ll need cotton fabric, batting or fiberfill, thread, scissors or rotary cutters, and optionally buttons or embroidery floss for details like eyes or outlines.
How long does it take to complete the project?
On average, this project can be completed in 1–2 hours, depending on your skill level and the complexity of the details you choose to add.
Can I sell Crab Pin Holders made from this pattern?
Yes, as long as the pattern allows for commercial use, many crafters sell handmade versions at markets or online platforms. Always check the pattern’s copyright terms.
Can I wash the Crab Pin Holder?
Yes, but hand washing is recommended, especially if you’ve used delicate embellishments or buttons. Let it air dry completely to maintain its shape and texture.
The Crab Pin Holder – Quilt Pattern is a fun, functional, and fantastic way to bring creativity into your quilting life. Whether you’re just starting out or have years of experience, this project blends personality and practicality in a way that few patterns do. From material selection to stitching the final seam, each step offers an opportunity to express your unique crafting voice.
We hope this article inspired you to try this adorable quilt pattern for yourself. If you’ve made one—or plan to—we’d love to hear your thoughts. Leave a comment below with your experiences, photos, or suggestions. Your feedback helps other quilters grow and brings our creative community even closer together.
