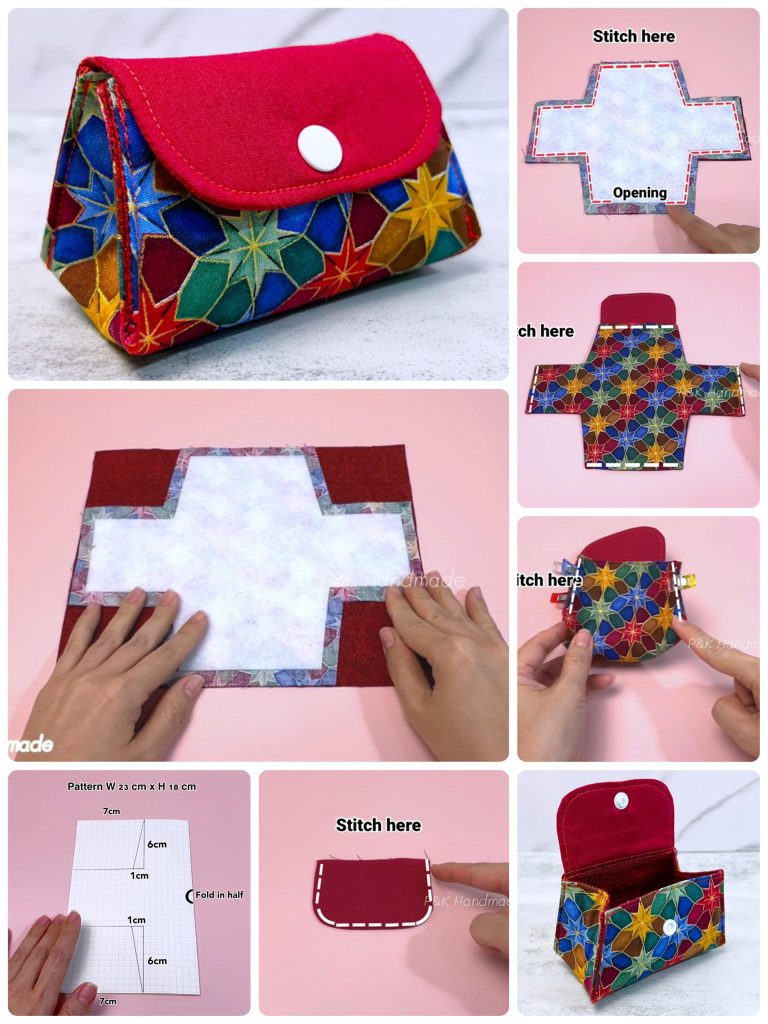
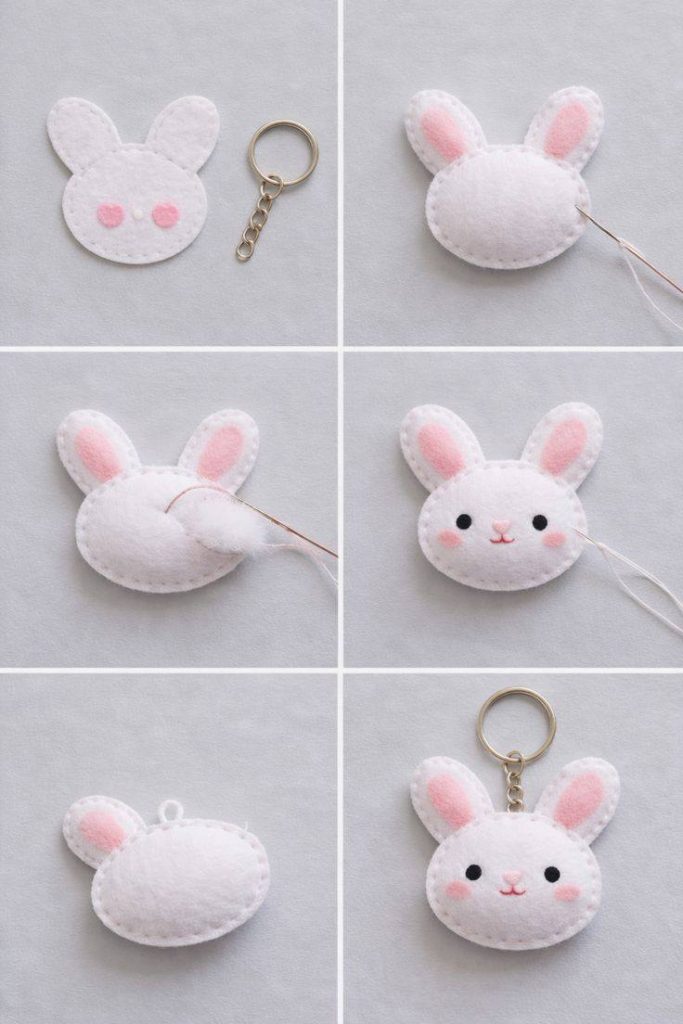
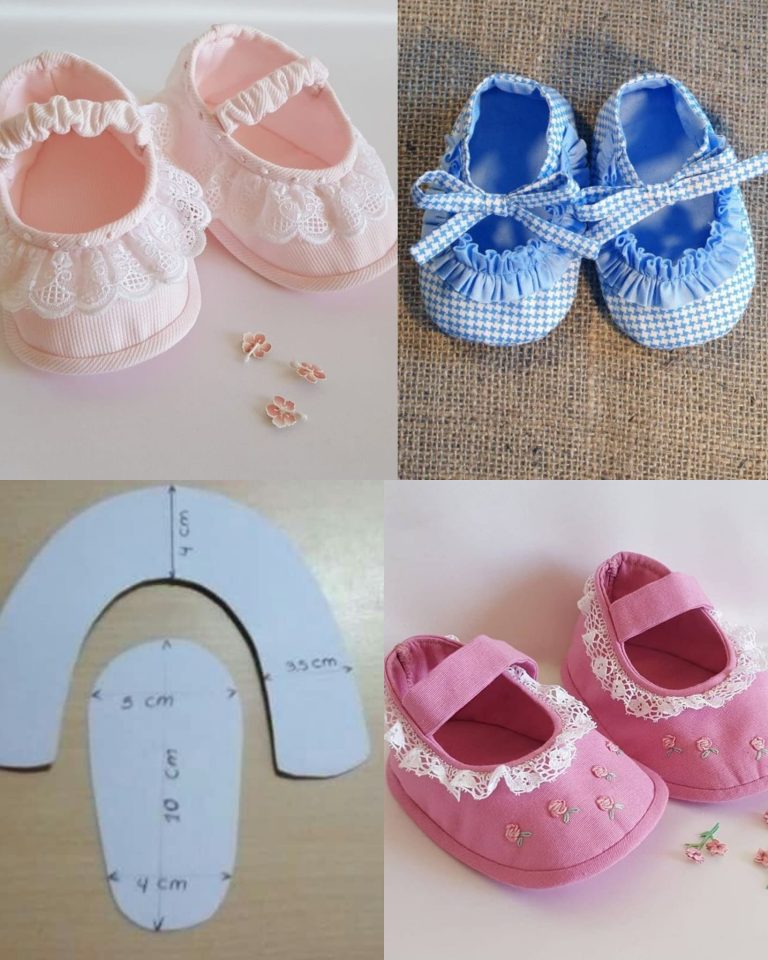
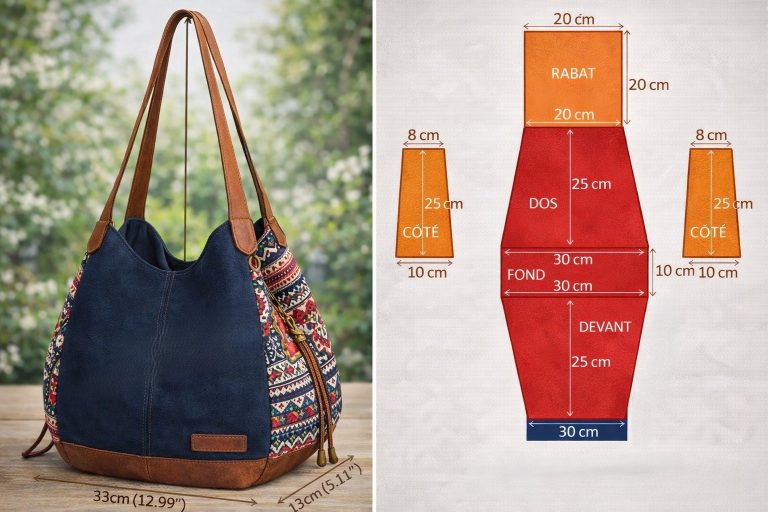
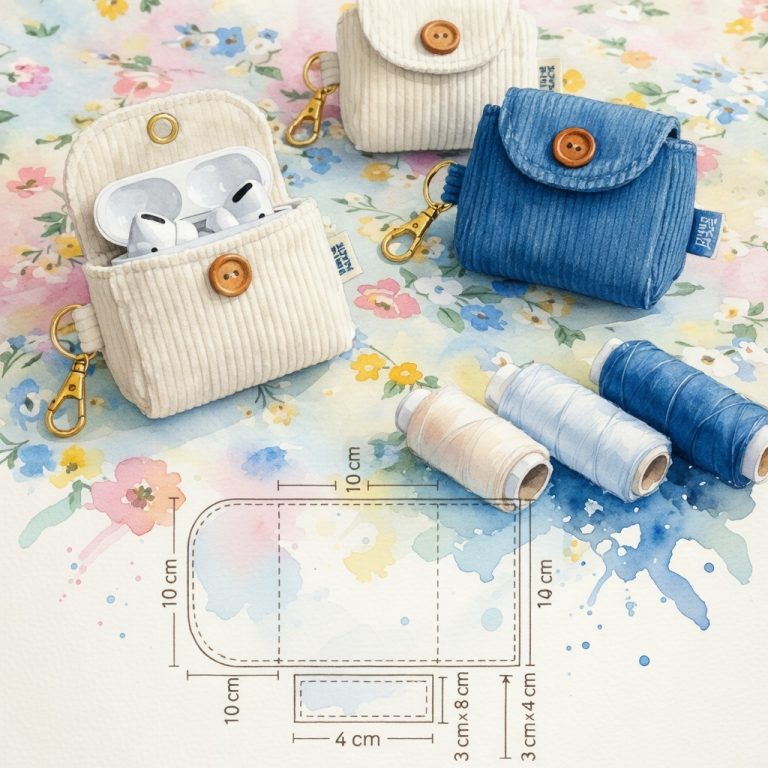
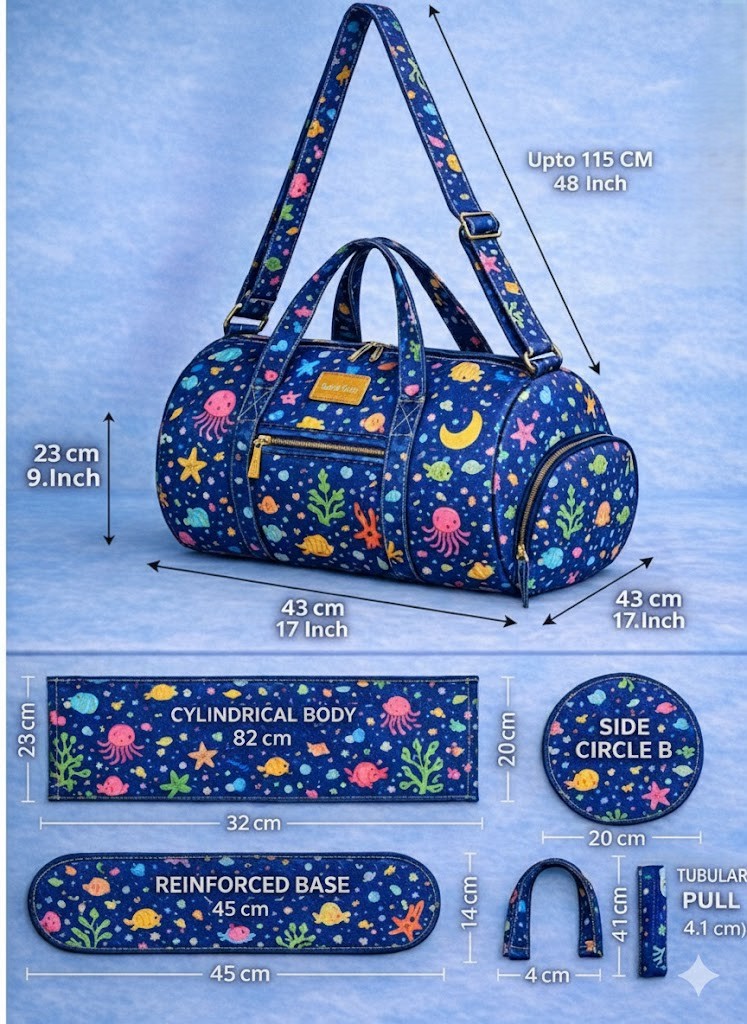
How to Make a Fabric Coin Purse Pattern
The Crossroads Block Quilt Pattern is one of those classic quilt designs that beautifully balances tradition and creativity. It’s a pattern that quilters of all skill levels love, thanks to its simple geometric layout and the endless possibilities for color combinations. Whether you’re a beginner looking for your first project or an experienced quilter aiming to create a timeless masterpiece, the Crossroads block offers an excellent opportunity to explore symmetry, precision, and artistry.
This quilt block is known for its iconic “cross” design that symbolizes the meeting of paths, making it not just a piece of fabric art but also a meaningful representation of connection and unity. The Crossroads Block Quilt Pattern can be used on its own for a full quilt or combined with other block styles to form unique patchwork designs. Its structure allows for endless variations, and you can easily adapt it to match any color palette or fabric style, from vintage florals to modern solids.
Learning to make the Crossroads Block Quilt Pattern is an exciting process that blends cutting accuracy with creative flair. Each block can be constructed using squares and rectangles, which makes it a great project to improve your piecing skills. Once you master one block, you’ll find it incredibly satisfying to see the repeating pattern emerge as the quilt grows. Let’s dive into the details of how to create and customize your own Crossroads Block Quilt.
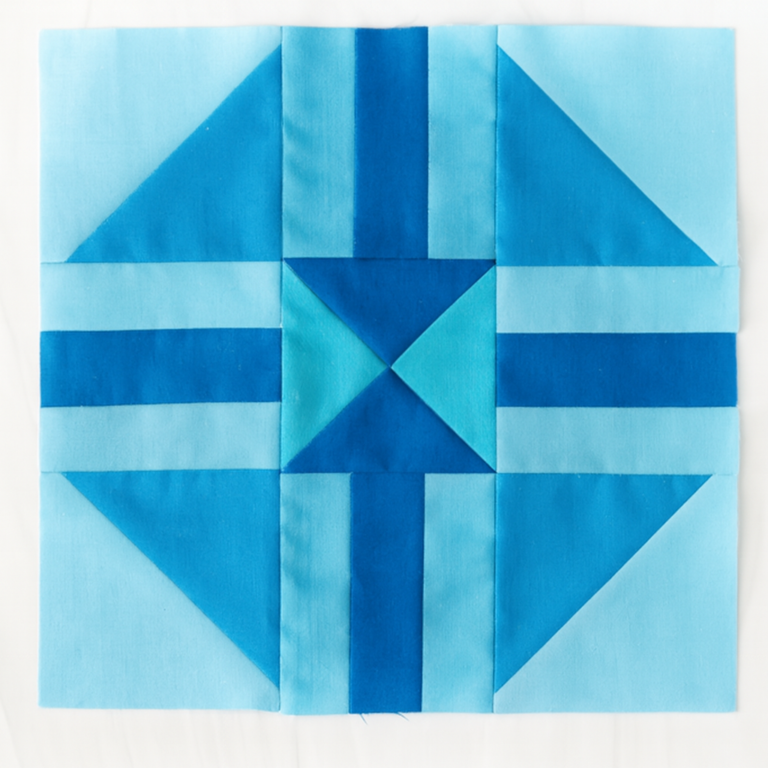
The Crossroads Block Quilt Pattern is typically constructed from a grid of simple shapes—usually a combination of squares and rectangles that form intersecting lines resembling a cross. This makes it not only visually striking but also relatively simple to sew. The block is based on symmetry, with a center square and crossing bands that radiate outward.
To begin, you’ll need to decide on your desired block size. Common dimensions for this quilt block are 12” x 12” or 10” x 10”, though it can easily be scaled up or down depending on your project. The precision of your cuts is crucial because the intersecting lines depend on straight edges and consistent seam allowances.
When selecting fabrics, think about contrast. The Crossroads Block Quilt Pattern looks best when there’s a distinct separation between the background fabric and the cross sections. You might use a bold, dark color for the cross and a lighter tone for the background, or even experiment with prints to add depth.
The beauty of this pattern lies in its adaptability. It can serve as a central motif for a larger quilt or as a repeated block pattern across the entire piece. Some quilters even incorporate it into table runners, pillow covers, or wall hangings to showcase its intricate yet straightforward design.
Once you’ve gathered your materials and chosen your color palette, it’s time to cut your fabric accurately. Precision cutting ensures that your seams align perfectly, maintaining the crispness of the crosses. A rotary cutter, self-healing mat, and clear ruler are essential tools for this step.
Finally, take your time assembling the first block. Lay out your pieces before sewing to ensure the pattern aligns correctly. This initial planning step saves time and fabric and helps you visualize how the finished quilt will look.
To start your Crossroads Block Quilt Pattern, cut your fabric into the necessary shapes. Typically, you’ll need four rectangles for the cross arms, one square for the center, and several background squares or strips depending on your layout. The measurements can vary, but maintaining uniformity is essential for a balanced look.
Arrange your pieces on a flat surface before stitching. This layout step is vital because it allows you to experiment with placement and color arrangement. You might notice that flipping certain fabrics can change the overall feel of the quilt.
Next, sew the rectangles together to form the cross shape. Use a ¼-inch seam allowance throughout the process to ensure consistency. Press each seam flat as you go; this step not only makes assembly easier but also gives your quilt block a clean, professional appearance.
Once your cross section is complete, attach the surrounding background pieces. Be sure that all seams align properly where the crossbars meet. Accuracy here ensures that your final quilt will have a smooth, even surface without warping.
After completing one block, measure it carefully to confirm it matches your desired size. Adjust your seam allowance slightly if necessary before proceeding with additional blocks. Small errors in measurement can multiply across multiple blocks, so double-checking early can prevent issues later.
Finally, repeat the process for as many blocks as you need. The Crossroads Block Quilt Pattern can be arranged in rows or diagonally, depending on your preferred final layout.
One of the most exciting aspects of the Crossroads Block Quilt Pattern is its versatility in color and layout. You can achieve dramatically different effects simply by changing your color palette. For a traditional look, use contrasting solids—like navy blue crosses on a white background. For a more modern aesthetic, consider pastels, ombré gradients, or bold geometric prints.
You can also play with negative space by reversing the traditional color placement. Use dark fabrics for the background and light tones for the crosses to create a stunning inversion of the usual pattern. This technique often adds depth and visual interest to the finished quilt.
Another design idea is to alternate blocks of the Crossroads Block Quilt Pattern with simpler patchwork squares. This approach breaks up the repetition and highlights the intricate details of each cross block.
Some quilters enjoy incorporating texture by mixing fabric types. Try using linen, cotton, or even batik prints to create tactile contrast. Just remember that fabrics should be prewashed and of similar weight to ensure smooth stitching.
If you’re feeling adventurous, experiment with size variation. You can create a quilt that features both small and large Crossroads blocks arranged in a dynamic, mosaic-like pattern.
Lastly, consider adding sashing or borders between blocks. This not only helps frame the design but also gives your quilt structure and balance, especially if your colors are bold or highly contrasting.
Once all your blocks are assembled, it’s time to join them together into the final quilt top. Arrange your blocks in a layout that feels harmonious, balancing colors and patterns across the quilt. Sew the rows together, then join the rows to complete the quilt top.
Next comes layering. For your Crossroads Block Quilt Pattern, use a quality batting and a soft backing fabric that complements your front design. Baste the layers carefully using safety pins, spray adhesive, or hand stitching to prevent shifting during quilting.
When it’s time to quilt, there are many techniques you can choose from. Straight-line quilting emphasizes the geometric nature of the Crossroads design, while free-motion quilting can add a more organic, artistic flair. Both approaches work beautifully with this pattern.
Be mindful of thread color—choose a shade that blends seamlessly or one that stands out to highlight your stitching. The Crossroads Block Quilt Pattern benefits from both subtle and decorative quilting styles depending on your vision.
Once quilting is complete, trim any excess fabric and batting. Attach the binding around the edges to give your quilt a polished finish. Double-fold binding tends to be the most durable option, especially for quilts that will see frequent use.
Finally, give your quilt a gentle wash and dry to soften the fabric and allow the stitches to settle. Seeing the finished piece come to life is incredibly rewarding—each cross symbolizing creativity, patience, and craftsmanship.
1. What size should I cut my fabric for the Crossroads Block Quilt Pattern?
A common size is a 12” block, but you can adjust it depending on your project. Just keep the proportions consistent when scaling up or down.
2. Is the Crossroads Block suitable for beginners?
Yes, it’s a great pattern for beginners. The block uses simple shapes and straight seams, making it an excellent introduction to quilting basics.
3. What fabrics work best for this quilt?
100% cotton fabrics are ideal because they are durable, easy to sew, and press well. You can mix prints and solids for visual interest.
4. Can I make a full quilt using only Crossroads blocks?
Absolutely! Many quilters create entire quilts using only this block. You can also mix it with other block styles for a more eclectic look.
5. How can I make my seams align perfectly?
Accuracy starts with precise cutting and a consistent ¼-inch seam allowance. Press seams carefully after each step to ensure they lay flat.
6. Do I need special tools for this pattern?
Basic quilting tools—such as a rotary cutter, cutting mat, clear ruler, sewing machine, and iron—are all you need to get started.
The Crossroads Block Quilt Pattern is more than just a sewing project—it’s a creative journey that connects quilters through generations. Its timeless design and adaptability make it an ideal choice for beginners and experienced makers alike. By understanding fabric choices, mastering your cutting accuracy, and exploring different color combinations, you can bring this beautiful pattern to life in your own unique way.
Now that you’ve learned how to create your own Crossroads Block Quilt Pattern, we’d love to hear from you! Share your honest opinions, creative suggestions, or personal experiences with this classic quilt design. Your insights can inspire other quilting enthusiasts to embark on their own Crossroads quilting adventure.


