
Bird Quilt Block Pattern
Dear comfort-circle quilt friends, welcome to a heartwarming crochet journey where comfort meets creativity. Whether you’re a seasoned quilter exploring new techniques or a crochet enthusiast diving into something new, this guide is tailored especially for you. The blend of quilting aesthetics with crochet softness is what makes this pattern a delightful and unique project for all crafters.
In this post, we’ll walk you through every detail of the Dear comfort-circle quilt friends pattern — from fabric cuts to crochet stitches — so you can make your own heartfelt masterpiece. This pattern is especially meaningful for those who love gifting handmade pieces of warmth and joy to their loved ones or charity.
With precise instructions and step-by-step guidance, you’ll soon be stitching together a crochet quilt that not only looks beautiful but also tells a story of care and connection. Let’s explore this cozy world of stitches, shapes, and soft textures together.

One of the most exciting parts of making the Dear comfort-circle quilt friends crochet pattern is selecting your colors and materials. A thoughtful combination of yarns and fabric prints can make your finished quilt truly shine.
Start by choosing your yarn. A soft worsted-weight cotton or cotton blend yarn works best for this pattern. It gives the quilt enough structure while keeping it soft and cuddly.
For this quilt, you’ll be combining quilted fabric circles with crochet borders. Choose quilting cotton fabrics in coordinating colors or mix solids and prints for a patchwork effect.
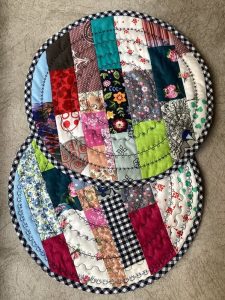
You’ll need 12 fat quarters or 1/4 yard cuts of quilting fabric for the circles. Each fabric cut should measure at least 10” x 10” (25.4cm x 25.4cm) to allow for a 9” circle plus seam allowances.
For the crochet borders, you’ll need approximately 800g of worsted-weight yarn in a neutral color like white, cream, or gray to bring all the circles together cohesively.
Don’t forget the batting! Use lightweight quilt batting cut slightly smaller than your fabric circles — about 8.5” in diameter — to reduce bulk in the seams.
Lastly, you’ll need a circle template (9” diameter), scissors or rotary cutter, yarn needle, and a 4.5mm crochet hook. These tools will help you stay precise as you work through the Dear comfort-circle quilt friends pattern.
Precision is key when preparing your fabric pieces for the Dear comfort-circle quilt friends crochet quilt. This section will guide you through cutting and prepping your circles for crochet edging.
Begin by making or printing a 9” circle template out of cardstock or template plastic. This will serve as your guide for cutting each fabric piece.
Place your template on the back of your fabric square and trace around it using a fabric-safe marker or chalk. Cut out 24 fabric circles using sharp scissors or a rotary cutter.
Cut 24 matching circles from lightweight batting, about 8.5” in diameter. This slightly smaller size reduces the bulk in your finished quilt.
For each quilt block, create a sandwich: place the batting between two fabric circles with right sides facing out. Pin in place and baste around the edge using a sewing machine or hand stitching.
Once your fabric sandwiches are ready, you’ll need to prepare the edges for crochet. Using a blanket stitch and embroidery floss, stitch evenly around the edge of each circle about 1/4″ from the edge.
Make sure your stitches are evenly spaced—ideally 1/4″ apart—so you’ll have consistent points to work your crochet border. This helps maintain the circular shape and allows for a neat finish.
This is where the magic begins — transforming quilted circles into a connected, comforting masterpiece using crochet. The Dear comfort-circle quilt friends crochet edging brings the entire quilt together with texture and warmth.
Insert your crochet hook through the blanket stitch of one circle and pull up a loop with your yarn. Chain 1 to start, then work one round of single crochet evenly around the edge, placing one stitch in each blanket stitch.
At the end of the round, join with a slip stitch and fasten off. Repeat this edging process for all 24 quilted circles.
Next, decide on your layout. You can place the circles in a 4 x 6 rectangle, a square format, or any arrangement that suits your space or purpose.
To join the circles, you’ll use a flat slip stitch seam or a single crochet join. Place two circles wrong sides together and insert your hook through the outer loops of both circles’ edging stitches. Slip stitch all the way across.
Continue joining all your circles in rows, then join the rows together in the same way. The joins become part of the design, forming an almost lacy connection between each block.
After all the circles are joined, you can choose to add a final crochet border around the whole quilt for a finished look. A round or two of double crochet with a picot edge adds charm and stability.
You’re almost done with your Dear comfort-circle quilt friends crochet quilt! Now it’s time to add the finishing touches that make your project shine.
Block your finished quilt to smooth out the seams and align the circle edges. Wet blocking works well for cotton yarn and fabric. Simply dampen the quilt and pin it into shape on a foam board or towel.
Let the quilt air dry completely. This helps set the shape and gives it a more professional look. If needed, steam with a low-heat iron, avoiding direct contact with the yarn.
If you’ve added a crochet border, weave in all the yarn ends carefully with a yarn needle. Make sure all the joins are secure before gifting or using your quilt.
To care for your quilt, machine wash on gentle cycle with cold water and lay flat or tumble dry on low heat. Avoid bleach or harsh detergents to maintain the color and softness.
This quilt makes a thoughtful gift for loved ones, a cozy lap quilt, or a treasured heirloom. Its circular design and heartfelt craftsmanship make it a standout piece in any home.
Above all, be proud of the time and care you’ve invested. Each stitch in your Dear comfort-circle quilt friends pattern tells a story of creativity, comfort, and connection.
What type of yarn is best for this quilt?
Use soft worsted-weight cotton or cotton-blend yarn for durability and comfort. Avoid stretchy or fuzzy yarns, which can distort the shape of the circles.
Can I use other shapes instead of circles?
The charm of the Dear comfort-circle quilt friends pattern lies in its unique circular blocks, but you can experiment with hexagons or octagons for a similar effect.
How many fabric circles do I need?
You’ll need 24 quilted circles for a medium-sized throw. Feel free to add more for a larger quilt.
Is this quilt suitable for beginners?
Yes! It’s perfect for confident beginners comfortable with single crochet and basic sewing. The combination of handwork and crochet offers a gentle learning curve.
Can I use pre-quilted fabric?
Yes, pre-quilted fabric can save time. Just be sure it’s not too thick, or it may be difficult to stitch and crochet through.
What size is the finished quilt?
With 24 circles joined in a 4 x 6 layout, the finished quilt measures approximately 48” x 72” depending on your seam width and crochet tension.
The Dear comfort-circle quilt friends crochet quilt is more than a crafting project — it’s a heartfelt expression of warmth, care, and artistry. From selecting your fabrics and yarns to joining each quilted circle with love, every step reflects your dedication and creativity.
By combining quilting techniques with the cozy texture of crochet, you create something truly unique and meaningful. Whether it’s a gift, a keepsake, or a charitable contribution, this quilt carries comfort and connection in every stitch.
We hope this guide helps you bring your Dear comfort-circle quilt friends crochet quilt to life. If you enjoyed this pattern, let us know in the comments or share your finished quilt with us. Your feedback and creations inspire the whole crafting community!


