Diamond and Trapezoid Cloth Block 3D: How to Make This Stunning Quilt Pattern
Advertising
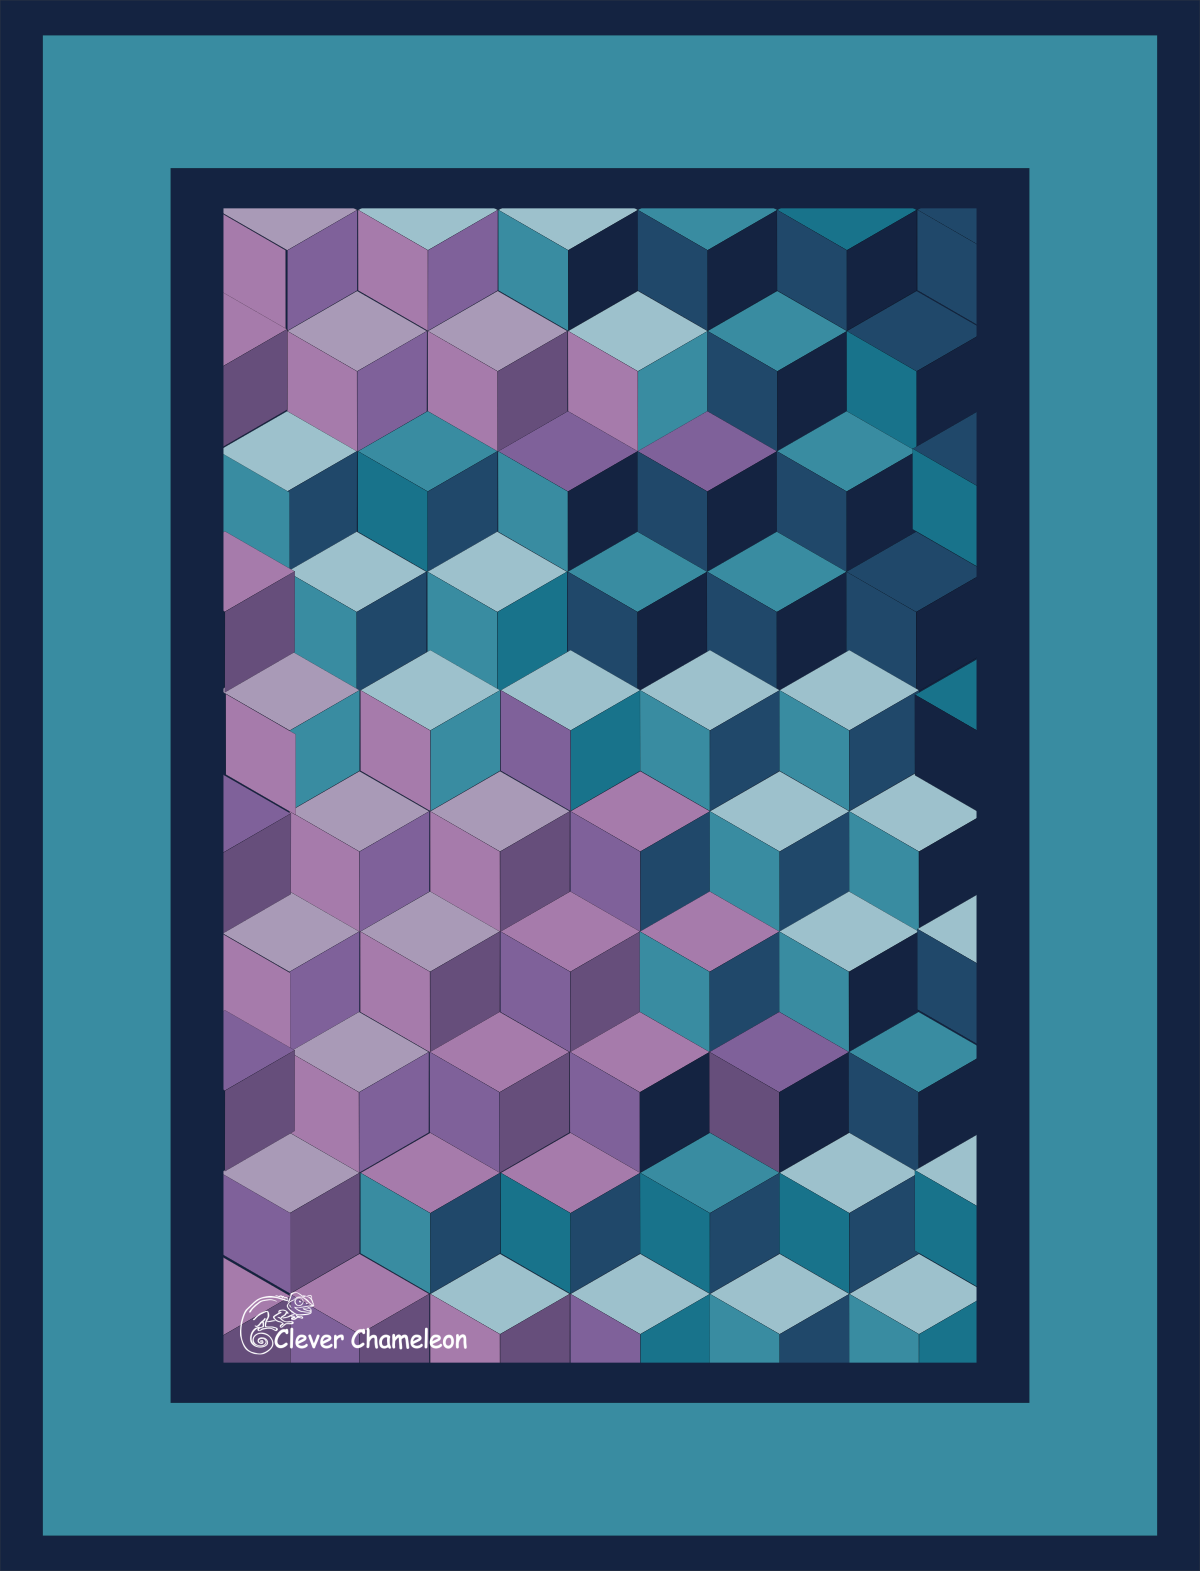
Creating a Diamond and Trapezoid Cloth Block 3D is an exciting way to add depth and movement to your quilting projects. This geometric design brings a visually striking effect, making it an ideal choice for those looking to enhance their quilting skills. By using precise fabric cuts and careful assembly, you can create a quilt that appears to have a three-dimensional structure.
This pattern is perfect for both beginners and experienced quilters who want to experiment with shapes and optical illusions. The combination of diamonds and trapezoids gives the quilt a dynamic look, resembling a cascading or interlocking effect. With the right fabric choices, the design can either be subtle and elegant or bold and eye-catching.
Advertising
In this step-by-step guide, we will walk you through everything you need to know to create a Diamond and Trapezoid Cloth Block 3D quilt. From fabric selection to precise cutting techniques, sewing instructions, and final assembly, you will have all the details needed to bring this pattern to life.
To make a Diamond and Trapezoid Cloth Block 3D, you will need specific fabric pieces in precise measurements. The right choice of colors and contrasts will enhance the three-dimensional effect of the quilt pattern.
Fabric selection: Choose at least three coordinating colors—one light, one medium, and one dark—to create contrast and depth. Cotton fabric works best for precise cutting and sewing.
Cutting tools: A rotary cutter, cutting mat, and quilting ruler are essential for accuracy.
Sewing supplies: Thread that matches your fabric, sewing machine, and an iron for pressing seams.
Diamond pieces: Cut 4-inch by 4-inch diamond shapes. Ensure accuracy to maintain symmetry in the quilt pattern.
Trapezoid pieces: Cut 2.5-inch by 4-inch trapezoids. These pieces will connect the diamonds to form the 3D illusion.
Background fabric: Cut strips measuring 3-inch by 6-inch to frame the quilt blocks and enhance contrast.
Having all materials ready before starting ensures a smooth sewing process and prevents interruptions. Organizing your fabric pieces by color and shape will help maintain a structured workflow.
## Cutting and Preparing Fabric Pieces
Advertising
Precision is key when cutting fabric for the Diamond and Trapezoid Cloth Block 3D quilt. Each piece must be accurately measured and cut to maintain the geometric effect of the pattern.
Cutting diamonds: Using a quilting ruler, measure and cut diamond shapes precisely. Each piece should be equal in size to create uniformity.
Cutting trapezoids: Place your fabric strips on the cutting mat and use a ruler to measure 2.5-inch by 4-inch trapezoid shapes.
Aligning fabric grain: Ensure that all cuts follow the grain of the fabric to prevent stretching or distortion.
Sorting fabric pieces: Arrange your diamond and trapezoid pieces by color to make assembly easier.
Pressing fabric: Use an iron to press all pieces before sewing. This helps prevent wrinkles and makes stitching more precise.
Checking measurements: Double-check all pieces to ensure they match in size. Any discrepancies can affect the final quilt block alignment.
With all fabric pieces properly cut and prepared, the next step is assembling the quilt blocks into the 3D pattern.
## Sewing the Diamond and Trapezoid Blocks
Now that all fabric pieces are ready, it’s time to start sewing the Diamond and Trapezoid Cloth Block 3D quilt blocks. Following the correct order ensures a smooth construction process.
Arranging the pieces: Lay out one diamond in the center and place trapezoids on opposite sides.
Stitching the trapezoids: Sew one trapezoid to each side of the diamond, using a ¼-inch seam allowance.
Pressing the seams: After sewing each piece, press the seams open to reduce bulk and ensure a flat quilt top.
Adding background fabric: Sew the 3-inch by 6-inch strips around the finished block to frame the design.
Checking alignment: Ensure that all pieces fit together without gaps or misalignments.
Repeating the process: Continue sewing multiple blocks until you have enough to complete your desired quilt size.
By maintaining consistency in sewing, you will create a quilt top with a flawless 3D diamond and trapezoid pattern.
## Final Assembly and Quilting Techniques
Once all quilt blocks are sewn, it’s time to assemble them into the final quilt layout. This step brings everything together and enhances the overall visual effect.
Laying out the blocks: Arrange all finished blocks on a flat surface to determine the best layout.
Sewing rows together: Stitch the quilt blocks together row by row, ensuring seam alignment for a professional finish.
Pressing the entire quilt top: Use an iron to press all seams flat, which will make quilting easier.
Adding a border: Consider adding a border using 3-inch fabric strips to frame the design.
Layering the quilt: Place the quilt top over batting and backing fabric, then baste them together.
Quilting and finishing: Choose a quilting technique that complements the Diamond and Trapezoid Cloth Block 3D effect, such as straight-line quilting or free-motion stitching.
With the quilt assembled and quilted, the final step is binding the edges to give it a polished and durable finish.
By following this comprehensive guide, you can successfully create a Diamond and Trapezoid Cloth Block 3D quilt that showcases depth, movement, and precise craftsmanship. Happy quilting!