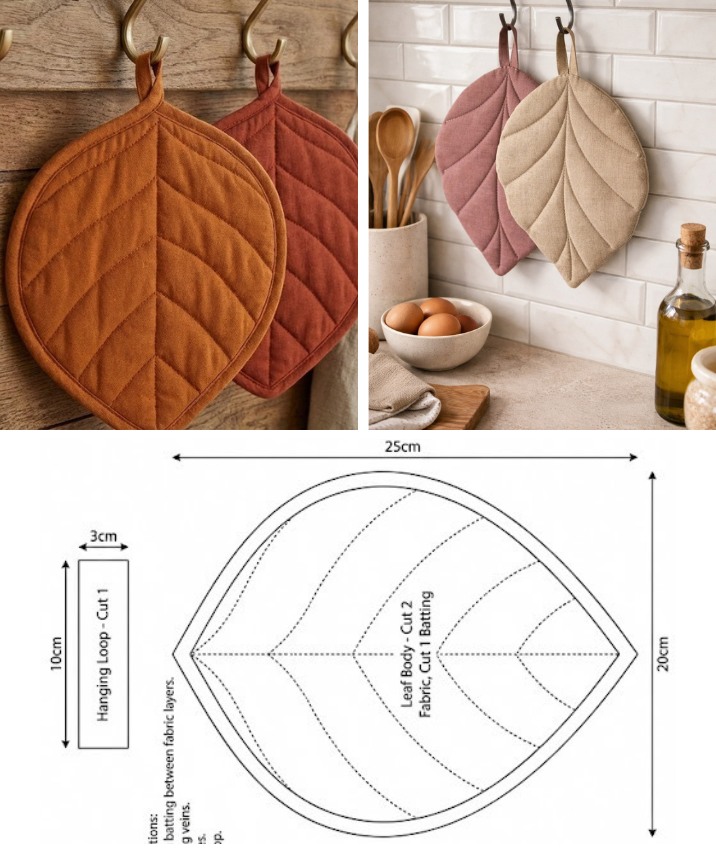
Padding leaf-shaped pot holder Pattern
If you are searching for a fun and creative sewing project, the Digby Scrappy Dog is the perfect choice. This adorable stuffed dog pattern is designed to use fabric scraps, giving new life to leftover materials. With its charming, scrappy look, Digby becomes a unique handmade toy or gift that everyone will love.
The Digby Scrappy Dog is not only beginner-friendly but also a fantastic way to practice basic sewing skills. Whether you are making it for a child, a friend, or simply as a cute decoration for your home, this pattern offers both fun and satisfaction. Plus, it’s an eco-friendly craft that encourages fabric recycling.
In this detailed guide, you will learn how to make the Digby Scrappy Dog from start to finish. The article includes fabric cuts, measurements, step-by-step instructions, and helpful tips to ensure your sewing project turns out perfectly. Get ready to create something truly special with this delightful scrappy dog pattern.

Creating the Digby Scrappy Dog starts with gathering the right materials and preparing your fabric cuts. This project is designed to use various fabric scraps, giving your dog a patchwork, charming appearance.
To begin, collect cotton fabric scraps in different colors and patterns. You’ll need pieces large enough to cut the body parts of the Digby Scrappy Dog. Mixing patterns like florals, stripes, dots, and solids adds to its scrappy charm.
Here are the fabric cuts and measurements you’ll need:
You’ll also need:
Prepare all your fabric pieces before you start assembling the Digby Scrappy Dog. Having everything ready makes the sewing process smoother and more enjoyable.
The head is one of the most expressive parts of the Digby Scrappy Dog, and assembling it correctly is essential. Follow these simple steps to create a cute and scrappy face.
Start by attaching the nose patch to one of the head pieces. Place it in the center lower part and stitch around the edge using a small zigzag or straight stitch for a secure hold.
Next, sew the two eye patches onto the same head piece, placing them symmetrically above the nose. You can use buttons or embroidery for the eyes at this stage or leave that for the finishing step.
Take the two ear pieces for one ear and place them right sides together. Sew around the sides, leaving the top open. Turn the ear right side out and press. Repeat for the other ear.
Pin the ears to the top corners of one head piece, facing inward (the raw edge of the ears aligns with the raw edge of the head). Place the second head piece on top, right sides together, sandwiching the ears in between.
Sew around the head, leaving the neck open. Clip curves, especially around the nose and ears, then turn the head right side out. Give it a gentle press to smooth the seams.
Finally, prepare the head gusset. Pin it starting from the top center of the head and sew along one side to create depth and shape. Repeat for the other side. The Digby Scrappy Dog head now has its adorable scrappy character.
Now that the head is complete, it’s time to move on to the body and legs of the Digby Scrappy Dog. This part gives the dog its structure and scrappy style.
Begin with the legs. Place two leg pieces right sides together and sew around the sides, leaving the top open. Turn right side out and stuff lightly with fiberfill. Repeat this for all four legs.
Prepare the tail the same way as the legs. Place the two tail pieces right sides together, sew around the curve, and leave the straight edge open. Turn it right side out and press. You can stuff it lightly if desired.
Lay one body piece flat with the right side facing up. Position the legs at the bottom and the tail at the back where indicated on your template or pattern. Baste them in place using a long straight stitch close to the edge.
Place the second body piece on top, right sides together, matching all edges. Pin securely, making sure the legs and tail are sandwiched between the two body layers.
Sew around the body, leaving the neck and a small section on the belly open for turning and stuffing. Clip the curves and corners to help the fabric lay flat after turning.
Turn the body right side out and smooth the seams. The Digby Scrappy Dog is starting to take shape, with its scrappy legs and tail adding personality to the body.
The belly gusset gives the Digby Scrappy Dog a rounded, plush shape and is an important step in the construction process.
Pin one end of the belly gusset to the front of the body at the neck opening. Align the gusset along the curve of the belly and pin it all the way around to the back end.
Sew the gusset to one side of the body first, starting from the neck to the back. Then repeat the process on the other side. This will create a three-dimensional body with enough space for stuffing.
Attach the head to the body by aligning the open neck edges. Pin securely and sew around the neck opening to connect the head and body.
Now it’s time to stuff the Digby Scrappy Dog. Begin with the legs, making sure they are firm enough to support the body. Then stuff the body firmly but not overly tight to maintain softness. Finish with the head, adjusting the stuffing to achieve the desired shape.
Sew the opening on the belly closed using a ladder stitch for an invisible finish. Take your time to make it neat and secure.
Finish the face details. If you haven’t already, add button eyes or embroider the eyes using black thread. You can also embroider the mouth and add any extra details like a collar or name tag to personalize your Digby Scrappy Dog.
With the basic Digby Scrappy Dog completed, you can now add finishing touches and personalize your scrappy friend. This step allows your creativity to shine.
Consider adding a cute fabric collar with a small button or a charm. This small detail makes the Digby Scrappy Dog even more adorable and unique.
You can stitch the dog’s name or a little heart onto one side of the body. Use embroidery thread in a contrasting color to make it pop against the scrappy fabrics.
If you have extra scraps, create a small patch or heart and applique it onto the dog’s side or back. This adds an extra layer of scrappy charm and personality.
For a more playful look, use felt or fleece to make spots or patterns on the dog’s body. Cut circles or other shapes and sew them onto the body before assembling.
Try experimenting with different fabric textures. Combine cotton with flannel, denim, or linen to give your Digby Scrappy Dog a variety of feels and appearances.
Lastly, you can make multiple Digby Scrappy Dogs in different color themes—bright and playful, pastel and soft, or neutral and rustic—to create an adorable collection for gifting or decorating.
Can I make the Digby Scrappy Dog by hand without a sewing machine?
Yes, the Digby Scrappy Dog can be made entirely by hand using a backstitch for strength. It will take more time but works beautifully.
What is the best fabric for Digby Scrappy Dog?
Cotton scraps are ideal due to their stability, but you can mix in flannel, denim, or linen for texture variety.
Is this pattern suitable for beginners?
Absolutely! The Digby Scrappy Dog is beginner-friendly and a perfect project to practice basic sewing and stuffing techniques.
Can I sell Digby Scrappy Dogs made from this pattern?
If the pattern designer allows it, yes. Always check the terms of use for the specific pattern you’re using.
How big is the finished Digby Scrappy Dog?
The finished dog is approximately 12 inches (30 cm) long from nose to tail, depending on seam allowances and stuffing.
Can I wash the Digby Scrappy Dog?
Yes, if you use washable fabrics and secure stitches, the Digby Scrappy Dog can be hand-washed. Avoid machine washing to preserve its shape.
Creating the Digby Scrappy Dog is a joyful and rewarding sewing project. Not only does it help reduce fabric waste, but it also results in a delightful handmade toy full of character and charm. With the step-by-step guide, fabric cuts, and customization ideas provided in this article, you are fully equipped to craft your very own scrappy dog.
If you enjoyed this tutorial, leave a comment below and share your experience. Have you tried different fabrics, sizes, or added unique touches? We’d love to hear about your version of the Digby Scrappy Dog.


