
Stairway To Heaven Quilt Pattern
The Disappearing Nine Patch Quilt Block Tutorial – Quilt Pattern is one of the most beloved and versatile quilting techniques in the sewing world. Known for its ability to turn a simple block into something truly stunning, this method combines ease of creation with a complex and elegant final look. Whether you’re a beginner looking for an approachable yet impressive project or an experienced quilter seeking to add a creative twist to your collection, this pattern is an excellent choice.
At its core, the Disappearing Nine Patch Quilt Block Tutorial – Quilt Pattern starts with a classic nine patch block. From there, strategic cuts and rearrangements create an entirely new block design that looks intricate but is surprisingly simple to sew. This makes it ideal for quick quilting projects, as well as large-scale quilts that require multiple repeating blocks. The name “disappearing” comes from the magical transformation that happens when the original block is sliced apart and sewn back together.
The beauty of the Disappearing Nine Patch Quilt Block Tutorial – Quilt Pattern is that it can be personalized in countless ways. Fabric choices, color combinations, and block arrangements can completely change the mood of the quilt. From bright, cheerful baby quilts to sophisticated, muted-toned bedspreads, this pattern adapts to every style. Plus, it’s a wonderful way to use up fabric scraps or charm packs you may have on hand.
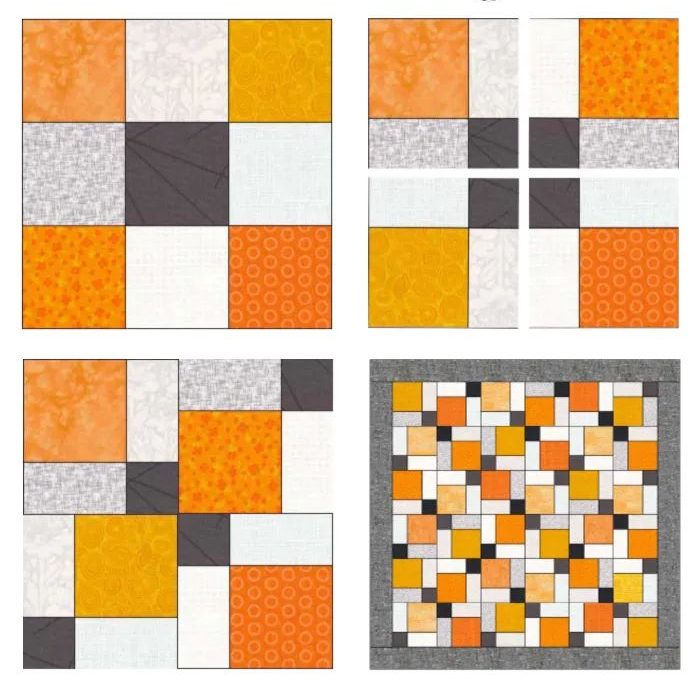
The first step in mastering the Disappearing Nine Patch Quilt Block Tutorial – Quilt Pattern is understanding how the technique works. In traditional quilting, a nine patch block consists of three rows of three squares, often alternating light and dark fabrics for contrast. To create the disappearing effect, you sew this block together first, then cut it directly down the middle both horizontally and vertically, resulting in four smaller blocks.
Once the cutting is complete, the fun begins. Each of the smaller blocks is rotated or rearranged to create an entirely new layout. This is where creativity shines—there’s no single “right” way to arrange them. You can choose a symmetrical design for a neat, orderly look, or mix things up for a more dynamic and modern appearance. The options are endless, which is why this technique remains a favorite among quilters.
One of the biggest advantages of this method is that it allows for precise, clean lines without requiring advanced skills. Beginners can follow the step-by-step process confidently, while advanced quilters can experiment with bold fabric choices and layouts. This makes the Disappearing Nine Patch Quilt Block Tutorial – Quilt Pattern a universal technique for all skill levels.
Fabric selection plays a major role in the final outcome. Using high-contrast fabrics will highlight the transformation more clearly, while using fabrics from the same color family will create a softer, blended look. Whether you choose solids, prints, or a combination of both, the disappearing nine patch will transform them into something unexpectedly beautiful.
This technique also saves time compared to piecing smaller individual blocks from scratch. By working with larger nine patch units first and then slicing them, you reduce the number of seams you need to match, making the process faster and more efficient. This efficiency is especially valuable when making large quilts or when working with deadlines.
Finally, the disappearing nine patch is a great way to explore creative quilting without feeling overwhelmed. You can start with a small project like a pillow cover or table runner before moving on to full-sized quilts. This flexibility makes it a go-to choice for many crafters.
To begin your Disappearing Nine Patch Quilt Block Tutorial – Quilt Pattern, gather your materials. You’ll need nine fabric squares of the same size, preferably 5″ or 6″ squares, which are common sizes in charm packs. Arrange them in a classic nine patch layout, alternating light and dark fabrics to enhance the visual transformation.
Sew the squares together in rows, then join the rows to complete your nine patch block. Press your seams carefully, either open or to the side, depending on your preference. Accurate pressing ensures your cuts and seams align perfectly in the next steps.
Next, take your finished block and place it on a cutting mat. Using a rotary cutter and ruler, slice the block vertically down the middle, then horizontally across the middle. You should now have four smaller blocks, each containing a mix of the original fabrics.
The magic happens when you rotate these four blocks. Try turning two of them 90 degrees and leaving the other two in their original position. You can also rotate all four in different directions for a more abstract design. Lay them out until you find a combination you love.
Once you’re satisfied with your arrangement, sew the four smaller blocks together to form the new disappearing nine patch block. Press the seams neatly to keep the block square and flat. You now have a quilt block that looks far more complicated than it actually is.
Repeat the process to create as many blocks as needed for your project. The uniformity of the block size makes assembly easy, and because the design is so adaptable, you can mix and match layouts within the same quilt for variety.
The Disappearing Nine Patch Quilt Block Tutorial – Quilt Pattern is incredibly flexible, allowing you to experiment with different layouts and color schemes. One variation is to use only two contrasting colors for a bold, graphic look. Another is to incorporate a range of prints for a more eclectic and scrappy style.
You can also play with the scale of your fabric squares. Larger starting squares will result in larger blocks, which is ideal for bed quilts. Smaller squares create more intricate patterns, perfect for wall hangings or table runners. This scaling option makes the technique suitable for projects of all sizes.
A popular creative twist is to alternate disappearing nine patch blocks with solid blocks or other quilt block patterns. This adds visual interest and gives the eye a place to rest, especially in busy designs. Pairing the disappearing nine patch with simple sashing can also enhance the individual block designs.
Seasonal fabric choices can make this pattern shine for specific occasions. For example, using reds, greens, and golds for a holiday quilt or soft pastels for a spring-themed project can give your quilt a thematic touch.
You can even adapt the technique for modern quilting by using monochromatic color schemes or bold geometric prints. The disappearing nine patch lends itself beautifully to contemporary design trends while still honoring traditional quilting methods.
Finally, adding decorative quilting stitches can elevate the finished piece. Whether you choose straight-line quilting for a clean look or free-motion quilting for texture and movement, the stitching will complement your disappearing nine patch blocks perfectly.
For the best results with your Disappearing Nine Patch Quilt Block Tutorial – Quilt Pattern, accuracy is key. Always measure and cut your fabric squares precisely to ensure your blocks align correctly after sewing. Small inaccuracies can add up when assembling multiple blocks.
Pressing is just as important as cutting. Taking the time to press your seams after each step will help your blocks lie flat and your points match neatly. This attention to detail gives the quilt a professional appearance.
When sewing, use a consistent seam allowance—most quilters use a ¼” seam. This consistency ensures your blocks stay uniform in size, making assembly much easier.
If you’re working with patterned fabrics, pay attention to fabric orientation before making your cuts. This can help maintain symmetry in your design, especially if the prints have a directional pattern.
Basting and quilting should be done carefully to avoid puckering. Use pins or basting spray to secure your quilt layers before quilting. Take your time with this stage; the effort shows in the final product.
Lastly, binding your quilt neatly is the finishing touch. Choose a binding fabric that complements your quilt top and take care to miter the corners for a polished finish.
1. What is a disappearing nine patch quilt block?
It’s a quilting technique where a classic nine patch block is sewn, cut into quarters, and rearranged to create a new, more complex design.
2. Do I need special tools for this pattern?
No, just basic quilting supplies like a rotary cutter, ruler, cutting mat, and sewing machine.
3. Can I make this pattern with scraps?
Yes, it’s perfect for scrap quilting since it uses small squares of fabric.
4. How do I choose fabrics for this pattern?
High-contrast fabrics make the design stand out, while similar tones create a softer look.
5. Is this a good pattern for beginners?
Absolutely. It’s simple to sew but looks intricate, making it great for learning and practicing quilting skills.
6. Can I mix disappearing nine patch blocks with other patterns?
Yes, they work beautifully with solid blocks or other quilt block designs for added interest.
7. What size should my squares be?
Common starting sizes are 5″ or 6″, but you can adjust based on your desired block size.
The Disappearing Nine Patch Quilt Block Tutorial – Quilt Pattern is a delightful blend of simplicity and sophistication. From understanding the basic nine patch construction to exploring endless variations, this technique offers something for everyone—beginners and seasoned quilters alike. Its adaptability means you can create a quilt that’s entirely your own, full of color, texture, and personality.
Now that you’ve learned the process, it’s time to bring out your favorite fabrics and start stitching. I’d love to hear your honest opinion about this tutorial and any suggestions you have for making it even better. Your feedback helps keep the quilting community creative and inspired!


