
Bird Quilt Block Pattern
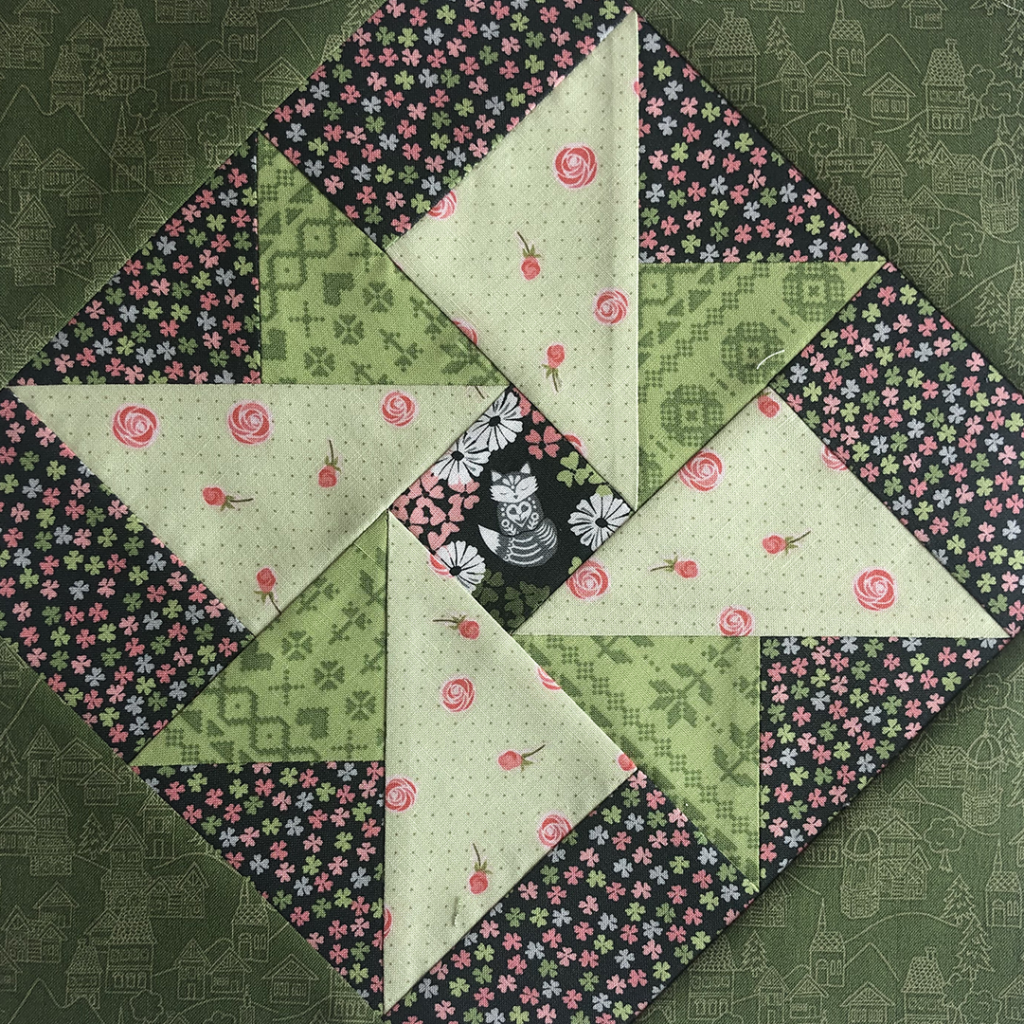
Creating a Double Windmill Quilt Block is a rewarding and fun experience for any quilting enthusiast. This quilt pattern is not only visually appealing but also simple to make, making it perfect for both beginners and experienced quilters. By following this guide, you will learn how to piece together a Double Windmill Quilt Block with precise fabric measurements and cutting instructions.
Quilting is a beloved craft that brings together creativity and functionality. The Double Windmill Quilt Block adds a dynamic look to any quilt, making it an excellent choice for both traditional and modern designs. Its rotating pinwheel effect gives the illusion of movement, enhancing the aesthetic of your finished quilt. Whether you are making a small quilt block for a sampler quilt or incorporating multiple blocks into a full-sized quilt, this pattern is sure to impress.
In this detailed tutorial, we will break down each step, from selecting the right fabric to sewing your pieces together. With proper cutting, alignment, and stitching, you will create a beautiful and symmetrical Double Windmill Quilt Block. Follow along as we guide you through the process to ensure accuracy and a stunning finished product.
Step 1: Gathering Materials and Fabric Cutting
To create a Double Windmill Quilt Block, you will need a selection of fabrics that contrast well to highlight the pattern. Choosing fabrics with distinct colors or prints will help emphasize the windmill effect. Cotton fabrics work best for quilting, as they are durable and easy to sew.
Here are the fabric pieces you need to cut:
Once you have your fabric cut, it’s time to prepare them for sewing. Lay out the pieces in the windmill formation to ensure they align properly. Arranging the pieces before sewing helps prevent mistakes and allows for adjustments if needed.
Mark diagonal lines on the back of the 5″ x 5″ squares using a fabric pencil. These guide marks will be crucial for the next step, helping you sew straight and even seams. Accuracy in cutting and marking is essential to achieve sharp, clean lines in your final quilt block.
Having your fabric prepped correctly will make the assembly process much smoother. Take your time to measure twice and cut once—precision is key when working with any quilt patterns.
Step 2: Sewing the Half-Square Triangles (HSTs)
The foundation of the Double Windmill Quilt Block lies in its half-square triangles (HSTs). These components form the dynamic movement of the windmill and are simple to make using the squares you previously cut.
To create the HSTs, place one main color fabric square and one secondary color fabric square right sides together. Align the edges and pin them in place to prevent shifting during sewing. Repeat this with the second set of squares.
Sew along both sides of the diagonal line you marked earlier, using a 1/4″ seam allowance. This method creates two HSTs per set, maximizing fabric usage. After sewing, use a rotary cutter and ruler to cut along the marked diagonal line.
Once cut, press the seams open or to one side, depending on your preference. Pressing the seams properly ensures that your quilt lies flat and looks professional. Trim the HSTs to measure 4.5″ x 4.5″ for a perfect fit in your block assembly.
Repeat the process for the remaining fabric squares, ensuring you have a total of four HSTs. These will be crucial in forming the windmill effect of your quilt pattern.
Step 3: Arranging and Assembling the Quilt Block
Now that you have your HSTs and background fabric squares ready, it’s time to arrange them into the Double Windmill Quilt Block pattern. Lay out the pieces on a flat surface to visualize the final design before sewing them together.
Place the background fabric squares in the corners, with the HSTs positioned in between to create the rotating windmill shape. Double-check your arrangement to make sure the colors and angles align correctly.
Begin sewing the pieces together row by row. Start with the first row, sewing one HST to a background square, then another HST to a background square. Repeat for the second row. Press seams after each row to keep the fabric flat and aligned.
Next, sew the two rows together, nesting the seams to reduce bulk. Pin the pieces in place before sewing to ensure the points meet precisely. A well-aligned quilt block enhances the overall look of your quilt.
Press the final seams, ensuring everything lies smoothly. At this stage, your Double Windmill Quilt Block should measure 8.5″ x 8.5″ before final trimming. Use a square ruler to check for accuracy.
Take a moment to admire your work! You now have a completed Double Windmill Quilt Block, ready to be incorporated into a larger quilt pattern.
Step 4: Tips for Perfecting Your Double Windmill Quilt Block
Creating a flawless Double Windmill Quilt Block requires attention to detail and a few quilting tips to ensure accuracy. Here are some expert suggestions to refine your quilting technique.
Always use a 1/4″ seam allowance when sewing quilt blocks. Consistency in seam allowances ensures that all your quilt blocks fit together seamlessly. A quilting foot attachment on your sewing machine can help maintain precise seams.
Pressing your fabric correctly is just as important as cutting and sewing. Use a hot iron to press seams open or to one side, reducing bulk and achieving a smoother finish. Avoid stretching the fabric while pressing to maintain its shape.
For more precise HSTs, consider using fabric starch before cutting. Stiffened fabric is easier to cut accurately and prevents fraying, leading to cleaner edges in your quilt block.
If your block turns out slightly uneven, trim it using a quilting ruler and rotary cutter. Trimming ensures uniformity and makes assembling multiple quilt blocks easier when working on a larger quilt pattern.
Experiment with different fabric combinations to create unique variations of the Double Windmill Quilt Block. Whether you choose bold contrasts or subtle tones, the windmill effect remains a stunning centerpiece in any quilt design.
With practice and patience, mastering the Double Windmill Quilt Block will become an enjoyable and rewarding part of your quilting journey. Keep experimenting and have fun creating beautiful, handmade quilts!


