Eight Point Star Quilt Block Tutorial: Step-by-Step Guide
Advertising
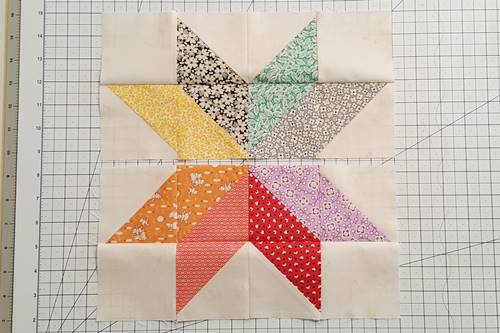
Creating a quilt with a stunning Eight Point Star quilt block is a rewarding and enjoyable experience for quilters of all skill levels. This traditional design has been cherished for generations, and with the right approach, you can craft your own beautiful quilt patterns featuring this timeless star motif. In this tutorial, we will walk you through each step, ensuring that you achieve precise cuts and perfect seams.
Whether you are new to quilting or looking to refine your skills, following a structured method will help you create a flawless Eight Point Star quilt block. We will cover everything from fabric selection and cutting to piecing and assembling the block. By the end of this guide, you will have a stunning quilt block ready to be incorporated into a larger quilt project.
Advertising
This tutorial is designed to be easy to follow, providing clear measurements and instructions for creating a quilt block that is both traditional and modern. Let’s dive into the step-by-step process and start crafting a beautiful Eight Point Star quilt block today!
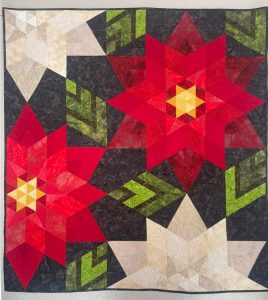
Image From Google
H2: Materials and Fabric Cutting
Choosing the right materials and making precise fabric cuts are essential for a successful quilt project. Selecting high-quality fabrics will ensure durability and vibrant colors for your quilt patterns.
Fabric Selection: Choose two contrasting fabrics—one for the star and another for the background. Cotton quilting fabric is ideal for this project.
Required Tools: Gather essential tools like a rotary cutter, self-healing cutting mat, quilting ruler, iron, and sewing machine with a 1/4-inch foot.
Cutting Instructions: Cut the following pieces:
Four 4.5-inch squares of background fabric
Four 4.5-inch squares of star fabric
Four 5-inch squares of background fabric (for half-square triangles)
Four 5-inch squares of star fabric (for half-square triangles)
Creating Half-Square Triangles: Draw a diagonal line on the back of each 5-inch background square, pair them with 5-inch star squares, and sew 1/4-inch away from the line on both sides.
Trimming Blocks: Cut along the diagonal line, press seams open, and trim each half-square triangle to 4.5 inches.
Laying Out the Pieces: Arrange all cut pieces in the Eight Point Star quilt block pattern before sewing to ensure proper placement.
Once the fabric pieces are cut, the next step is to assemble the quilt block with accurate seams and alignment. Precision in piecing will make a significant difference in the final look of your quilt patterns.
Advertising
Sewing Half-Square Triangles: Join the half-square triangles in pairs, ensuring points align correctly. Press seams to the side.
Assembling Rows: Begin by sewing squares and half-square triangles into three rows, maintaining a 1/4-inch seam allowance.
Pressing Seams: After sewing each row, press seams in opposite directions to reduce bulk and improve accuracy.
Joining the Rows: Carefully align seams and pin rows together before stitching to keep the pattern symmetrical.
Final Pressing: Press the completed Eight Point Star quilt block well to keep edges crisp and flat.
Checking Block Size: Ensure your finished block measures 12.5 inches square before incorporating it into your quilt.
H2: Finishing Touches and Assembly
After completing the Eight Point Star quilt block, the final steps will refine the design and integrate it into a full quilt pattern. Taking time to add finishing details will enhance the block’s beauty and durability.
Squaring Up the Block: Use a quilting ruler to ensure your block is perfectly square before adding it to a quilt.
Adding Sashing and Borders: Consider framing your block with sashing to highlight the quilt patterns and create a cohesive design.
Choosing a Quilt Layout: Decide if you will use multiple Eight Point Star quilt blocks in your quilt or mix them with other blocks.
Basting the Quilt: Once the quilt top is complete, layer it with batting and backing fabric, securing with pins or basting spray.
Quilting the Layers: Use straight-line or free-motion quilting to stitch the layers together and enhance the block’s design.
Binding the Quilt: Finish your quilt with a fabric binding to give it a professional and polished look.
H2: Tips for Perfecting Your Eight Point Star Quilt Block
Achieving a professional-looking Eight Point Star quilt block requires attention to detail and practice. Here are some essential tips to ensure success.
Accurate Cutting: Always use a rotary cutter and ruler to make precise fabric cuts for clean and crisp edges.
Consistent Seam Allowance: Maintain a consistent 1/4-inch seam allowance to ensure all pieces fit together correctly.
Proper Pressing Techniques: Press seams well after each step to reduce bulk and improve the block’s overall appearance.
Using Starch for Stability: Lightly starch fabric pieces before sewing to prevent stretching and distortion.
Checking Alignment Regularly: Lay out pieces before sewing and check alignment frequently to avoid mistakes.
Practice and Experiment: Try different fabric combinations and layouts to create unique quilt patterns featuring the Eight Point Star.
By following this step-by-step Eight Point Star quilt block tutorial, you can create a timeless and elegant quilt design. Whether making a single block or an entire quilt, mastering this classic pattern will add beauty and charm to your quilting projects.


