
Bird Quilt Block Pattern
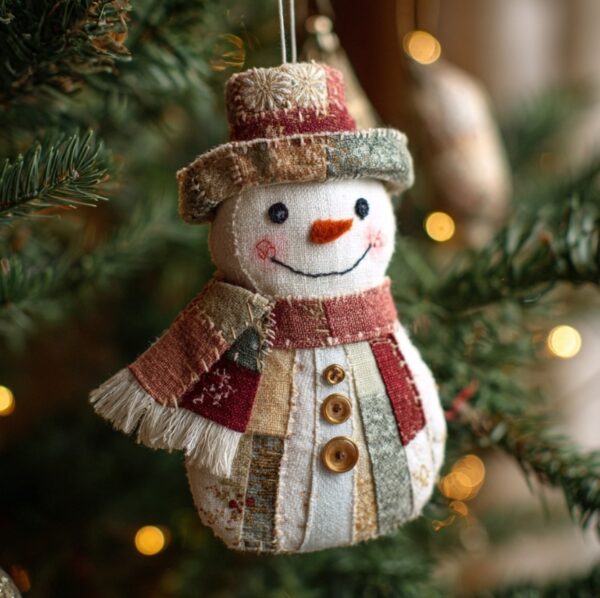
The Fabric Snow Buddy Pattern is one of the most charming winter craft ideas for those who love sewing, quilting, and handmade décor. Right from the first stitch, this project captures the cozy magic of winter and transforms simple scraps of fabric into a delightful snow-themed companion. Many crafters enjoy this pattern because it is easy to personalize, making each Snow Buddy truly unique. Whether you are a beginner or an experienced maker, this pattern is a great way to express creativity while bringing a touch of seasonal warmth to your home.
Using a Fabric Snow Buddy Pattern gives you the freedom to choose textures, colors, and embellishments that match your style. You can create a rustic Snow Buddy using burlap or linen, or choose soft fleece and cotton for a more playful look. This project also works wonderfully as a handmade gift, especially for holidays, winter celebrations, or as a décor piece for a cozy family room. Because the pattern is simple to adapt, it encourages crafters to experiment with different techniques while still creating something adorable and meaningful.
Another reason the Fabric Snow Buddy Pattern is so popular is that it requires only basic materials and simple sewing steps. This makes the project accessible to beginners while still being fun for skilled crafters who enjoy detailed finishing touches. From the hat and scarf to the tiny buttons and embroidered smile, every part of this Snow Buddy adds charm and personality. As you create your Snow Buddy, you’ll find that it becomes more than just a craft project—it becomes a joyful experience that invites creativity and imagination.
The Fabric Snow Buddy Pattern works as a flexible guide that you can personalize in countless ways. Most versions include basic body shapes, such as round snowball forms, which can be sewn together and stuffed to create a soft, plush figure. You can choose patterned cotton, felt, fleece, or even leftover quilt blocks to make your Snow Buddy more colorful and unique. The simplicity of the pattern is what makes it so beginner-friendly.
Another great feature of the Fabric Snow Buddy Pattern is the opportunity to experiment with accessories. Many people enjoy adding hats, scarves, tiny mittens, or decorative elements like embroidery and buttons. These small details help your Snow Buddy stand out and allow you to match it with seasonal décor themes. Even small scraps of ribbon, lace, or fabric can become adorable accessories.
When working with the pattern, accuracy in cutting and stitching ensures a polished final result. However, minor imperfections rarely affect the charm of the Snow Buddy. In fact, the handmade look is what makes it so heartwarming. Crafters often use this project to practice simple sewing techniques like whip stitch, blanket stitch, or straight machine stitching.
One of the benefits of this pattern is its adaptability. You can enlarge or shrink the template to create different sizes—from tiny Snow Buddy ornaments to larger plush figures. This flexibility allows you to create entire sets, turning your décor into a lovely winter display. Families often enjoy making Snow Buddies together, turning the craft into a fun seasonal activity.
The pattern’s simplicity also makes it great for using leftover fabric. Scrap-friendly projects are sustainable and budget-friendly, something many crafters truly appreciate. Instead of throwing away small pieces, you can repurpose them into a delightful creation. This adds meaning and value to the finished Snow Buddy.
Finally, using a Fabric Snow Buddy Pattern encourages creativity at every stage. Whether you experiment with embroidery, add textured fabrics, or personalize facial expressions, each Snow Buddy becomes a reflection of your imagination and crafting style.
To begin working with the Fabric Snow Buddy Pattern, you will need a few basic materials that are easy to find. Cotton fabric, fleece, or felt are excellent choices because they are simple to cut and sew. Choosing contrasting fabrics can help highlight different parts of the Snow Buddy, such as the body, hat, and accessories.
Stuffing is an essential material for giving shape and softness to your Snow Buddy. Polyester fiberfill is commonly used because it provides a smooth, fluffy finish. You can also use fabric scraps inside the larger areas as an eco-friendly option. The firmness of the stuffing will determine how plump your Snow Buddy looks.
For tools, you will need sharp scissors, pins, a fabric marker, and a sewing needle or sewing machine. Beginners may prefer hand-sewing the smaller pieces, especially when attaching details like hats or scarves. A sewing machine can speed up the process, especially for the main body sections.
Embellishments add personality to your Snow Buddy. Tiny buttons, embroidery thread, ribbons, and felt pieces can be used to create eyes, smiles, accessories, and other decorations. Be creative when choosing colors and textures. Each detail adds charm and helps make your Snow Buddy one-of-a-kind.
Safety is important if your Snow Buddy is intended for children. In that case, avoid using small hard embellishments like buttons and instead sew facial features using thread. Embroidered eyes and soft decorations make the finished toy safer for younger children while maintaining its adorable appearance.
Because the materials are simple and affordable, this project is accessible to anyone who loves crafting. Many crafters enjoy collecting fabrics just for this purpose and creating multiple Snow Buddies as gifts for friends and family.
The first step in bringing the Fabric Snow Buddy Pattern to life is preparing the fabric pieces. Trace the pattern shapes onto your chosen fabric using a fabric marker, then cut them out carefully. Accuracy helps ensure that all parts fit together properly. Double-layer cutting can help keep pieces symmetrical.
Once the body pieces are ready, place them right sides together and begin sewing around the edges. Leave a small opening to insert the stuffing later. After stitching, turn the piece inside out to hide the seams. This step instantly brings shape and dimension to your Snow Buddy. Now it’s time to stuff the body until it becomes soft and plump.
After stuffing, close the opening using small, invisible stitches. This helps keep the form neat and round. Now you can move on to the fun part—decorating your Snow Buddy. Attach the eyes, sew the smile, and add accessories like hats, scarves, and buttons. Each detail enhances the charm of your Snow Buddy and makes it unique.
If your pattern includes separate sections for the head and body, assemble them by stitching them together securely. Take time to align the parts so the Snow Buddy stands or sits properly. Some crafters add weighted pellets to the bottom to help the figure stand upright, but this is optional.
Accessories are where your creativity truly shines. Use colorful felt to create a small winter hat or cut out strips of fabric to make a miniature scarf. Add small embellishments like snowflakes or embroidered patterns to enhance the design. The more personalized the details, the more memorable the final piece becomes.
Finishing your Snow Buddy brings a wonderful sense of accomplishment. Each step, from cutting to stitching, creates a project full of warmth and personality. The beauty of the Fabric Snow Buddy Pattern lies in how adaptable and joyful the crafting experience can be.
One of the best aspects of the Fabric Snow Buddy Pattern is the ability to customize it endlessly. You can mix and match fabrics, colors, textures, and accessories to create a Snow Buddy that fits any theme. Seasonal color palettes, rustic inspirations, or modern styles all work beautifully with this versatile pattern.
Some crafters like to create themed Snow Buddies, such as holiday-inspired versions decorated with festive colors or woodland-themed versions using earthy tones. Adding small props like miniature brooms, felt animals, or tiny winter clothing pieces enhances the storytelling aspect of your design. Creativity has no limits with this pattern.
Another option is to create Snow Buddy families in multiple sizes. This works wonderfully as a centerpiece or winter décor arrangement. By scaling the pattern up or down, you can craft tiny ornaments or large plush decorations. This flexibility makes the pattern suitable for a variety of projects and holiday displays.
Children also love participating in the decoration process. You can prepare the main body shapes and allow them to choose colors for the hats, scarves, or facial features. This makes the craft both fun and meaningful, turning the Snow Buddy into a memory-making activity.
For those who love quilting, incorporate small quilt blocks into the Snow Buddy’s body or clothing. Tiny patchwork squares or appliqué details can add a special handcrafted touch. Mixing sewing and quilting techniques creates a uniquely artistic result that stands out from traditional plush toys.
Finally, you can personalize your Snow Buddy to give as a heartfelt handmade gift. Adding initials, embroidered dates, or customized colors makes the gift memorable. Handmade crafts like these are treasured because they carry love, effort, and creativity in every stitch.
What is a Fabric Snow Buddy Pattern?
It is a sewing template used to create a soft snowman-like plush figure made from fabric. It usually includes body shapes and accessory pieces.
Is the Fabric Snow Buddy Pattern beginner-friendly?
Yes, it is very beginner-friendly. The shapes are simple, and the sewing steps are easy to follow, making it a great project for new crafters.
What fabrics work best for this pattern?
Cotton, felt, and fleece are excellent choices because they are easy to cut and sew. You can also use leftover fabric scraps.
Can I personalize my Snow Buddy?
Absolutely. You can add hats, scarves, embroidery, buttons, and other accessories to make your Snow Buddy unique.
Do I need a sewing machine?
No. You can sew the entire project by hand. A sewing machine simply speeds up some steps but is optional.
Can children help make a Fabric Snow Buddy?
Yes, especially with decorating and choosing accessories. However, adults should handle cutting and sewing.
How long does it take to complete one Snow Buddy?
Most crafters can finish one in a few hours, depending on the level of detail and accessories added.
Can I use this pattern to make gifts?
Yes! Handmade Snow Buddies make wonderful holiday or winter gifts.
Is stuffing necessary?
Yes, it gives the Snow Buddy its shape and softness. Polyester fiberfill or fabric scraps both work well.
Can I create different sizes?
Yes, you can resize the pattern to make smaller ornaments or larger décor pieces.
The Fabric Snow Buddy Pattern is a delightful and accessible project that brings creativity, warmth, and personality into your crafting time. By choosing fabrics, adding accessories, and personalizing details, you create a unique handmade piece filled with charm. This pattern is perfect for beginners and experienced crafters alike, offering a fun and rewarding experience. I hope this guide inspires you to make your own Snow Buddy. If you enjoyed this article, feel free to leave your sincere opinion and suggestions—I would love to hear your thoughts!


