
Bird Quilt Block Pattern
Fabric Tray Sewing Tutorial is a practical and creative way to transform simple pieces of fabric into functional organizers that add charm and order to any space. This Fabric Tray Sewing Tutorial is designed for beginners and experienced sewists alike, offering clear explanations, useful tips, and a humanized approach that makes sewing enjoyable rather than intimidating. By following this guide, you will not only learn how to sew a fabric tray, but also understand why this project is so popular in home décor and handmade gift ideas.
In this Fabric Tray Sewing Tutorial, you will discover how versatile fabric trays can be used in everyday life. They are perfect for organizing sewing supplies, cosmetics, keys, toys, or even as decorative catch-all trays on desks and shelves. Because they are made from fabric, they are lightweight, customizable, and safe for use around children and pets, which makes them a smart choice for many households.
Another reason this Fabric Tray Sewing Tutorial stands out is its focus on creativity and personalization. Fabric trays can be made in countless sizes, colors, and patterns, allowing you to match your home style or create themed pieces for holidays and special occasions. Throughout this article, the term Fabric Tray Sewing Tutorial will be revisited and explained in different contexts to strengthen your understanding and help optimize this content for search engines while remaining natural and reader-friendly.
The idea behind a Fabric Tray Sewing Tutorial is simple: teaching how to construct a structured tray using fabric, interfacing, and basic sewing techniques. Unlike rigid plastic or wooden trays, fabric trays combine softness with structure, making them unique and appealing. This tutorial concept focuses on clarity, step-by-step logic, and practical results.
A Fabric Tray Sewing Tutorial usually starts with selecting the right fabric. Cotton fabrics are commonly used because they are easy to handle and widely available. However, linen blends, canvas, or even quilted fabric can also be incorporated depending on the desired stiffness and look.
Another essential element in a Fabric Tray Sewing Tutorial is interfacing. Interfacing provides structure and stability to the tray, preventing it from collapsing. Fusible interfacing is especially beginner-friendly, as it adheres easily to the fabric with heat.
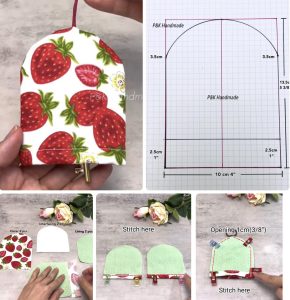
Measurements and cutting are also core aspects of any Fabric Tray Sewing Tutorial. Accurate cutting ensures clean corners and a balanced shape. Most tutorials explain how to cut squares or rectangles that will later be boxed to form the tray walls.
Stitching techniques in a Fabric Tray Sewing Tutorial are generally straightforward. Straight stitches are sufficient for most steps, making this project accessible even for those who are new to sewing machines.
Finally, finishing details are emphasized in a quality Fabric Tray Sewing Tutorial. Pressing seams, trimming corners, and topstitching not only improve durability but also elevate the overall appearance of the tray.
Preparing materials is a crucial phase in any Fabric Tray Sewing Tutorial, as it sets the foundation for a smooth sewing experience. Having everything ready before you start saves time and reduces frustration.
Fabric selection plays a central role in a Fabric Tray Sewing Tutorial. Choosing complementary fabrics for the exterior and lining allows for reversible designs, adding extra value to your handmade piece.
Interfacing, as mentioned earlier, is non-negotiable in a Fabric Tray Sewing Tutorial. Medium to heavy-weight interfacing is recommended for trays that need to stand upright and hold items securely.
Basic sewing tools are also part of a complete Fabric Tray Sewing Tutorial. Scissors or a rotary cutter, pins or clips, a ruler, and an iron are typically required to achieve precise results.
Thread choice matters more than many beginners realize in a Fabric Tray Sewing Tutorial. A high-quality all-purpose thread ensures strong seams and reduces the risk of breakage during sewing.
Preparation also includes pressing fabric before cutting. In a Fabric Tray Sewing Tutorial, this step is often highlighted because wrinkles can distort measurements and affect the final shape.
Lastly, setting up your workspace is encouraged in every Fabric Tray Sewing Tutorial. A clean, well-lit area improves focus and makes the sewing process more enjoyable and efficient.
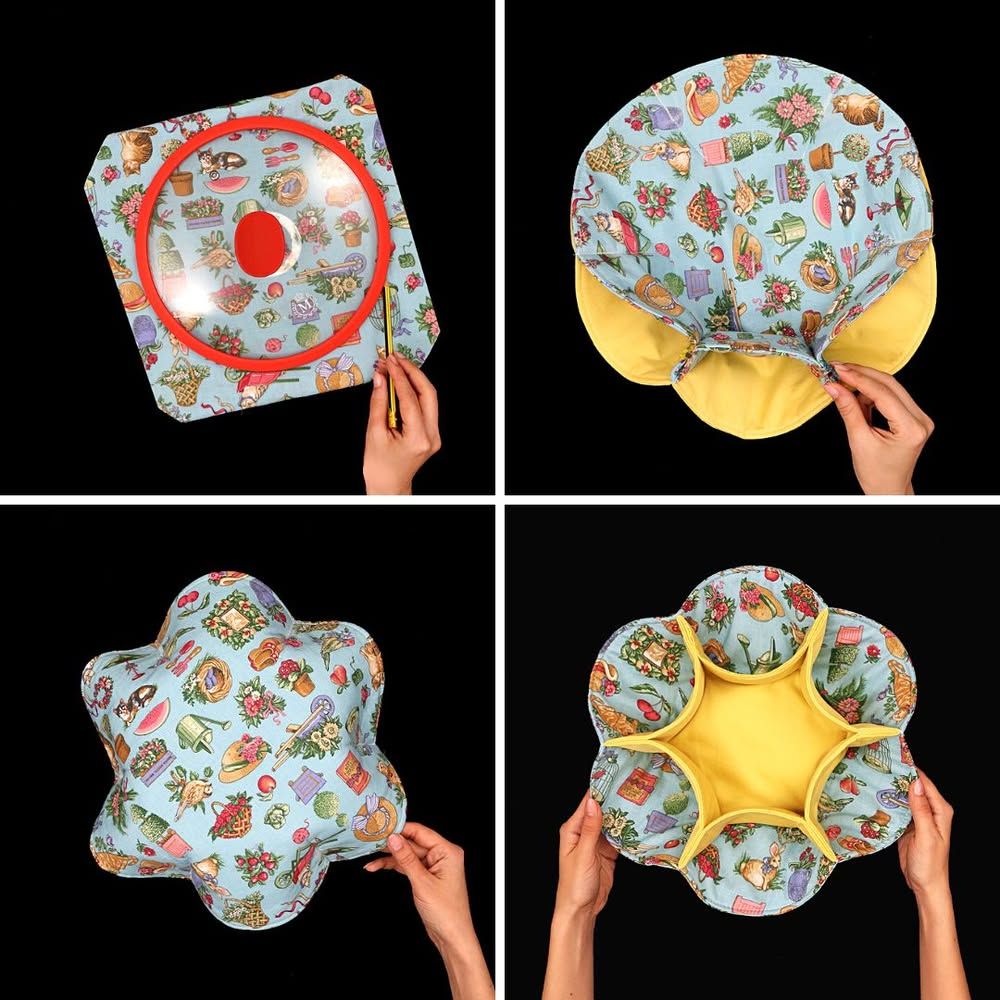
The construction phase is the heart of any Fabric Tray Sewing Tutorial, where flat fabric pieces begin to transform into a three-dimensional object. This process is both satisfying and educational.
A typical Fabric Tray Sewing Tutorial starts with attaching interfacing to the wrong side of the fabric. This step adds firmness and prepares the fabric for assembly.
Next, the exterior and lining fabrics are sewn together. In a Fabric Tray Sewing Tutorial, this is often done by placing the fabrics right sides together and stitching around the edges, leaving an opening for turning.
Boxed corners are a defining feature in a Fabric Tray Sewing Tutorial. By sewing across the corners, the flat piece gains depth and forms the tray walls.
Turning the tray right side out is a small but exciting moment in a Fabric Tray Sewing Tutorial. This step reveals the basic shape and motivates sewists to continue refining their project.
Topstitching is frequently recommended in a Fabric Tray Sewing Tutorial. It reinforces seams, closes the turning gap, and gives the tray a polished, professional look.
Finally, shaping and pressing complete the process. In a Fabric Tray Sewing Tutorial, gentle pressing helps the tray stand neatly and maintain its structure over time.
One of the most appealing aspects of a Fabric Tray Sewing Tutorial is the endless potential for creativity. Once the basic technique is mastered, variations become easy and fun.
Size adjustments are common in a Fabric Tray Sewing Tutorial. Small trays work well for jewelry or keys, while larger versions can hold craft supplies or folded fabrics.
Fabric choices also allow for personalization in a Fabric Tray Sewing Tutorial. Seasonal prints, neutral tones, or bold patterns can completely change the look and purpose of the tray.
Some Fabric Tray Sewing Tutorial variations include adding handles or snaps. These features improve functionality and make the trays portable or collapsible.
Quilted trays are another popular idea often mentioned in a Fabric Tray Sewing Tutorial. Quilting adds texture and extra padding, enhancing both appearance and durability.
A Fabric Tray Sewing Tutorial can also inspire eco-friendly practices. Using fabric scraps or upcycled materials reduces waste and promotes sustainable crafting.
Lastly, handmade fabric trays make thoughtful gifts. Many sewists follow a Fabric Tray Sewing Tutorial specifically to create personalized, meaningful presents for friends and family.
FAQ
What is a fabric tray used for?
A fabric tray is used for organizing small items such as accessories, sewing tools, cosmetics, or office supplies. It combines functionality with decorative appeal.
Is a Fabric Tray Sewing Tutorial suitable for beginners?
Yes, a Fabric Tray Sewing Tutorial is beginner-friendly because it uses basic sewing techniques and simple shapes.
What fabric works best for a Fabric Tray Sewing Tutorial?
Cotton, canvas, and linen blends work well. The key is pairing the fabric with suitable interfacing for structure.
Do I need a sewing machine for a Fabric Tray Sewing Tutorial?
While a sewing machine makes the process faster, a fabric tray can also be sewn by hand with patience and strong stitches.
How long does it take to complete a Fabric Tray Sewing Tutorial project?
Most fabric trays can be completed in under an hour, making them ideal for quick and satisfying sewing sessions.
Can fabric trays be washed?
Yes, most fabric trays can be gently hand-washed, especially if made with washable fabrics and threads.
Video Tutorial
This Fabric Tray Sewing Tutorial has shown how a simple sewing project can combine practicality, creativity, and personalization. From understanding the concept and gathering materials to following step-by-step construction and exploring creative variations, you now have a complete overview of how to make your own fabric trays. The Fabric Tray Sewing Tutorial approach emphasizes clarity, accessibility, and inspiration, making it suitable for sewists at any level. If you enjoyed this guide, please leave an honest opinion and share your suggestions, as your feedback helps improve future tutorials and inspires new creative ideas.


