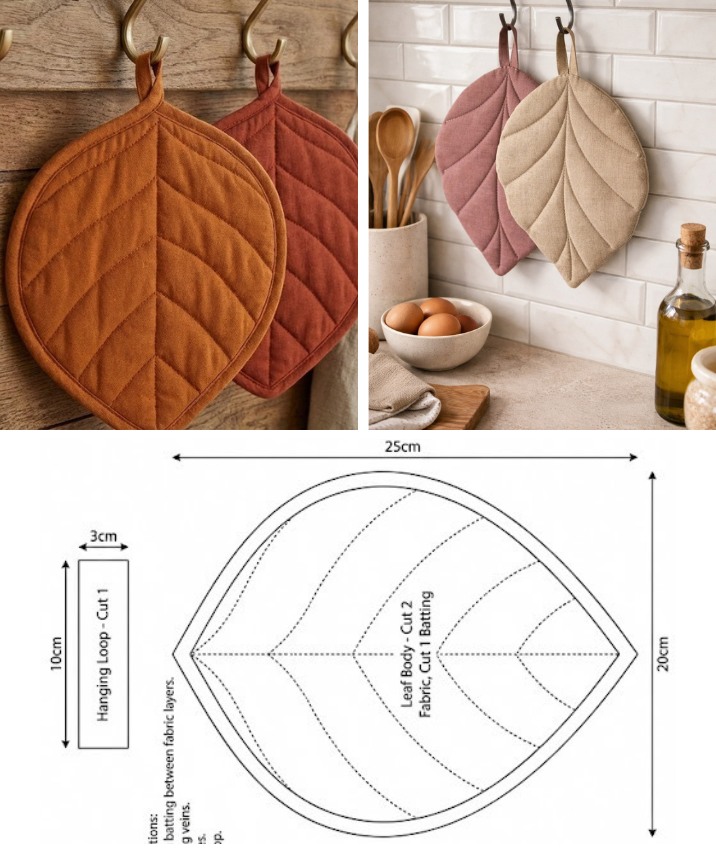
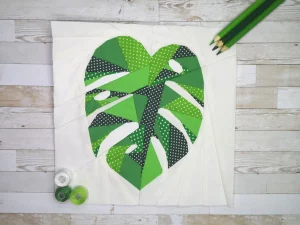
Padding leaf-shaped pot holder Pattern
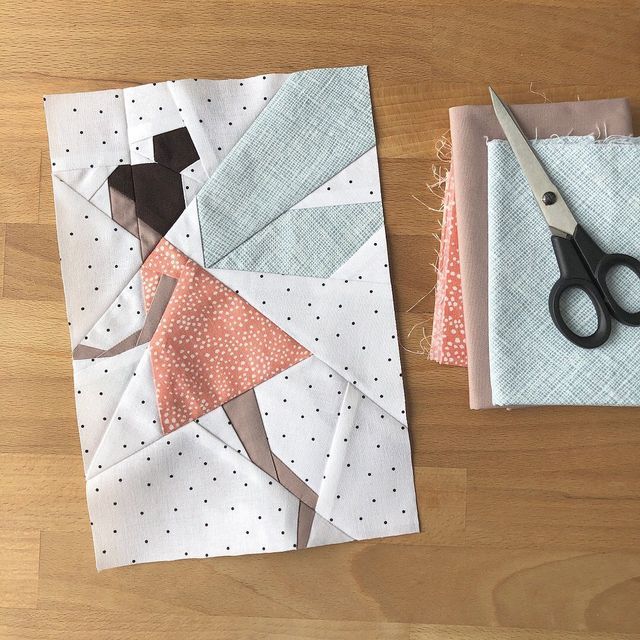
The Fairy Sisters Block quilt is more than just a quilt pattern—it’s a whimsical celebration of creativity, color, and storytelling through fabric. Whether you’re a seasoned quilter or just beginning your quilting journey, this block pattern offers charm, magic, and structure in equal measure. With its enchanting name and captivating design, it invites you to bring a touch of fairy tale wonder into your quilting projects.
In this blog post, we will explore everything you need to know about creating your very own Fairy Sisters Block quilt. From fabric cutting dimensions and layout suggestions to a detailed step-by-step guide, you’ll find all the inspiration and information necessary to start stitching. This pattern is ideal for quilts intended as gifts for children, nature lovers, or anyone who appreciates the whimsy of patchwork artistry.
By following this guide and using the Fairy Sisters Block quilt as your foundation, you’ll create a finished piece that sparkles with joy, unity, and handcrafted love. Whether it’s for a wall hanging, throw, or full bedspread, this magical block will help you tell a story with every stitch.
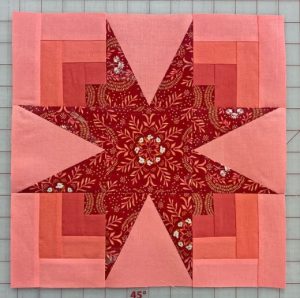
The Fairy Sisters Block quilt design is inspired by themes of nature, sisterhood, and ethereal beauty. Each block represents harmony and balance, with a playful symmetry that mimics the companionship between fairy sisters. The geometric layout gives structure, while the fabric choices bring fantasy and personality to life.
Each block measures 12.5″ x 12.5″ unfinished (12″ x 12″ finished). The block is composed of half-square triangles (HSTs), flying geese units, and center squares framed by smaller strips. These components allow for variation and creativity in color selection.
To bring the Fairy Sisters Block quilt to life, choose a palette inspired by florals, woodland tones, or even bold pastels. Soft purples, mossy greens, sky blues, and fairy dust pinks can all enhance the enchanting effect of the quilt. Fussy cutting motifs like butterflies or stars can add even more magic.
Despite its intricate appearance, the block is beginner-friendly with basic piecing techniques. The repetition of units makes chain-piecing easy and efficient, and once you get the hang of one block, the rest come together like a fairy tale. Aim to create at least 16 blocks for a throw-size quilt, and more if desired.
The charm of the Fairy Sisters Block quilt lies in its storytelling capacity. You can personalize each block using contrasting fabrics to represent different “sisters” or tales. The pattern offers both visual variety and cohesion, perfect for a cohesive quilt top.
This design is also ideal for scrap quilting, allowing quilters to use up small fabric cuts while still achieving a harmonious layout. With careful color placement, each block tells a small story while fitting into the larger quilt narrative.
To begin your Fairy Sisters Block quilt, gather a variety of fabrics that harmonize well together. Think in color families—cool tones for a dreamy look, or warm tones for a sunlit feel. You’ll need a mix of background, main, and accent fabrics.
For each block, you’ll need:
To make a throw-size quilt with 16 blocks (4×4 layout), you’ll need approximately:
Use a rotary cutter and cutting mat to ensure precision when preparing your fabrics. Accurate cuts will help ensure crisp points and clean intersections, especially in the flying geese and HST components.
Label your fabric pieces or use small bins to separate components for each block. This makes the piecing process more efficient and helps prevent confusion. If you’re using a variety of prints, lay out your blocks before sewing to see how your colors interact.
Press all fabric pieces before cutting to eliminate wrinkles and ensure square edges. If using directional prints, consider orientation during cutting for a more polished look. Take time at this stage—neat preparation will save you effort later.
Finally, always test your first block before mass-cutting for multiple. This allows for any adjustments to seam allowance or layout before committing to the full set of blocks.
Now that you’ve cut your fabrics, it’s time to bring the Fairy Sisters Block quilt to life! Here’s a detailed step-by-step sewing guide to help you piece together each magical block with ease.
Step 1: Make Half-Square Triangles (HSTs)
Take your 5″ squares (2 background, 2 contrast), place them right sides together. Draw a diagonal line across the back of the lighter square, sew 1/4″ on either side, and cut along the drawn line. Press seams open or to one side. Each pair yields 2 HSTs (you need 4 per block).
Step 2: Make Flying Geese Units
Using the 2.5″ x 4.5″ background rectangles and 2.5″ squares of contrast fabric, sew two flying geese units for each block. Place a small square on one corner of the rectangle, right sides together. Stitch diagonally, trim excess, and press. Repeat on the opposite corner.
Step 3: Assemble Center Block
Place the 4.5″ x 4.5″ center square in the middle. Sew the 1.5″ x 4.5″ strips to the left and right sides, then add the 1.5″ x 6.5″ strips to the top and bottom. Press all seams outward from the center.
Step 4: Lay Out the Block
Arrange your components: HSTs in the corners, flying geese on the sides, and the bordered center block in the middle. Ensure directional prints are aligned and that values contrast well for visual balance.
Step 5: Assemble the Rows
Sew together the top row (HST + flying geese + HST), middle row (flying geese + center + flying geese), and bottom row (HST + flying geese + HST). Press each row seams in alternating directions to reduce bulk.
Step 6: Join Rows to Complete Block
Sew the three rows together to form your complete Fairy Sisters Block quilt unit. Press seams and trim to 12.5″ square if necessary. Repeat the process to create all blocks for your desired quilt size.
Once you have all blocks ready, lay them out in rows to determine placement. Sew blocks together in rows, then join rows to complete the quilt top. Add a 2.5″ or 3″ border if desired.
Finishing your Fairy Sisters Block quilt is where the magic truly comes alive. Now that your quilt top is assembled, it’s time to move on to quilting, binding, and labeling your handmade treasure.
First, prepare your quilt sandwich: backing (right side down), batting, and quilt top (right side up). Use basting spray or safety pins to secure all three layers together, smoothing out wrinkles as you go. Take your time here—it’s essential for smooth quilting.
Choose a quilting method that complements the whimsy of your blocks. Echo quilting around the block shapes enhances the design, while free-motion motifs like swirls or vines can add a playful, fairy-inspired look. If using a walking foot, try straight-line quilting across diagonals.
Trim the edges of the quilt evenly after quilting. Bind your quilt using 2.5″ strips of fabric folded in half and sewn around the edges. For a magical touch, use a metallic or sparkle-thread binding to highlight the fairy theme.
Don’t forget to add a quilt label! Include your name, date, and a message if gifting the quilt. A label adds personality and marks the story behind your Fairy Sisters Block quilt.
Wash your finished quilt on a delicate cycle or by hand to help soften it and crinkle the fabric just right. Use a gentle detergent to preserve color and texture. Lay flat to dry or tumble on low if needed.
Celebrate your accomplishment—whether it’s your first quilt or your fiftieth, completing a Fairy Sisters Block quilt is a beautiful achievement. Display it proudly or wrap it as a cherished gift from the heart.
What skill level is the Fairy Sisters Block quilt suitable for?
The pattern is perfect for confident beginners and up. It uses basic techniques like HSTs and flying geese.
How can I personalize each block in the quilt?
You can use different fabrics to represent each “sister” or even fussy cut motifs for the center square to reflect personalities or themes.
What size does the quilt finish at?
Each block finishes at 12″ x 12″. A 4×4 block layout makes a 48″ x 48″ quilt, without borders. Add borders to increase size as needed.
Can I make this quilt using scraps?
Absolutely! The Fairy Sisters Block quilt is scrap-friendly and a great way to use leftover fabrics.
Is it possible to make this quilt by hand instead of by machine?
Yes, though it will take longer. The piecing methods work well for hand-stitching if preferred.
What’s the best color palette for a magical look?
Soft florals, pastels, fairy-toned batiks, or nature-inspired palettes all work beautifully for a dreamy aesthetic.
The Fairy Sisters Block quilt offers quilters a magical and meaningful way to bring stories to life through fabric and design. With its charming layout and beginner-friendly construction, this pattern is ideal for any sewing enthusiast wanting to add a little enchantment to their craft.
By following the fabric cutting instructions and sewing steps provided, you can confidently create a quilt full of beauty, whimsy, and heartfelt artistry. Whether it’s gifted to a loved one or kept as a personal treasure, each stitch holds a bit of fairy dust.
We hope this guide inspires you to start your Fairy Sisters Block quilt today. Have you made one? We’d love to hear your thoughts, variations, or see your magical creations—share in the comments below!


