
Bird Quilt Block Pattern
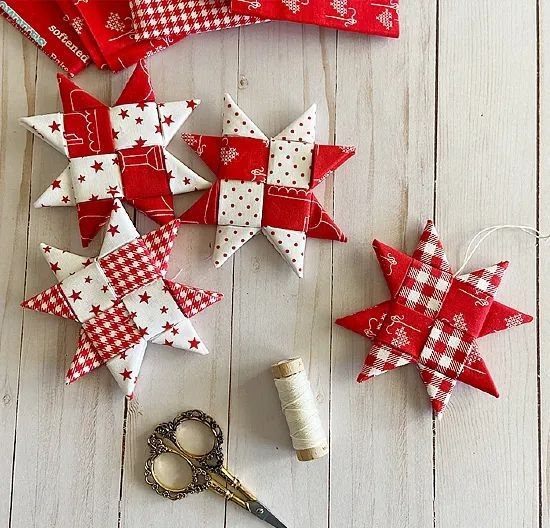
The Folded Fabric Star Tutorial is one of the most fascinating techniques in the world of quilting. It combines the beauty of precise folds, the harmony of color contrast, and the satisfaction of transforming simple fabric squares into a stunning layered star. Whether you are a beginner or an experienced quilter, this project offers a relaxing yet rewarding creative experience. It’s the perfect way to use fabric scraps and bring a three-dimensional charm to your quilting projects.
Creating a Folded Fabric Star requires patience and attention to detail, but the process is truly enjoyable. As you fold, press, and arrange your fabrics, you begin to see the star bloom before your eyes. This folded star is ideal for decorating pillow covers, table runners, wall hangings, or even the center block of a quilt. The layered texture gives the illusion of depth, making it a captivating focal point in any piece.
In this Folded Fabric Star Tutorial, we’ll explore every step — from cutting the fabrics to sewing and finishing your block beautifully. You’ll also learn helpful tips to ensure each fold stays crisp and symmetrical. Let’s dive into this timeless quilting method that has inspired generations of quilters around the world.
Before starting your Folded Fabric Star, it’s essential to choose your fabrics carefully. This project works best with 100% cotton fabrics, as they hold crisp folds and press beautifully. You will need at least four different fabrics to create color contrast and visual depth. Choose a light fabric for the center and progressively darker tones for the outer layers to make your star pop.
Begin by cutting your fabric squares. For a classic 12-inch finished block, cut:
Press all your fabric squares well before folding. Use a light starch spray to help maintain sharp edges. Make sure your iron is set to a medium heat setting suitable for cotton. Accurate pressing at this stage will make the folding process much easier and help your star look neat.
Now, fold each square diagonally once to form a triangle. Press again. Then fold both sides of the triangle inward toward the center line, forming a diamond shape with a sharp point. Press firmly. Repeat this process for all your squares. These folded pieces will be the building blocks of your star.
To keep your layers organized, group them by color or size. Labeling them helps if you plan to make several stars at once. This preparation step might feel meticulous, but it ensures a smooth assembly later on. Having all your folded pieces ready before you start arranging them is a key part of this Folded Fabric Star Tutorial.
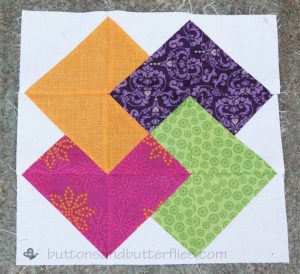
The heart of your Folded Fabric Star begins at the center. Lay your background square on a flat surface. You may want to draw faint guide lines through the center of the square — one vertical and one horizontal — using a fabric-safe pencil. This will help you align your folds accurately as you begin to form your star.
Take four folded pieces from your smallest set. Position each one with the pointed tip facing the center of your background fabric, aligning them along the guide lines. The four points should meet perfectly in the middle, forming a small star-like shape. Pin or lightly glue them in place to keep them secure while you add more layers.
The key to a balanced Folded Fabric Star is symmetry. Each fold should mirror the others in shape and spacing. Adjust as needed before pressing lightly to secure the first layer. Once satisfied with the placement, stitch a few small tacking stitches near the base of each folded piece to hold them firmly in place.
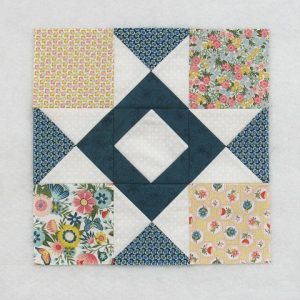
Continue with the next size of folded pieces, arranging them slightly outward from the center, overlapping the previous layer by about half an inch. Each new round should maintain even spacing and alignment. The layers will begin to form a dimensional starburst effect. Take your time to align each point precisely — this attention to detail will make your star stand out beautifully.
After completing the inner section, step back and admire the pattern emerging. The folded layers should create a circular, radiating appearance. Press the block gently using a pressing cloth to avoid flattening the folds. You’re now halfway through your Folded Fabric Star Tutorial and can already see the transformation taking shape.
The next step in the Folded Fabric Star Tutorial is to add the outer layers. These layers give your star a full, radiant look and highlight the gradient of colors. Use the larger folded squares for this section, continuing the same folding pattern and positioning them evenly around the previous layers.
Begin by placing the third set of folded pieces around the existing star, ensuring that each new tip is centered between the points of the previous layer. Overlap the folds slightly to create a seamless transition. Secure each fold with pins or a light fabric adhesive to hold them in place before stitching.
Once you’ve positioned all the outer folds, double-check the alignment and color balance. This step defines the star’s overall look, so make any small adjustments now. When everything looks symmetrical, stitch the base of each folded piece carefully. These stitches will be hidden later when the block is finished.
For a cleaner finish, trim any excess fabric that extends beyond the background square edges. Press the block one last time with gentle heat. Be careful not to crush the dimensional folds — use a light pressing motion instead of dragging the iron. This step preserves the crisp, layered look that makes this Folded Fabric Star so eye-catching.
If you want to add a border, choose a complementary fabric that enhances your color scheme. A narrow border (about 1 inch) frames the star beautifully and helps it stand out when used as a quilt block or wall piece. Take your time with this step — the outer layers determine the final harmony of your design.
Finally, admire your work. The Folded Fabric Star now glows with depth and balance, showing the artistry of your folds and fabric choices. It’s a wonderful representation of how fabric manipulation and creativity come together in quilting.
After completing the folding and stitching process, it’s time to finish your Folded Fabric Star. If you plan to use it as a quilt block, square it up carefully. Make sure the block measures evenly on all sides. If you trimmed the background earlier, add a thin border fabric to restore your desired size.
You can now incorporate your star block into a larger quilt top, a cushion cover, or even frame it as a standalone wall decoration. The 3D effect adds texture and visual interest to any quilting project. Consider pairing multiple Folded Fabric Stars in different color combinations for a stunning quilt full of depth and contrast.
For a neat back, press all seams toward the outer edge and use a few invisible hand stitches if needed to secure any loose folds. If you’re turning this block into a pillow or wall hanging, add a layer of batting and backing fabric before quilting. Stitch around the outer edges of the star to anchor it securely.
To maintain the crisp look of your folded layers, avoid washing your Folded Fabric Star too often. If necessary, spot-clean with a damp cloth and press lightly using a pressing cloth. Proper care ensures your folded star will remain beautiful for years to come.
Displaying your finished Folded Fabric Star brings joy and inspiration. Whether gifted to a loved one or kept as a decorative accent in your sewing room, it represents both patience and artistry — qualities every quilter values. Each fold, each color, and each stitch tells a story of creativity and care.
1. What type of fabric works best for a Folded Fabric Star?
100% cotton fabric is ideal because it holds folds sharply and presses easily. Avoid stretchy or slippery fabrics, as they make folding more difficult.
2. Can I sew the layers together with a machine?
Yes, but hand-stitching near the center gives more control and prevents flattening. You can use a machine to secure the base of each folded piece if you prefer.
3. How do I keep the folds from unfolding over time?
Use light fabric starch before pressing and secure each fold with small stitches. Proper pressing and gentle handling keep the folds crisp.
4. What size should I cut my fabric squares for different block sizes?
For smaller stars, reduce each fabric square by 1 inch. For larger stars, increase each layer proportionally. Always keep the same ratio between the layers.
5. Can beginners try this technique?
Absolutely! The Folded Fabric Star Tutorial is beginner-friendly. It’s a great project to practice fabric folding, color arrangement, and precision without requiring advanced sewing skills.
6. What can I make with Folded Fabric Stars?
You can use them in quilts, table toppers, pillow covers, or as ornaments. They make wonderful handmade gifts and decorative accents.
The Folded Fabric Star Tutorial is more than just a quilting pattern — it’s a journey of patience, creativity, and precision. With every fold and stitch, you transform plain fabric into a textured piece of art that radiates beauty. This timeless technique connects quilters across generations and continues to inspire new interpretations today.
Now that you’ve learned how to create your own Folded Fabric Star, take time to experiment with colors, fabrics, and arrangements. Each version you make will have its own charm and character. We hope this tutorial has inspired you to explore your creativity and add this classic block to your quilting collection.
We’d love to hear from you — share your honest opinion and suggestions below. What color combinations did you choose? What project will you use your folded star in? Your feedback helps inspire future tutorials and keeps the quilting community vibrant and connected.


