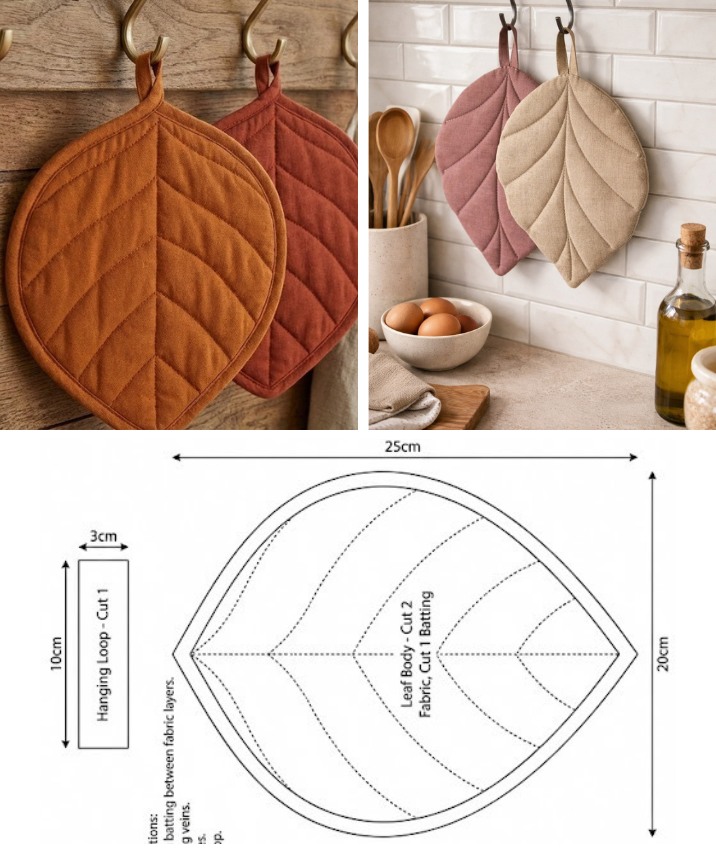
Padding leaf-shaped pot holder Pattern
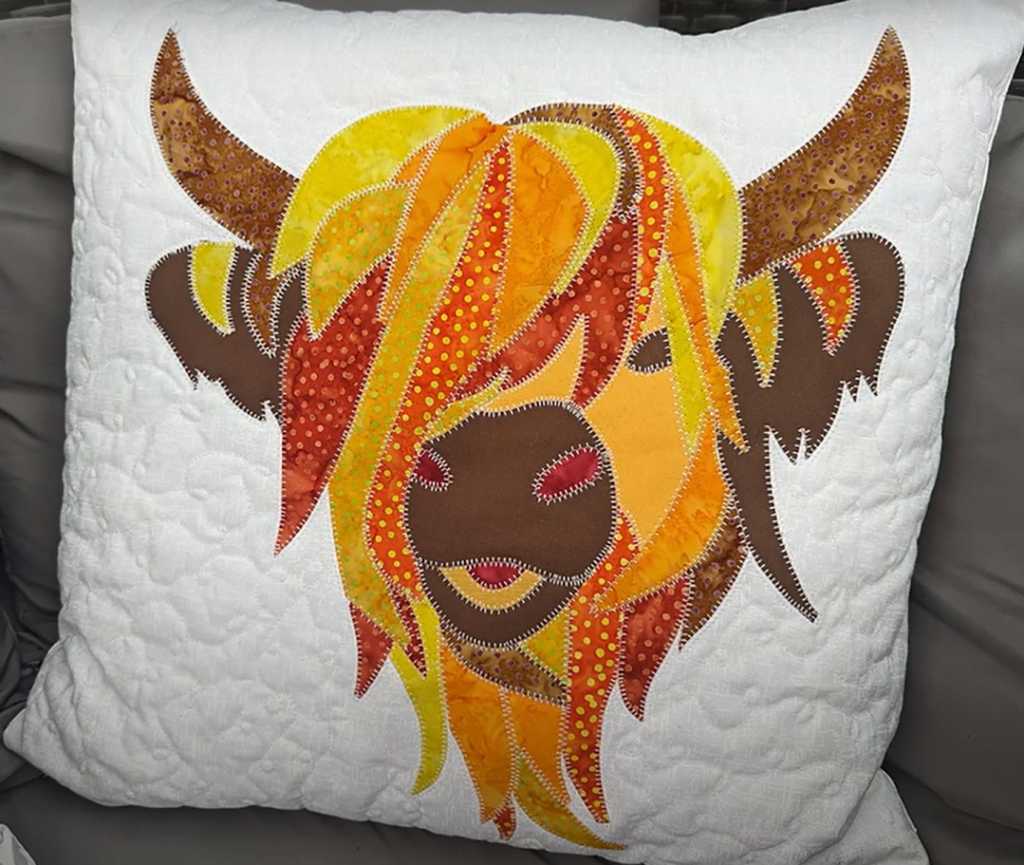
The Highland cow applique – Quilt Pattern is a charming and rustic quilting project that adds personality and warmth to any handmade creation. Known for their long fringes and gentle faces, Highland cows have captured the hearts of quilters around the world. Incorporating these iconic creatures into your quilt design brings a touch of country charm that feels both traditional and timeless.
Whether you’re a beginner or an experienced quilter, creating a quilt using a Highland cow applique – Quilt Pattern is an engaging way to explore textures, fabric layering, and the joy of appliqué techniques. This motif is particularly popular in farmhouse-themed decor or children’s quilts where whimsy and texture come together. From the detailed horns to the playful tufts of hair, this pattern allows plenty of room for creative expression.
Using a Highland cow applique – Quilt Pattern is also a great opportunity to personalize your quilts. You can play with different fabric prints to give the cow a unique personality, match it with seasonal palettes, or even customize it with accessories like flowers, scarves, or glasses. This not only makes your quilt stand out but also gives it sentimental value that’s perfect for gifting or displaying.
The first step in any successful Highland cow applique – Quilt Pattern project is selecting the right fabrics. Since this pattern relies on multiple fabric layers and textured designs, it’s best to choose high-quality cotton, felt, or flannel that holds its shape well. Neutral tones like browns, tans, creams, and whites are often used to mimic the natural coloring of Highland cows, but don’t be afraid to mix things up with vibrant or pastel palettes.
Using contrasting fabrics helps define the layers of the cow’s fur, face, and horns, giving the appliqué a more dimensional and realistic look. Batik and wool fabrics are also great choices for adding depth and texture. To ensure the pieces don’t fray, always prewash and press your fabrics before cutting them for the appliqué.
Fusible webbing is essential in this technique. It allows your fabric pieces to stick securely to the base layer before you stitch them. Lightweight fusible web is ideal for delicate projects, while heavier webbing provides sturdier adhesion for thicker fabrics. Don’t forget to prepare a stabilizer if you’re working on a thinner quilt base—it keeps your stitches from puckering and ensures a clean finish.
Your thread choice will also impact the overall effect of your Highland cow applique – Quilt Pattern. If you want the stitching to blend in, use matching thread colors. For a bold, outlined look, choose contrasting threads. Embroidery threads can add personality to the cow’s facial features or fur details, making the design come to life.
Lastly, gather essential tools such as sharp fabric scissors, a rotary cutter, appliqué needles, a pressing iron, and your sewing machine. Having everything ready before you begin streamlines the process and minimizes errors during stitching.
Once you have all your materials prepared, take a moment to study the layout of your Highland cow applique – Quilt Pattern. Planning the sequence of layering—starting from the background and moving forward—will help you avoid misalignment and make the final product neater and more professional-looking.
Creating a Highland cow applique – Quilt Pattern involves a few fundamental steps that ensure your quilt block turns out as intended. Following a step-by-step process makes the project enjoyable and manageable, even for those new to quilting.
Start by tracing the individual parts of the Highland cow pattern onto your fusible web. This usually includes the cow’s head, fur, snout, ears, horns, and other facial elements. Make sure to reverse the design if your pattern requires it, especially if you want the final image to face a certain direction.
Next, iron the fusible web to the wrong side of your chosen fabrics. Carefully cut out each piece along the traced lines. Take your time during this stage, as precision will affect how well the appliqué aligns later on. If necessary, use small scissors for intricate details like eyes or hair strands.
Once the pieces are cut, begin arranging them on the quilt background, starting with the base layer (often the cow’s head) and building up with features like the fur and horns. Use your iron to adhere each piece in place according to the instructions of your fusible web. Remember, layering in the correct order gives the appliqué a natural and cohesive look.
After all pieces are attached, it’s time to stitch around the edges. This step secures the appliqué permanently and adds decorative flair. You can use a zigzag stitch, blanket stitch, or even free-motion quilting, depending on the style you’re going for. A tight zigzag works well to prevent fraying, while a raw-edge technique gives a more rustic, textured finish.
When stitching around facial features, go slow and steady. These areas define the cow’s expression and need to be cleanly outlined. You can also use hand embroidery to enhance small features like the nostrils or eyes for added depth.
Once the appliqué is completed, finish the quilt block by adding borders or combining it with other blocks if you’re making a larger quilt. Always press your finished block to smooth it out and prepare it for final assembly.
One of the best things about the Highland cow applique – Quilt Pattern is how easily you can adapt it to suit your style. Whether you’re creating a wall hanging, a baby blanket, or a cushion cover, this pattern offers endless creative opportunities.
Add fun accessories to your cow, such as bows, glasses, or floral crowns. These embellishments can be made from felt, ribbon, or scrap fabric and sewn or glued onto the quilt block after the main appliqué is complete. They instantly add character and make your design more unique.
Use non-traditional colors to give your quilt a modern twist. Bright pinks, teals, and purples can turn your Highland cow into a whimsical centerpiece for a child’s room. Conversely, using earth tones and muted shades can help the quilt blend with rustic farmhouse decor.
Consider adding background elements such as grass, barns, or flowers to create a full scene around the cow. These can be simple shapes in appliqué or detailed images using embroidery and fabric paint. They enhance the storytelling element of your quilt and allow more room for creativity.
Mix and match textures within the same appliqué for visual interest. Combine flannel for the fur, cotton for the background, and linen for the horns. This gives your quilt a tactile appeal that invites people to touch and explore the design.
Add hand-stitched names, dates, or short messages to personalize your quilt as a keepsake or gift. This is especially meaningful for baby quilts or commemorative pieces that celebrate special occasions.
If you’re feeling ambitious, turn your single quilt block into a full series featuring different farm animals. The Highland cow applique – Quilt Pattern can be the star of a larger project that includes sheep, pigs, or chickens, creating a charming barnyard quilt.
Once the appliqué is complete, it’s time to quilt and finish your project. This stage is just as important as the design itself, as it brings structure, stability, and polish to your quilt.
Begin by layering your quilt top (with the Highland cow appliqué), batting, and backing fabric. Use safety pins or basting spray to hold the layers together before quilting. Make sure everything is smooth and centered to prevent puckering.
Choose a quilting method that complements your appliqué. Straight-line quilting adds a modern feel, while free-motion quilting allows for creativity with swirls or meandering lines. You can even echo-quilt around the cow to make it stand out more prominently.
Use a walking foot or free-motion foot on your sewing machine for smooth quilting. Adjust the stitch length according to your fabric thickness and test on a scrap before starting. Keep your speed steady to avoid uneven stitches.
When quilting near the appliqué, go slowly and pivot your quilt as needed to maintain accuracy. Quilting too close to delicate edges can cause them to lift or fray. Leave a small gap or reinforce with a stabilizing stitch if necessary.
Once quilting is done, trim the edges and square up your quilt. Choose a binding fabric that frames the design without overpowering it. Neutral bindings like gray, tan, or black often work best with busy appliqué patterns.
Finish the quilt by adding a label to the back with your name, the date, and any special notes. This final detail gives your project a personal touch and helps preserve its story for years to come.
What is a Highland cow applique – Quilt Pattern?
It is a quilting design that features the face or full body of a Highland cow made using fabric appliqué techniques. The pattern typically involves layering and stitching various fabric shapes to create the cow’s features.
Can beginners try the Highland cow applique?
Yes! While some detailing may take practice, the pattern is very beginner-friendly, especially if you use fusible webbing and simple stitch types.
What fabrics work best for the cow appliqué?
Cotton, flannel, and felt are excellent choices. They’re easy to cut and stitch and give a cozy, textured finish that works well for animal designs.
Do I need a special sewing machine for appliqué?
No special machine is required. Most home sewing machines can handle appliqué with zigzag or blanket stitches. A free-motion foot may be useful for more detailed quilting.
Can I resize the Highland cow pattern?
Absolutely. Most patterns can be enlarged or reduced using a copier or digital tools, allowing you to fit the appliqué to pillows, wall hangings, or larger quilts.
How do I keep the appliqué edges from fraying?
Use fusible web to bond pieces, and finish with a tight zigzag or satin stitch around each edge. Pre-washing your fabrics also reduces fraying.
The Highland cow applique – Quilt Pattern offers a fun and heartfelt way to bring personality and rustic charm into your quilting projects. Whether you’re creating a thoughtful gift, decorating your home, or simply exploring your creativity, this pattern delivers versatility, beauty, and handmade appeal.
Throughout this article, we’ve explored the materials you need, how to construct the appliqué, ways to personalize it, and tips for finishing your quilt. With just a bit of planning and patience, you can create a stunning piece that will be cherished for years.
If this guide helped or inspired you, feel free to share your thoughts! We’d love to hear your honest opinion and welcome your suggestions for future tutorials or patterns you’d like to explore.


