
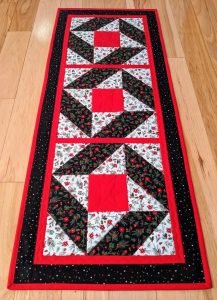
Bird Quilt Block Pattern
The world of quilting is full of creativity, and nothing makes it easier to start than a Charm pack quilt. This type of quilt is perfect for beginners and experienced quilters alike, thanks to the pre-cut 5″ x 5″ squares that save time and add charm to every project. Right from the first stitch, a Charm pack quilt feels rewarding and surprisingly simple to create.
Many quilters love making a Charm pack quilt because it blends ease and beauty. The pre-cut squares open endless possibilities to play with colors, prints, and textures without the hassle of measuring and cutting dozens of fabric pieces. Whether you want to create a cozy lap quilt or a decorative wall hanging, this method offers an accessible path to success.
In this article, you’ll discover an easy-to-follow step-by-step guide to making a Charm pack quilt. We’ll cover choosing your charm pack, planning your design, cutting and arranging the fabrics, and sewing everything together. Let’s bring your quilting vision to life with a timeless and colorful Charm pack quilt.

Selecting the perfect fabrics is the first step to making your Charm pack quilt truly unique. A standard charm pack usually includes 42 squares, each measuring 5″ x 5″. Look for collections with coordinating colors and patterns that match your style or your room’s theme.
Before you start, gather the essential tools for your Charm pack quilt: a rotary cutter, quilting ruler, cutting mat, pins or clips, iron, and a reliable sewing machine. Having these tools on hand ensures your quilting process is smooth and enjoyable.
Think about your quilt’s final size. For instance, two charm packs (about 84 squares) can make a quilt top roughly 36″ x 42″, perfect for a baby quilt. If you prefer a throw or bed quilt, you might need four to six charm packs, depending on your design.
Always wash and press your backing and binding fabrics before cutting. While charm packs are pre-cut, washing and pressing helps prevent shrinking or bleeding after quilting. Keep your charm squares unwashed to maintain sharp edges for precise sewing.
Consider adding solid-colored squares to your Charm pack quilt for contrast. Neutral colors like white, cream, or gray balance busy prints, making the design stand out beautifully.
Finally, lay out your charm squares on a design wall or flat surface before sewing. This helps visualize your quilt’s overall look and rearrange colors until you’re satisfied. Taking time at this stage will make your Charm pack quilt shine.
One of the joys of making a Charm pack quilt is the reduced cutting, but there’s still some preparation needed for the borders, binding, and backing. Here’s a simple list of what you’ll need to cut:
Arrange your charm squares in rows. For a simple layout, create 6 rows of 7 squares each. Play with the arrangement until you like the mix of prints and colors.
Use a quilting ruler to double-check the edges of your charm squares before sewing. Even pre-cut squares sometimes have uneven edges. A quick trim makes your seams match better.
Press each square gently with an iron before sewing. This helps flatten any folds and gives a professional look to your Charm pack quilt.
If your design includes sashing (strips between rows), cut strips at 2.5″ wide and the same length as your rows. Sashing adds structure and separates busy prints for a cleaner look.
Lay your arranged squares back on the design wall after trimming and pressing. Take a picture to keep track of your layout while you sew. It’s a helpful reference if pieces get mixed up.
Start sewing your Charm pack quilt by piecing the charm squares into rows. Place two squares right sides together and sew along one side with a ¼” seam allowance. Continue adding squares until you finish each row.
After sewing each row, press the seams. Press one row’s seams to the left and the next row’s seams to the right. This technique, called “nesting,” helps your corners match perfectly.
Once all the rows are ready, sew them together, matching the nested seams. Take your time and pin carefully for accuracy. Press all the seams after joining the rows.
Attach the border strips you cut earlier. Sew the shorter borders to the top and bottom first, press, then add the longer side borders. Borders frame your quilt and add size.
Prepare the quilt sandwich: lay the backing fabric right side down, place the batting on top, and finally add the quilt top right side up. Smooth out wrinkles and baste with pins or temporary adhesive spray.
Quilt as desired! You can do simple straight-line quilting along the seams (called “stitch in the ditch”) or free-motion quilting for a decorative look. Finish by sewing the binding strips around the edges, folding over, and hand-stitching or machine-stitching to close.
Your Charm pack quilt deserves a perfect finish. Once quilted and bound, give it a final press to flatten the seams and highlight the quilting texture.
Check all seams and edges to ensure everything is secure. Repair any loose threads before washing to prevent unraveling.
If you plan to gift your Charm pack quilt, consider adding a personalized label with your name, date, and message. Labels make quilts extra special and memorable.
Wash your finished quilt gently in cold water with mild detergent, then tumble dry on low or lay flat to dry. This softens the quilt and gives it a cozy look.
Store your quilt properly by folding loosely or hanging. Avoid direct sunlight to prevent fading, and rotate folded quilts occasionally to avoid permanent creases.
Finally, share your creation! Post photos on social media, join quilting groups, or display your Charm pack quilt at a local show. Your hard work can inspire fellow quilters and celebrate the art of quilting.
A Charm pack quilt brings creativity, warmth, and joy, whether for yourself or as a heartfelt gift. With pre-cut squares, thoughtful fabric choices, and careful sewing, anyone can make a quilt that looks beautiful and professional. From selecting your charm packs to sewing the final binding, each step transforms simple fabric squares into a quilt that tells a unique story.
If you’ve followed this guide, you now have everything you need to start making your own Charm pack quilt. Enjoy the process, experiment with colors, and don’t worry about perfection—quilting is all about love and creativity.
Have you tried making a Charm pack quilt before? Share your experience, ask questions, or leave suggestions in the comments below. Happy quilting!


