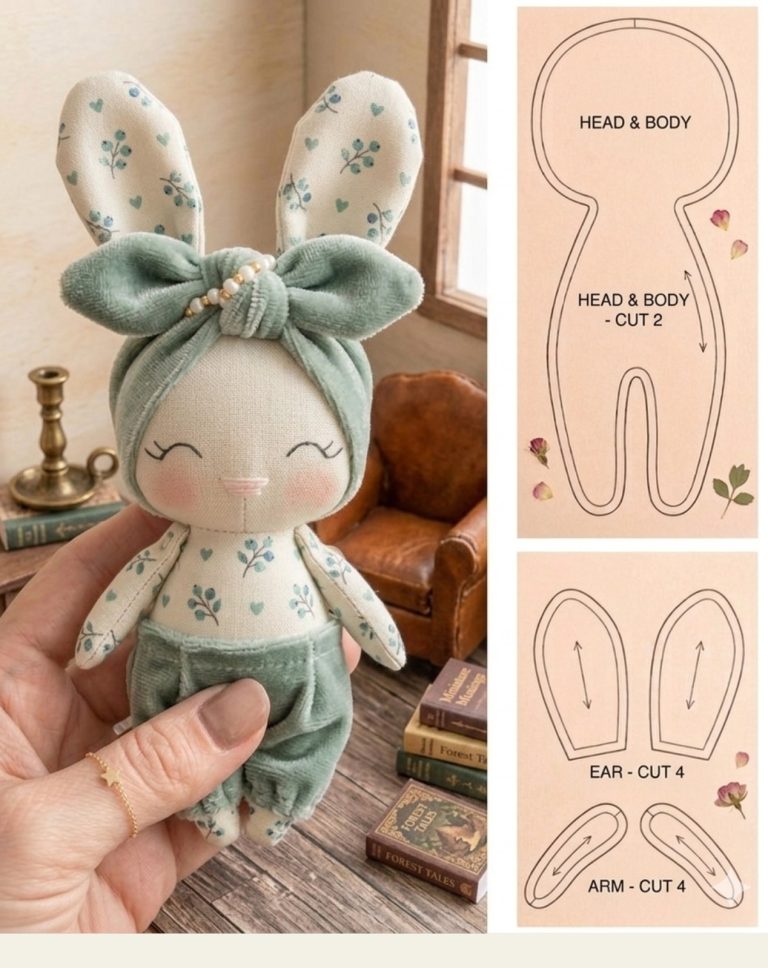
How to Make a Bunny Doll Pattern
How to Make a Bunny Doll Pattern is a delightful creative journey that combines imagination, craftsmanship, and the joy of handmade art.
Whether you enjoy sewing, crafting toys, or creating heartfelt gifts, learning how to make a bunny doll pattern can open the door to endless possibilities.
Handmade dolls have a special charm that store-bought toys simply cannot replicate, and bunny dolls in particular have a timeless appeal that makes them perfect for children, collectors, or decorative pieces.

When exploring how to make a bunny doll pattern, many crafters discover that the process is not only relaxing but also deeply rewarding. Designing and sewing your own doll allows you to choose fabrics, colors, and styles that reflect your personality or the theme you want to create. From soft pastel bunnies for nurseries to playful patterned rabbits for seasonal decorations, a bunny doll pattern offers flexibility and creativity in every step.
Another reason many people search for how to make a bunny doll pattern is the growing interest in handmade and sustainable crafts. Creating a doll from fabric scraps or leftover materials can reduce waste while producing something beautiful and meaningful. In addition, handmade toys often become treasured keepsakes that last for years. With a little patience and creativity, anyone can learn the techniques needed to design and sew a charming bunny doll.
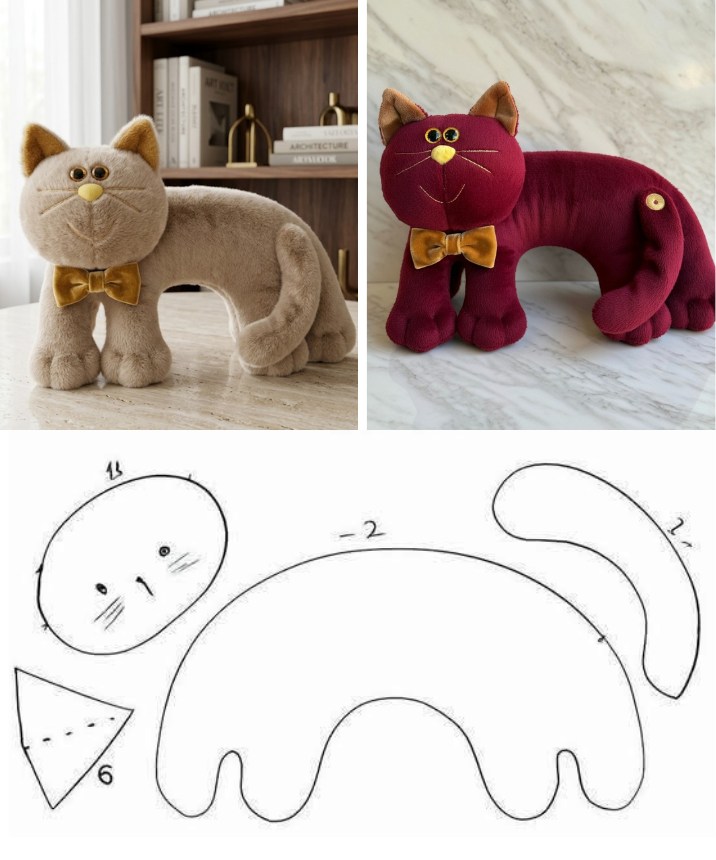
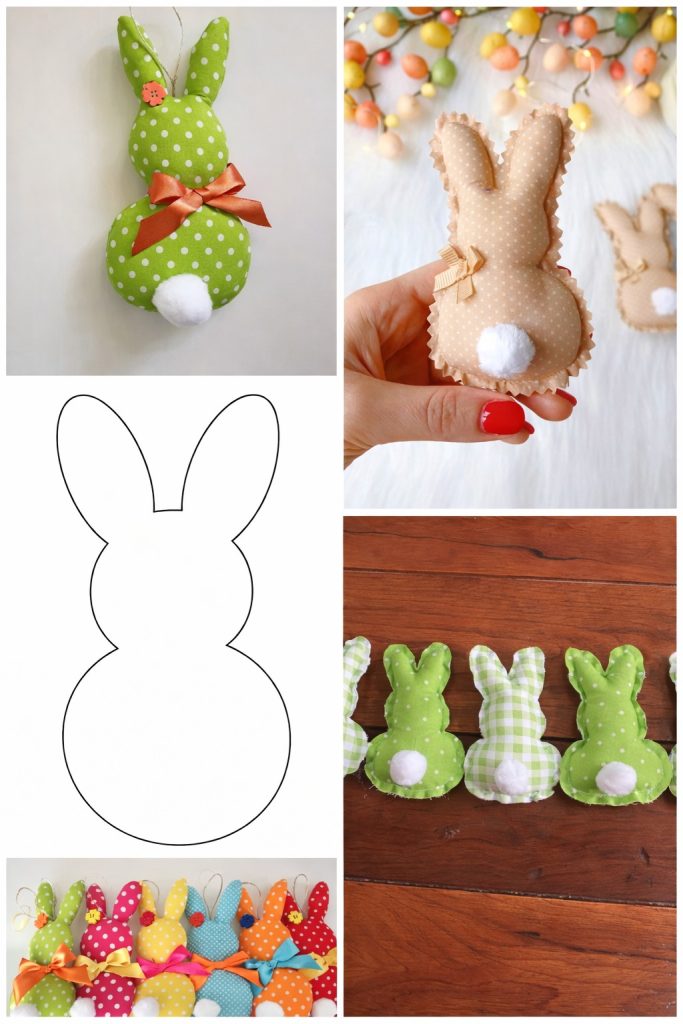
Learning how to make a bunny doll pattern begins with understanding what a pattern actually represents. A doll pattern is essentially a template that guides you in cutting fabric pieces that will be sewn together to form the final shape. In the case of a bunny doll, the pattern usually includes pieces for the body, ears, arms, legs, and sometimes clothing accessories.
When designing your own bunny doll pattern, it helps to sketch the doll first. This step allows you to visualize the proportions of the bunny’s body, the length of the ears, and the overall personality of the doll. Some bunny dolls are designed with long floppy ears, while others have short upright ears that give them a playful expression.
Another important element when learning how to make a bunny doll pattern is symmetry. Most doll patterns are created so that the left and right sides mirror each other. To achieve this, many crafters fold the paper pattern before cutting the shape, ensuring both sides remain balanced and visually pleasing.
Fabric choice also plays a key role in the pattern design. Soft cotton, linen, fleece, or felt are commonly used materials when creating bunny dolls. Each fabric behaves differently when sewn and stuffed, so selecting a fabric that matches the style of your pattern is essential for a successful result.
Measurements are another aspect to consider when developing your pattern pieces. Even a small change in size can affect the final look of the doll. For example, longer legs can create a whimsical bunny, while a rounder body can give the doll a cuddly appearance.
Finally, labeling each piece of the pattern helps keep everything organized. Writing notes such as “cut two pieces,” “place on fold,” or “add seam allowance” makes the process of assembling your bunny doll much easier and prevents confusion during sewing.
Once you understand the basics of how to make a bunny doll pattern, gathering the right materials becomes the next step. Preparing your tools and supplies ahead of time makes the crafting process smoother and more enjoyable. Having everything ready ensures you can focus on creativity rather than searching for missing materials.
Fabric is one of the most important elements in the process. When learning how to make a bunny doll pattern, choosing high-quality fabric can significantly influence the appearance and durability of the finished doll. Soft fabrics such as cotton or fleece are ideal because they are easy to sew and comfortable for plush toys.
Thread selection is also important. Matching thread color with the fabric creates a polished look, while contrasting thread can add decorative character if visible stitching is part of the design. Strong thread helps ensure that the seams remain secure, especially if the doll will be handled frequently.
Another essential material when practicing how to make a bunny doll pattern is stuffing. Polyester fiberfill is commonly used because it provides a soft and lightweight feel. The amount of stuffing determines whether the doll appears firm and structured or soft and cuddly.
Basic sewing tools are equally necessary. Sharp fabric scissors, sewing pins, needles, and a marking tool help ensure precise cuts and accurate stitching. Even beginners can achieve professional-looking results when their tools are reliable and well maintained.
Safety and finishing details should also be considered. If the bunny doll is intended for a child, embroidered facial features are often safer than plastic pieces. Buttons, ribbons, and embroidery can give personality to the doll while maintaining safety and durability.
Finally, preparing your workspace can make a big difference. A clean, well-lit area allows you to trace pattern pieces clearly and sew comfortably. Organization reduces mistakes and helps you stay focused on the creative process of building your bunny doll.
The most exciting part of learning how to make a bunny doll pattern is assembling the doll itself. Once your pattern pieces and materials are ready, the sewing process transforms simple fabric shapes into a charming handmade character.
Start by placing the pattern pieces onto your fabric and carefully tracing around them. This step ensures that the shapes remain consistent with the design of the bunny doll pattern. Be sure to include seam allowances so the pieces fit together correctly when sewn.
Next, cut the fabric pieces with precision. Clean edges make sewing easier and help maintain the intended shape of the doll. Take your time during this step because accurate cutting contributes greatly to the final appearance of your bunny.
After cutting, begin sewing the smaller pieces first, such as the ears and limbs. When following how to make a bunny doll pattern, assembling smaller components before attaching them to the body helps maintain control and accuracy during stitching.
Once the ears and limbs are prepared, sew the body pieces together while leaving a small opening. This opening allows you to turn the fabric right side out and add the stuffing that gives the doll its three-dimensional shape.
Carefully stuff the bunny using fiberfill or your preferred filling material. Distribute the stuffing evenly so the doll appears balanced. Too much stuffing can stretch the seams, while too little may cause the doll to look flat.
Finally, close the opening with neat hand stitches and add decorative details such as embroidered eyes, a nose, or a small bow. These finishing touches bring personality to the bunny and complete the process of how to make a bunny doll pattern.
One of the most enjoyable aspects of how to make a bunny doll pattern is the ability to personalize your creation. Every handmade bunny can become unique through creative choices in colors, fabrics, and decorative elements.
Different fabric patterns can dramatically change the personality of the doll. Floral prints may create a gentle spring-themed bunny, while bright geometric patterns can give the doll a modern and playful look. Experimenting with fabrics adds variety and creativity to the project.
Clothing accessories are another way to customize your bunny. Many crafters who explore how to make a bunny doll pattern enjoy sewing miniature dresses, scarves, or overalls for their dolls. These additions enhance the storytelling aspect of handmade toys.
Embroidery also offers endless possibilities for personalization. Simple stitches can create smiling faces, rosy cheeks, or decorative details on the body. Embroidered features add charm and help ensure the doll remains safe for children.
Another creative idea is to vary the size of the pattern. By enlarging or reducing the bunny doll pattern, you can create different versions such as small decorative ornaments or large plush toys suitable for cuddling.
Color coordination can also elevate the design. Using complementary shades for the body, ears, and clothing creates a harmonious appearance that feels professionally designed while still maintaining a handmade touch.
Finally, consider creating themed bunny dolls for special occasions. Seasonal designs for spring celebrations, baby showers, or holiday decorations can make your handmade bunny dolls even more meaningful and memorable.
What is a bunny doll pattern?
A bunny doll pattern is a template used to cut and assemble fabric pieces that form a rabbit-shaped doll. It guides crafters through the process of shaping the body, ears, arms, and legs to create a cohesive plush toy.
Is it difficult to learn how to make a bunny doll pattern?
No, beginners can successfully learn the process with basic sewing skills. Starting with a simple design and practicing the steps gradually helps build confidence and improves craftsmanship over time.
What type of fabric is best for a bunny doll?
Soft and durable fabrics such as cotton, fleece, or felt are commonly used. These materials are easy to sew and provide a comfortable texture for plush toys.
Can I make a bunny doll without a sewing machine?
Yes, many handmade dolls are created using hand sewing techniques. While a sewing machine can speed up the process, careful hand stitching can produce beautiful results.
How long does it take to complete a bunny doll?
The time varies depending on the complexity of the pattern and the crafter’s experience. A simple bunny doll may take a few hours, while more detailed versions with clothing or embroidery may take longer.
Can bunny dolls be washed?
Most fabric bunny dolls can be gently hand washed if they are made with washable materials. Allowing the doll to air dry helps preserve its shape and stitching.
Learning how to make a bunny doll pattern is a creative and fulfilling craft that combines artistic design with practical sewing skills. Throughout this article, we explored the essential steps involved in the process, from understanding the structure of a pattern and selecting the right materials to assembling the doll and adding personalized details.
By practicing the techniques described here, anyone can create beautiful handmade bunny dolls that bring joy to children, collectors, or home decor. The beauty of crafting your own bunny doll lies in the freedom to experiment with fabrics, colors, and styles, transforming a simple pattern into a unique and meaningful creation.
If you enjoyed learning how to make a bunny doll pattern, feel free to share your honest opinion about this guide and suggest new ideas or techniques you would like to explore. Your feedback and creative suggestions help inspire new projects and keep the crafting community growing.
