How to Make a Seashell-Shaped Quilt with Animal Details: Step-by-Step Guide
Advertising
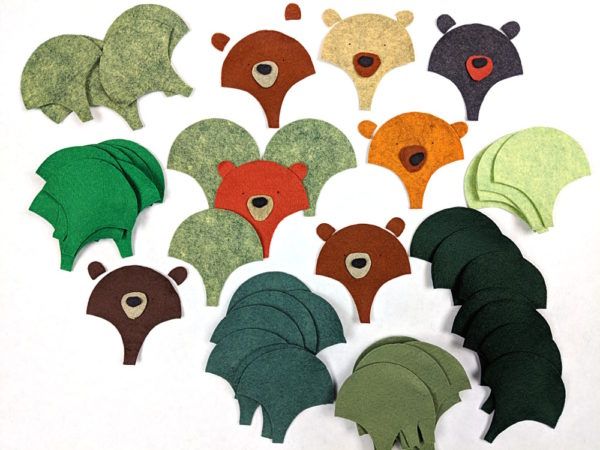
Creating a quilt with a seashell shape and animal details is a unique and creative project that brings a touch of nature into your home. This type of quilt is perfect for beach lovers, children’s rooms, or anyone who enjoys intricate quilt patterns. By incorporating animal details, such as sea turtles, dolphins, or starfish, you can add an extra layer of charm and personalization.
When designing this quilt, you need to focus on both the shape and the details. The seashell shape provides a beautiful base, while the animal details enhance the design, making it stand out. Choosing the right quilt patterns and fabrics is crucial to achieving a stunning final product.
Advertising
This guide will take you through a step-by-step process to create your own seashell-shaped quilt with animal details. Whether you are a beginner or an experienced quilter, following this structured approach will help you craft a unique and high-quality quilt that you can cherish for years.
Image from Pinterest
Choosing the Right Materials and Tools
Selecting the best materials and tools is the first step to creating a high-quality quilt. The right choices will ensure your quilt is durable, beautiful, and comfortable.
Fabric Selection: Choose soft, breathable cotton or linen fabrics with ocean-inspired colors. Look for quilt patterns that feature marine life, or opt for solid colors and add appliqué animal details later.
Batting: Select a lightweight batting if you want a thin quilt or a thicker one for added warmth. Cotton and wool battings work well for natural warmth and breathability.
Thread: Use high-quality, color-matching thread that complements your quilt’s design. Polyester thread is strong and resistant, while cotton thread blends naturally with fabrics.
Cutting Tools: A rotary cutter, quilting ruler, and cutting mat are essential for precise fabric cutting. Ensure your blades are sharp to avoid fraying edges.
Sewing Machine & Needles: A sewing machine with quilting capabilities is ideal. Use quilting needles that glide smoothly through multiple layers of fabric.
Marking Tools: Fabric pencils or disappearing ink pens help mark quilting lines and design placements accurately.
By gathering the right materials and tools before starting, you ensure a smoother quilting process and a more professional-looking quilt.
Designing and Cutting the Seashell Shape
The seashell shape is the foundation of your quilt, so designing it carefully will ensure a visually appealing result.
Create a Pattern: Draw or print a seashell outline on large paper. You can find quilt patterns online or sketch a symmetrical design with curved edges.
Determine the Size: Decide on the final dimensions of your quilt. A typical throw-size quilt is about 50” x 60”, but you can adjust based on preference.
Cut the Base Fabric: Using your pattern, trace and cut the seashell shape on the chosen base fabric. Leave a 1-inch seam allowance around the edges.
Prepare the Quilt Top: If your quilt has multiple fabric sections, cut them accordingly and sew them together before assembling the entire quilt.
Mark Quilting Lines: Lightly draw stitching guides that will follow the natural lines of a seashell. This helps maintain symmetry and structure.
Cut the Batting and Backing: Use the same seashell template to cut the batting and backing fabric, ensuring they match the quilt top.
Once your quilt patterns and cuts are ready, you’re prepared to assemble the quilt and bring your design to life.
Advertising
Adding Animal Details to Your Quilt
Animal details add charm and personality to your quilt. You can achieve this through appliqué, embroidery, or fabric painting.
Choose Animal Designs: Select marine creatures like sea turtles, dolphins, seahorses, or starfish to fit the ocean theme.
Create Appliqué Pieces: Cut animal shapes from contrasting fabrics. Iron-on adhesive backing helps secure them before stitching.
Sew the Appliqué: Use a zigzag or blanket stitch around the edges to attach the appliqué securely.
Embroidery for Details: Add eyes, fins, and other small details using embroidery techniques for a more intricate look.
Fabric Painting (Optional): Use non-toxic fabric paint to enhance animal designs, creating shading and dimension.
Arrange Placement Carefully: Position the animals evenly across the quilt to ensure balance and aesthetic appeal.
Adding these elements turns your quilt into a storytelling piece, making it truly one-of-a-kind.
Assembling and Finishing Your Seashell Quilt
The final assembly is crucial to ensuring your quilt is sturdy and visually pleasing.
Layering the Quilt: Place the backing fabric right-side down, batting in the middle, and the quilt top on top.
Pin or Baste: Secure the layers together using quilting pins or basting spray to prevent shifting during sewing.
Quilting the Layers: Follow your pre-marked quilting lines to stitch through all layers, reinforcing the seashell shape.
Trim Excess Fabric: Carefully trim any uneven edges, ensuring a neat finish.
Binding the Edges: Cut and sew a fabric binding around the quilt edges, mitering the corners for a professional touch.
Final Pressing: Iron the quilt lightly to smooth out wrinkles and set stitches in place.
Once your quilt is complete, it’s ready to be used as a cozy throw or displayed as a decorative piece in your home.
By following these steps, you can create a seashell-shaped quilt with animal details that showcases your creativity and quilting skills. Happy quilting!


