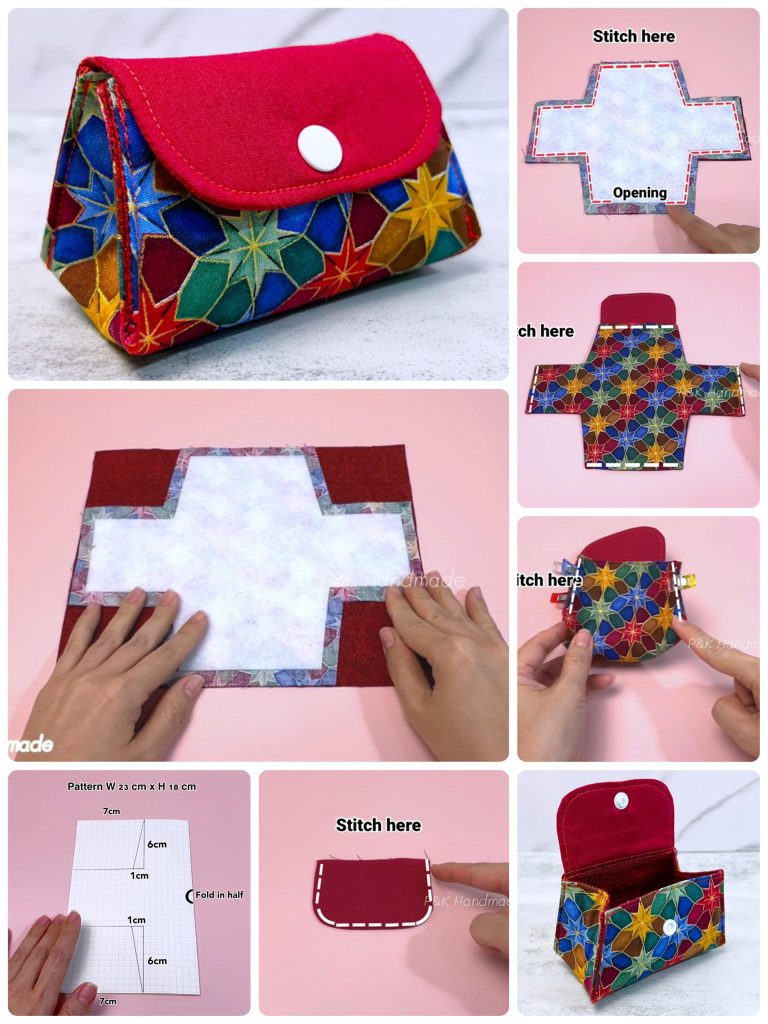
How to Make a Fabric Coin Purse Pattern
Learning how to use the 60º diamond ruler to make a table topper – quilt pattern can transform the way you approach quilting projects. This unique ruler makes it possible to cut precise shapes, create stunning geometric designs, and add a professional touch to your quilting work. Many beginners shy away from using specialty rulers because they seem complicated, but with a clear guide, this tool can open endless creative possibilities for your quilting journey.
The 60º diamond ruler is designed to cut diamonds, triangles, and hexagons, which are the building blocks of many traditional and modern quilt designs. When you learn how to handle it, you will find it much easier to create clean lines and accurate cuts, reducing fabric waste and saving valuable time. Making a table topper quilt pattern with this ruler is a perfect project because it is small enough for practice yet beautiful enough to display proudly in your home or gift to someone special.
This article will guide you step by step on how to use the 60º diamond ruler to make a table topper – quilt pattern, ensuring you understand the ruler’s functions, cutting techniques, piecing instructions, and finishing tips. By the end, you will feel confident in using this tool for a wide variety of quilting projects. Let’s dive into the details and unlock the full potential of this essential quilting accessory.
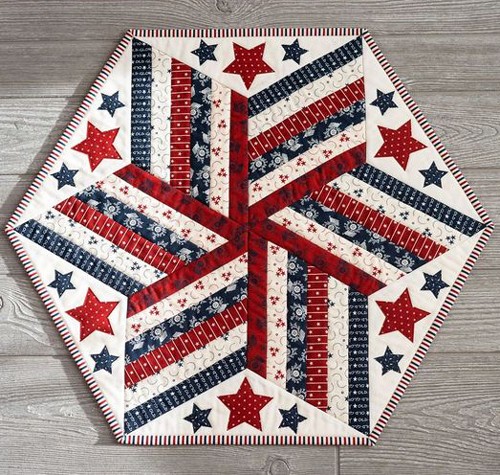
The 60º diamond ruler is a specialty tool designed for quilters who want precision and ease when cutting shapes commonly used in geometric quilt patterns. At first glance, the ruler might seem intimidating, with its angled markings and lines, but each marking has a clear purpose. By aligning your fabric correctly, you can cut exact 60º diamonds, triangles, or hexagons without guesswork.
One of the greatest benefits of this ruler is its versatility. With it, you can create simple diamond patterns, starbursts, or hexagon-based designs that appear intricate yet are simple once you understand the cutting process. This makes it ideal for both beginners and advanced quilters.
To begin, you will want to understand the measurements on the ruler. Each marking represents different sizes of diamonds and triangles you can cut. Practicing with scraps of fabric is a good way to become familiar with these measurements before starting your table topper quilt pattern.
Another advantage is the accuracy it provides. Traditional cutting methods often require several measurements with a standard ruler, which can lead to uneven shapes. The 60º diamond ruler eliminates this issue by guiding your rotary cutter directly along the right angle and edge.
When making a table topper, precision is key because even small inaccuracies can disrupt the symmetry of the finished quilt. By mastering the use of this ruler, you can ensure that your quilt blocks fit together seamlessly.
Overall, the 60º diamond ruler is more than just a tool; it is a gateway to more advanced and visually appealing quilting projects. Once you understand how it works, you will never look at cutting shapes the same way again.
The first step in learning how to use the 60º diamond ruler to make a table topper – quilt pattern is understanding how to cut your fabric correctly. Begin by preparing your fabric: wash, press, and straighten it so that it lays flat. This ensures that your cuts will be accurate and easy to piece together.
To cut diamonds, place the ruler on your fabric with the edge aligned to the grain. Use a rotary cutter along the side of the ruler to make your cut. Because the ruler has angled lines, you can rotate it to cut additional sides without moving your fabric too much.
When cutting triangles, the ruler markings make it easy to measure and cut different sizes. Align the base of the triangle with the straight edge of your fabric, then cut along the angled edge. You can repeat this to create multiple identical pieces quickly.
Cutting hexagons is slightly more advanced, but the ruler simplifies the process. By cutting diamonds and then combining them, you can easily piece together hexagon units that will form part of your table topper quilt pattern.
It is important to keep your rotary cutter sharp during this process. A dull blade can cause frayed edges and uneven cuts, which may affect your final quilt. Always check that your ruler does not slip by applying firm but gentle pressure as you cut.
Practice makes perfect. Even if your first few cuts are not ideal, continue practicing with scraps until you feel comfortable. This skill will greatly benefit your quilting projects for years to come.
Once your fabric pieces are cut with the 60º diamond ruler, the next step is piecing them together. Start by arranging your diamonds, triangles, and hexagons on a flat surface to visualize your design. The arrangement is key because it determines how your final table topper quilt pattern will look.
Begin sewing the pieces in rows. For example, you can sew diamonds together to form a star shape or combine triangles to make hexagons. Always use a consistent seam allowance, typically ¼ inch, to maintain accuracy throughout your quilt.
When sewing diamonds, match the points carefully. Pin them together at the intersections to avoid shifting while sewing. Press each seam after stitching to keep your blocks flat and neat.
As you build your table topper, you will notice that accuracy in cutting translates into easier piecing. If all your shapes are the correct size, they will align without gaps or distortions. This is one of the biggest advantages of using the 60º diamond ruler.
Continue piecing until you have completed the central design of your table topper. You can add borders using triangles or smaller diamonds to frame the design and give it a finished appearance.
Once piecing is complete, press the entire quilt top thoroughly. This step will prepare it for the final assembly, including layering, quilting, and binding.
The final stage of how to use the 60º diamond ruler to make a table topper – quilt pattern is quilting and finishing. After piecing, you should have a complete quilt top ready to be layered with batting and backing fabric.
Lay the backing fabric right side down, place the batting on top, and then position your quilt top face up. Smooth out any wrinkles before basting the layers together with safety pins or temporary adhesive spray.
When quilting, you can choose straight-line quilting or free-motion quilting, depending on your preference. Straight-line quilting works beautifully with geometric patterns because it enhances the crisp lines created by the 60º diamond ruler.
Bind your table topper with a fabric that complements your design. Binding not only secures the edges but also adds a decorative frame around your quilt. Sewing the binding with care ensures a neat finish.
Remember to measure your topper before cutting binding strips. Precision at this stage guarantees that the edges are even and professional-looking.
Once your binding is attached, give the table topper a final press. Your quilt is now complete and ready to be displayed on your dining or coffee table, adding a handmade and stylish touch to your home décor.
What is the 60º diamond ruler used for in quilting?
The 60º diamond ruler is designed to cut diamonds, triangles, and hexagons accurately, making it easier to create geometric quilt patterns like stars and hexagon blocks.
Is the 60º diamond ruler suitable for beginners?
Yes, it is suitable for beginners. Although it looks complex at first, with a little practice, quilters at any level can use it effectively.
What size table topper can I make with the 60º diamond ruler?
The size of your table topper depends on the number of units you cut and piece together. The ruler markings allow you to create different block sizes, giving you flexibility in your design.
Do I need special fabric for this project?
No special fabric is required. However, quilting cotton works best because it is easy to cut and piece, holding its shape well during the process.
How do I prevent fabric from slipping while cutting?
Apply gentle but firm pressure on the ruler with your hand, and make sure to use a sharp rotary cutter. Non-slip grips can also be added to the back of the ruler for extra stability.
Can I use the 60º diamond ruler for projects other than a table topper?
Absolutely. This ruler can be used for many quilting projects, including full-sized quilts, wall hangings, and decorative runners.
In this article, we explored how to use the 60º diamond ruler to make a table topper – quilt pattern from start to finish. We covered understanding the ruler, cutting fabric, piecing the quilt top, and finishing the project with quilting and binding. By mastering this tool, you can create precise, beautiful, and professional-looking quilts that stand out.
Now that you have the knowledge, it’s time to put it into practice. Try using the 60º diamond ruler in your next quilting project and see how it transforms your results. I would love to hear your sincere opinion and suggestions about this article—feel free to share your thoughts and experiences with this technique.

