
Bird Quilt Block Pattern
If you are looking for a beautiful and versatile quilting project, the Jewel Box Block Free Pattern is a fantastic choice. This pattern is beloved by quilters for its elegant layout, playful design, and endless color combinations. In this comprehensive guide, you will learn how to make the Jewel Box Block Free Pattern step-by-step, including all fabric cuts, measurements, and assembly instructions.
Whether you are a beginner or an experienced quilter, the Jewel Box Block Free Pattern offers a delightful sewing experience. This article will walk you through every stage of the process, ensuring that your quilt turns out stunning. Keep reading to discover how you can bring this dazzling pattern to life with simple techniques and careful planning.
From choosing the right fabrics to the final stitches, every detail matters when making the Jewel Box Block Free Pattern. You will find detailed instructions on cutting, piecing, and pressing to create clean, sharp lines in your quilt. Plus, you’ll learn valuable tips for fabric selection that enhances the beauty of this classic block.

Many quilters love the versatility of the Jewel Box Block Free Pattern because it looks incredible in scrappy versions as well as coordinated color schemes. This block combines half-square triangles and four-patch units to create a sparkling effect that resembles a box of precious gems.
By the end of this guide, you will have the confidence to create your own quilt using the Jewel Box Block Free Pattern, whether you want to make a full quilt, a wall hanging, or a table runner. Let’s dive into the details and start cutting those fabrics.
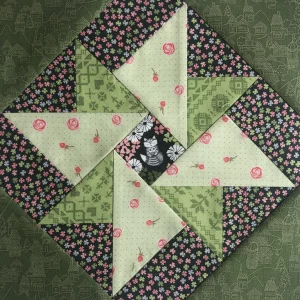
The Jewel Box Block Free Pattern is a traditional quilt block that consists of a combination of four-patch units and half-square triangles. This creates a beautiful secondary pattern when multiple blocks are joined together.
One of the most appealing features of the Jewel Box Block Free Pattern is its adaptability. You can use scraps from your stash or select a curated palette for a cohesive look. Either way, the result is always stunning.
Each block typically consists of two contrasting colors — a light fabric and a dark fabric — to highlight the design. The contrast helps create the illusion of boxes filled with sparkling jewels.
To make a single block for the Jewel Box Block Free Pattern, you will need a combination of squares and triangles. When multiplied, these blocks interlock beautifully, forming an intricate lattice.
This pattern is perfect for using pre-cuts like fat quarters or charm squares. If you prefer, you can cut from yardage as well. Either method works beautifully with the Jewel Box Block Free Pattern.
Before diving into the cutting instructions, take a moment to plan your color placement. The magic of the Jewel Box Block Free Pattern comes from the clever use of light and dark contrasts.
To create one 12-inch finished Jewel Box Block Free Pattern, you will need two main fabrics: one light and one dark. Below are the fabric cuts for each block.
These measurements make a single block, but you can multiply them depending on how many blocks you plan for your quilt.
Start by organizing your fabric cuts into piles for the four-patch units and the half-square triangles. Keeping organized at this stage ensures smooth assembly later.
Make sure your fabrics are pressed flat before cutting. Accurate cuts are essential for a precise Jewel Box Block Free Pattern that aligns perfectly.
If you are using scraps, ensure that each scrap piece is large enough to accommodate the needed cuts, especially for the 4” squares used for triangles.
Always use a rotary cutter, a quilting ruler, and a self-healing mat for the most accurate cuts. This step is vital for a neat and professional-looking Jewel Box Block Free Pattern.
Begin with the half-square triangles (HSTs). Place one light 4” square and one dark 4” square right sides together. Draw a diagonal line on the back of the lighter square.
Sew a seam 1/4 inch away from both sides of the drawn line. Then, cut along the line to create two HSTs. Press the seams open or toward the dark side, depending on your preference.
Trim each HST to exactly 3.5” x 3.5” to match the size of the four-patch units. This ensures your block will fit together accurately in the Jewel Box Block Free Pattern.
Next, assemble the four-patch units. Combine two light 3.5” squares with two dark 3.5” squares. Arrange them so that the dark and light fabrics are diagonal from each other.
Sew the squares together in pairs, pressing the seams in opposite directions so the intersections nest beautifully when joining the rows.
Join the pairs to complete the four-patch units. Ensure your seams match up neatly for crisp intersections. You will need two four-patch units for each Jewel Box Block Free Pattern.
Lay out your block with two HSTs, two four-patch units, and four plain 3.5” squares (two light, two dark). This layout forms the signature design of the Jewel Box Block Free Pattern.
Arrange the components in a 3×3 grid. Typically, place the HSTs in one corner, the four-patch units adjacent, and the solid squares filling in the rest of the grid.
Start by sewing the pieces into rows. Pay attention to the orientation of the HSTs to ensure the pattern flows correctly in the final block.
Once your rows are assembled, join them together to complete the block. Carefully press the seams — either open or to the side — depending on the bulk and how the block lies flat.
Check the final measurement of your block. It should measure 12.5” x 12.5” before sewing into a quilt top, which becomes 12” x 12” once finished.
Repeat this process for as many blocks as you need. The Jewel Box Block Free Pattern looks stunning in quilts of any size, from baby quilts to king-sized bed quilts.
The Jewel Box Block Free Pattern is a timeless quilting design that offers both simplicity and elegance. Its versatile structure makes it ideal for all kinds of fabric styles, from modern prints to classic florals.
One of the best things about the Jewel Box Block Free Pattern is how adaptable it is. Whether you prefer scrappy looks or coordinated palettes, this block always turns out beautiful.
When making multiple blocks, chain-piecing your four-patch units and HSTs will save you a lot of time. Efficiency is key when working on larger quilt projects.
For added visual interest, consider alternating the placement of dark and light fabrics in different blocks. This subtle shift can create dynamic movement across your quilt.
If you’d like, you can also add sashing or borders to frame each block and enhance the jewel-like appearance of the overall design.
I hope this step-by-step guide for the Jewel Box Block Free Pattern has inspired you to create your own beautiful quilt. Share your thoughts, questions, or your finished projects in the comments below — I’d love to hear from you!


