Mirror Quilt Pattern: A Comprehensive Guide to Crafting Stunning Quilts
Advertising
The Mirror quilt pattern is an enchanting design that brings symmetry and elegance to your quilting projects. Perfect for both beginners and experienced quilters, this pattern uses reflective arrangements of fabric pieces to create visually striking designs. Whether you’re looking to add a modern twist to traditional quilt patterns or experiment with your creativity, mastering the Mirror quilt pattern is an exciting challenge.
This pattern gets its name from the way fabric pieces are mirrored across an axis, resulting in a harmonious, balanced look. The beauty of the Mirror quilt pattern lies in its versatility; you can play with colors, shapes, and textures to suit your unique style. Its precision and symmetry make it an eye-catching addition to any collection, whether displayed as a wall hanging or used as a functional quilt.
Advertising
In this article, we’ll dive into the world of the Mirror quilt pattern. From understanding the basics to creating your first design, we’ll cover everything you need to know. By the end, you’ll not only have a thorough understanding of this quilting technique but also a step-by-step guide to crafting your very own masterpiece.
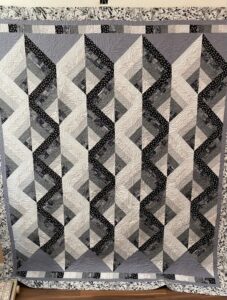
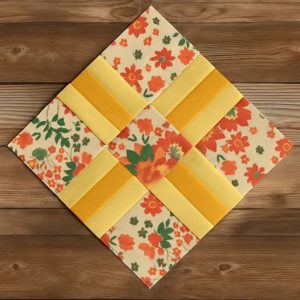
Image From Pinterest
Understanding the Basics of the Mirror Quilt Pattern
The Mirror quilt pattern revolves around the principle of symmetry. It involves arranging fabric pieces in a way that each section reflects its counterpart across a central axis. This creates a sense of balance and rhythm, making the quilt visually appealing.
Fabric Selection: Start by choosing fabrics that complement each other. Bold, contrasting colors work well for creating a dramatic effect, while pastel tones are ideal for a softer, more delicate look. Opt for high-quality quilting cotton for best results.
Planning the Design: Before cutting any fabric, sketch out your design on graph paper. This helps you visualize the mirrored layout and ensures precision during assembly.
Cutting the Pieces: Accurate cutting is essential for achieving symmetry. Use a rotary cutter, quilting ruler, and cutting mat to ensure clean, precise edges. The dimensions for each piece will depend on the size of your quilt.
Arranging the Layout: Lay out your fabric pieces on a flat surface to see how they mirror each other. This step is crucial for identifying and correcting any misalignments.
Sewing the Blocks: Assemble your quilt blocks by sewing the mirrored pieces together. Press the seams flat to achieve a polished look.
Final Assembly: Once all the blocks are complete, join them to form the quilt top. Add batting, backing fabric, and binding to finish your project.
Choosing the Right Tools and Materials
Having the right tools and materials is crucial for the success of your Mirror quilt pattern project. Here’s a breakdown of what you’ll need:
Rotary Cutter and Ruler: These tools are essential for precise fabric cutting. A rotary cutter ensures clean edges, while a quilting ruler helps maintain accuracy.
Cutting Mat: Protect your workspace and achieve straight cuts with a self-healing cutting mat.
High-Quality Fabric: Choose fabrics that coordinate well together. Look for quilting cotton, which is durable and easy to work with.
Thread: Use a thread that matches or complements your fabric. A high-quality polyester or cotton thread works best.
Sewing Machine: While hand quilting is an option, a sewing machine will save time and provide consistent stitches.
Iron and Pressing Tools: Pressing seams is crucial for achieving a professional finish. An iron and a pressing mat will help keep your quilt blocks flat and crisp.
Step-by-Step Process for Crafting the Mirror Quilt Pattern
Prepare the Fabric: Wash and iron your fabric to pre-shrink it and remove any wrinkles. This step ensures smooth and even cutting.
Cut Fabric Pieces: Use your rotary cutter, ruler, and mat to cut the fabric into the desired shapes and sizes. For a basic Mirror quilt pattern, cut squares and triangles.
Mark the Axis: Draw a line on your quilt blocks to indicate the axis of symmetry. This helps guide the placement of each fabric piece.
Assemble the Blocks: Begin sewing the mirrored pieces together, starting from the center and working outward. Use a ¼-inch seam allowance for consistency.
Press the Seams: After sewing each piece, press the seams flat. This step ensures that your quilt top lies smoothly.
Join the Blocks: Once all blocks are complete, sew them together to form the quilt top. Be mindful of alignment to maintain the mirrored effect.
Customizing Your Mirror Quilt Pattern
One of the best aspects of the Mirror quilt pattern is its adaptability. Here are some ideas for customizing your design:
Advertising
Experiment with Color: Play with bold and contrasting hues to create a striking visual impact. Alternatively, use monochromatic tones for a more understated look.
Incorporate Patterns: Mix solid fabrics with prints to add depth and interest to your quilt. Stripes, polka dots, and floral prints work beautifully.
Vary the Shapes: While squares and triangles are common, you can use hexagons, diamonds, or other geometric shapes to create unique designs.
Use Gradient Fabrics: Gradients add a dynamic touch to your quilt, creating a sense of movement and flow.
Add Embellishments: Consider adding embroidery, applique, or fabric paint to enhance your quilt’s design.
Play with Scale: Vary the size of your mirrored sections for a modern and artistic effect.
Tips for Perfecting the Mirror Quilt Pattern
Crafting a flawless Mirror quilt pattern requires attention to detail and practice. Keep these tips in mind:
Start Small: If you’re new to quilting, begin with a small project, like a pillow cover or wall hanging, to practice the technique.
Double-Check Measurements: Accuracy is key in creating a symmetrical design. Measure twice before cutting.
Use Pins: Pinning fabric pieces together before sewing helps maintain alignment.
Test Your Design: Lay out all the fabric pieces before sewing to ensure the mirrored effect looks as expected.
Stay Organized: Label your fabric pieces and blocks to avoid confusion during assembly.
Practice Patience: Symmetry takes time and effort. Don’t rush the process; enjoy the journey of creating your masterpiece.
The Mirror quilt pattern is a stunning and versatile design that allows you to showcase your creativity while mastering the art of symmetry. By carefully selecting fabrics, planning your design, and following the step-by-step guide provided, you can create a quilt that’s both beautiful and functional. Whether you’re crafting a gift or adding to your own collection, this pattern is sure to impress.
With practice and patience, you’ll find joy in the process of quilting and pride in the finished product. So, gather your tools, choose your fabrics, and start creating your own Mirror quilt pattern masterpiece today!


