
Bird Quilt Block Pattern
The Open Skies BOM Month 6 block quilt is an inspiring chapter in the beloved Block of the Month (BOM) series, capturing the essence of creativity and tradition in quilting. Whether you are an experienced quilter or just starting out, this month’s pattern offers fresh techniques and satisfying results. The beauty of the Open Skies BOM Month 6 block lies in its balanced geometry, delicate color play, and the joy it brings when each piece comes together.
In this article, we’ll guide you step by step on how to create the Open Skies BOM Month 6 block quilt, sharing precise fabric cuts and measurements, plus practical quilting tips. You’ll find everything you need to know: from selecting fabrics to assembling each section, finishing with a professional look that honors your craftsmanship.
Let’s dive deep into the story behind the Open Skies BOM Month 6, explore its details, and help you bring this quilt block to life, stitch by stitch.
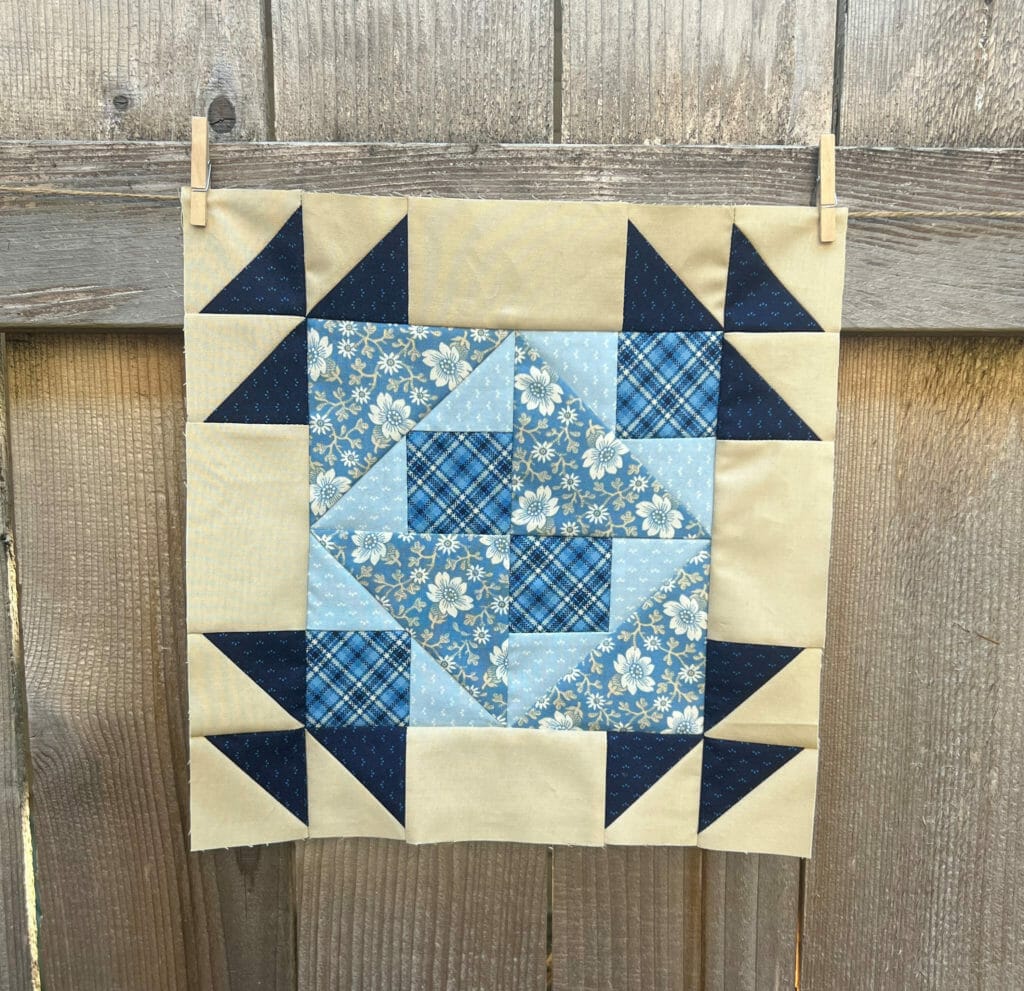
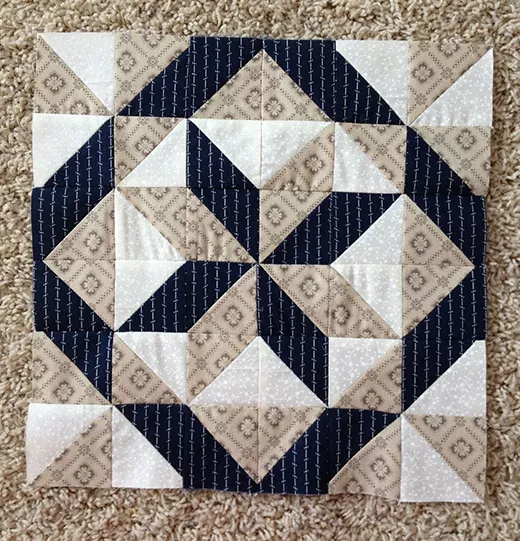
The Open Skies BOM Month 6 block quilt pattern is built around a charming star motif combined with subtle framing pieces that give it a fresh, open look. It perfectly balances complexity and clarity, making it both challenging and satisfying to piece together.
To begin, consider your color palette. Traditionally, the Open Skies BOM Month 6 block quilt looks stunning in soft blues, cream backgrounds, and warm accent tones like muted mustard or dusty rose. Choose fabrics that contrast enough to define each shape while still harmonizing across the quilt top.
Another key element is the block size. For the Open Skies BOM Month 6, the finished block measures 12½” square (unfinished). This size fits seamlessly with previous and future blocks in the series, keeping your quilt consistent and well-proportioned.
Take a closer look at the main components of the design: a central star, four flying geese units, corner squares, and outer frame strips. Each piece works together to create depth and motion, reflecting the open skies inspiration that gives the block its name.
Finally, pay attention to precision. The success of the Open Skies BOM Month 6 block quilt depends on accurate cutting and careful sewing. Always double-check measurements before cutting, and press seams as you go to keep everything flat and square.
To make your own Open Skies BOM Month 6 block quilt, you’ll need to prepare the following fabric cuts. These measurements assume you’re making one 12½” unfinished block:
The color arrangement is part of what makes the Open Skies BOM Month 6 block quilt so elegant. Choose lighter shades for the background rectangles and darker, richer colors for the triangles to let the star stand out.
For added interest, you could introduce subtle prints in the corner squares or border strips. This small detail can bring a handcrafted, vintage feel to the overall design.
When cutting, use a sharp rotary cutter and a quilting ruler to ensure straight edges and precise angles. Consistency is key: every piece must be true to size to avoid warping when you assemble the block.
Finally, organize your fabric pieces on your worktable before sewing. This visual map helps you catch mistakes before stitching and ensures the pattern comes together just as planned.
Creating the Open Skies BOM Month 6 block quilt is a joyful process that can be broken down into manageable steps. Here’s a clear, step-by-step guide to help you from start to finish.
While the traditional Open Skies BOM Month 6 pattern is beautiful on its own, adding your personal touch can make your quilt block unique and meaningful.
First, consider using gradient fabrics or ombré prints for the flying geese. This creates a gentle color transition across your block, adding depth and a dynamic effect.
Another idea is to incorporate small fussy-cut prints in the center square, featuring motifs like flowers, stars, or symbols that hold special meaning. It personalizes your Open Skies BOM Month 6 block quilt and turns each block into a storytelling piece.
Don’t forget texture: using fabrics like linen blends, batiks, or lightly textured cottons can add richness to the finished block, making it stand out when joined with other BOM blocks.
Experiment with quilting patterns too. When you finish piecing, you could quilt around the star points or add echo quilting around the flying geese for added dimension.
If you enjoy handwork, add hand embroidery details to the corner squares or the center square. Small stitches can highlight colors and create a charming, heirloom look.
Lastly, document your process. Take photos as you cut, sew, and press. Not only is this fun to share with fellow quilters, but it also becomes a part of your personal quilting story.
The Open Skies BOM Month 6 block quilt is more than just another pattern – it’s a chance to learn, explore creativity, and add something beautiful to your quilt project. From selecting fabrics and carefully cutting each piece to the satisfaction of sewing them into place, every step brings joy and accomplishment.
With precise fabric cuts and the step-by-step instructions shared here, you’re well-prepared to create your own stunning Open Skies BOM Month 6 block quilt. Embrace your creativity, experiment with colors and textures, and let this block reflect your unique quilting style.
Quilting is a journey stitched together by patience, passion, and creativity. Share your finished block, inspire fellow makers, and keep the tradition of quilting alive, one beautiful block at a time.
If you enjoyed this guide, feel free to share your thoughts or questions below. Happy quilting, and may your Open Skies BOM Month 6 bring as much joy to you as it has to countless quilters worldwide!


