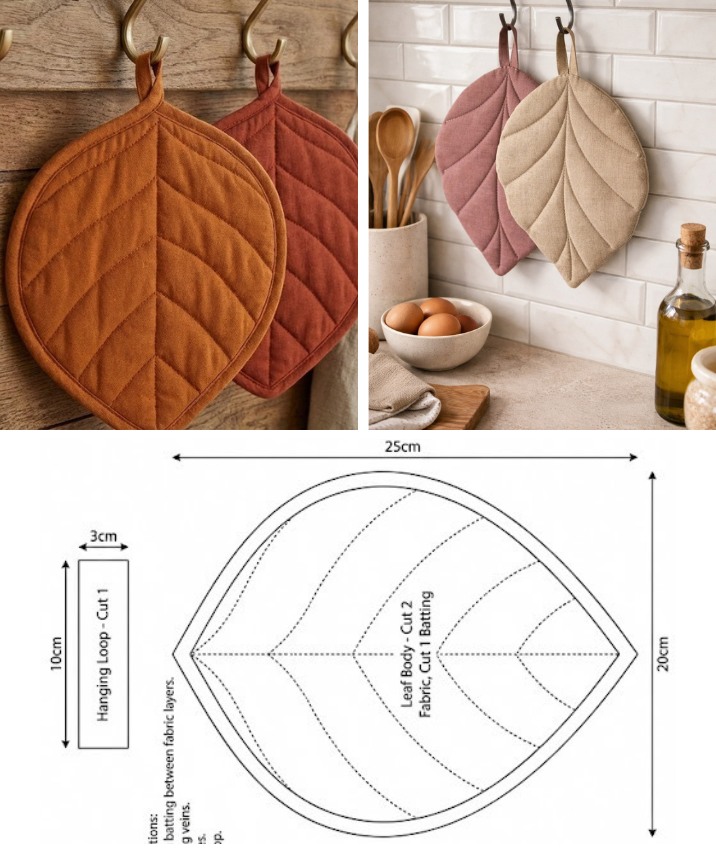
Padding leaf-shaped pot holder Pattern
If you are searching for the perfect project to brighten your quilting journey, the Picking Petals Quilt Pattern is a delightful choice. This pattern combines elegance, simplicity, and a charming floral design that quilters of all levels will love. Whether you are creating a quilt for your home or as a thoughtful gift, this guide will walk you through every step of making the Picking Petals Quilt Pattern.
The beauty of this quilt lies in its versatility. You can use vibrant colors for a bold statement or soft pastels for a delicate, cozy finish. The Picking Petals Quilt Pattern is designed to look like scattered petals, bringing a whimsical touch to any space.
In this guide, you will learn how to select fabrics, cut your pieces accurately, assemble your blocks, and complete your quilt. All the necessary fabric measurements and cutting instructions are included to ensure your project is a success.

Let’s dive into the wonderful process of making the Picking Petals Quilt Pattern, step by step. Get ready to enjoy the creative process while crafting something truly beautiful and unique.
Whether you are a beginner or an experienced quilter, this pattern offers the perfect balance between simplicity and artistic flair. Let’s begin with fabric selection and preparation to set the stage for your quilt.
The first step to creating the Picking Petals Quilt Pattern is gathering the right materials. Choosing high-quality fabrics will ensure a stunning and durable quilt.
For a finished quilt size of approximately 60″ x 72″, you will need the following fabrics:
Start by cutting the background fabric into:
Next, cut your petal fabrics (from the fat quarters) into:
From the accent fabric, cut:
For the binding, cut:
Double-check all your cuts before moving forward. Accuracy is key to ensuring your Picking Petals Quilt Pattern fits together perfectly.
Label your fabric piles according to their purpose (background, petals, centers) to make the assembly process smoother.
Now that your fabrics are cut, it’s time to start assembling the blocks for the Picking Petals Quilt Pattern. This is where your quilt begins to come to life.
Begin with one background rectangle (6.5″ x 8.5″) and lay it on your workspace. This serves as the base for your petals.
Position two petal shapes diagonally across the rectangle. Place them so that the ends almost touch the shorter sides of the rectangle, with a slight curve to mimic the look of flower petals.
Pin the petals securely in place. Take your accent fabric circle and center it where the two petals overlap. This creates the illusion of the flower’s center.
Using an applique stitch—either by hand or machine—secure the petals and the center circle to the background rectangle. A blanket stitch or small zigzag works beautifully for this step.
Repeat this process for all 48 blocks. Consistency in placement will help your quilt maintain balance and symmetry.
Once all blocks are complete, press them well. This ensures that your quilt top will be flat and easier to assemble.
With all 48 blocks prepared, it’s time to lay out your Picking Petals Quilt Pattern. This step allows you to decide on the final arrangement before sewing everything together.
Arrange your blocks into 6 rows of 8 blocks each. Play with the placement of colors and patterns to create an even distribution of tones and designs.
Check that petal directions flow harmoniously. Some quilters prefer all petals facing the same direction, while others enjoy a more scattered, whimsical look.
Once satisfied with the layout, start sewing the blocks together, row by row. Use a 1/4″ seam allowance for consistency.
After assembling each row, press the seams. Alternate pressing seams to the left on one row and to the right on the next to reduce bulk.
Sew all the rows together, carefully aligning the seams between blocks for a polished appearance.
Once the quilt top is complete, give it a final press. You’re now ready to prepare the quilt sandwich for finishing your Picking Petals Quilt Pattern.
Now that your quilt top is assembled, it’s time to bring your Picking Petals Quilt Pattern to completion. This stage involves layering, quilting, and binding.
Start by preparing your quilt backing. Cut the 4 yards of backing fabric into two pieces measuring 72″ each and sew them together along the long edge. This will create a backing piece large enough for the quilt.
Lay the batting down first, then place the backing fabric right side down, and finally the quilt top right side up. Smooth out each layer carefully to avoid wrinkles or puckers.
Baste the quilt layers together using safety pins, basting spray, or large hand stitches. Proper basting is crucial for keeping the quilt layers from shifting during quilting.
Choose your quilting method. Simple straight-line quilting following the seam lines creates a clean, modern look. Alternatively, free-motion quilting with loops or flower motifs complements the petal theme beautifully.
Once quilting is complete, trim the excess batting and backing, ensuring the edges are even with the quilt top.
Attach the binding strips by sewing them to the front of the quilt, folding them over to the back, and hand-stitching or machine-stitching them in place. Your Picking Petals Quilt Pattern is now ready to be enjoyed!
The Picking Petals Quilt Pattern is a charming and versatile design that offers both beauty and simplicity. Whether you’re a beginner learning the basics or an experienced quilter looking for a fun project, this pattern is an excellent choice.
From selecting vibrant fabrics to meticulously cutting each piece, every step contributes to the beauty of the final quilt. The step-by-step process of assembling petal blocks and bringing them together into a cohesive quilt top is both rewarding and enjoyable.
Adding your own creative touch with quilting designs and fabric choices makes each Picking Petals Quilt Pattern unique. The finished quilt is not only a warm, cozy addition to your home but also a meaningful handmade treasure.
If you’re inspired to start your own Picking Petals Quilt Pattern, gather your fabrics, follow this guide, and enjoy the process of creating something truly special.
Thank you for reading! If you have any questions, suggestions, or would like to share your finished quilt, feel free to leave a comment below. Happy quilting!


