
Bird Quilt Block Pattern
The Pinwheel Star Quilt Block is a charming fusion of two beloved quilt designs: the dynamic pinwheel and the elegant star. This beautiful block is a favorite among quilters who love traditional patterns with a playful, modern edge. Whether you’re creating a full quilt or just a sampler, the Pinwheel Star Quilt Block adds motion and sparkle to your quilting project.
This block not only looks complex but is surprisingly beginner-friendly. With careful fabric selection and accurate cutting, anyone can bring this pattern to life. The clean points of the pinwheel combined with the radiating points of the star create a visually balanced and engaging design. Perfect for baby quilts, table runners, or wall hangings, it’s a versatile block that works with both soft pastels and bold, high-contrast fabrics.
In this article, you’ll learn everything you need to make your own Pinwheel Star Quilt Block, including precise fabric cutting instructions, sewing steps, and tips to keep your seams sharp and aligned. Follow along to build confidence in your piecing skills while creating a stunning block that will shine in any quilt layout.
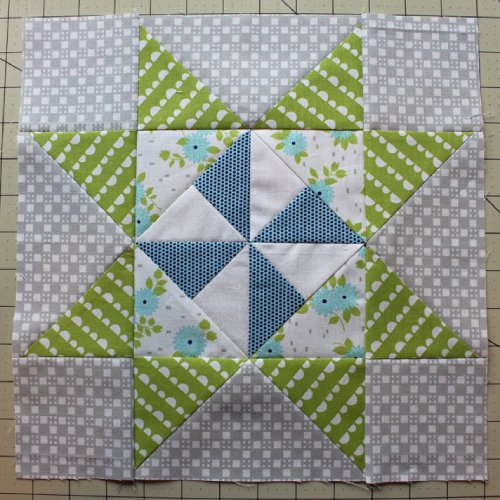
The Pinwheel Star Quilt Block combines two iconic quilt motifs into one unified and beautiful layout. It is made up of triangles, squares, and flying geese units arranged in a nine-patch format. Each part of the block plays a role in forming the final starburst appearance.
The central pinwheel is formed by four half-square triangles (HSTs). These triangles create a spinning motion, which gives the center its pinwheel effect. Accurate alignment is essential to get the perfect rotation. This element gives the block its playful energy.
Surrounding the pinwheel are four flying geese units, which form the star’s points. These pieces add dimension and direction to the block. The flying geese must be sewn carefully to keep the triangle tips from being cut off.
The corner units of the block are usually simple squares, but this is where you can get creative with prints or contrast. They help balance the motion of the pinwheel and the star, grounding the entire design visually.
Understanding this structure is key before cutting or sewing. Each of the nine components (in a 3×3 grid) must be pieced with precision. This ensures that the final block aligns properly and lays flat.
A well-made Pinwheel Star Quilt Block finishes at 12.5″ x 12.5″ before being sewn into your quilt top. This size makes it ideal for standard quilts and easy to calculate for larger layouts.
Once you’re familiar with the components—HSTs, flying geese, and squares—you’ll find that the Pinwheel Star Quilt Block is a rewarding and creative pattern to master.
Before you start assembling your Pinwheel Star Quilt Block, prepare your fabrics and cut them according to the sizes listed. Accurate cuts will make your sewing easier and your points crisper.
Fabric A (Background Fabric):
Fabric B (Star Points):
Fabric C (Center Pinwheel):
Begin by pairing the 5” x 5” squares from Fabric A, B, and C to make your half-square triangles. Each pair yields two HSTs, and you’ll need a total of 4 for the pinwheel.
Next, create the flying geese units using the stitch-and-flip method. Each flying geese unit will use one 2.5” x 4.5” rectangle from Fabric A and two 2.5” x 2.5” squares from Fabric B. You’ll need 4 flying geese for the star points.
Finally, cut the (4) 4.5” x 4.5” squares from Fabric A for the block corners. These provide a clean and calm background to let the pinwheel and star shine.
Make sure all your fabrics are pressed before cutting, and use a sharp rotary cutter for accuracy. Label your pieces if necessary to stay organized throughout the assembly.
Accurate cutting is crucial in achieving a symmetrical and beautiful Pinwheel Star Quilt Block. Don’t rush this step—precision now saves frustration later.
Now that all your pieces are cut, it’s time to start sewing your Pinwheel Star Quilt Block. Begin by making the half-square triangles (HSTs), which will form the spinning center.
To make the HSTs, place two 5” squares right sides together. Draw a diagonal line across the lighter fabric. Sew a ¼” seam on both sides of the line, then cut along the line to yield two HSTs. Repeat to make 4 HSTs total. Press seams open or to one side, and trim each HST to 4.5” square.
Arrange the HSTs in a pinwheel layout so the dark triangles spin in a clockwise or counterclockwise direction. Sew the top two HSTs together, then the bottom two. Press seams, then sew the rows together to complete the pinwheel center.
For the flying geese units, place a 2.5” square (Fabric B) right sides together on one end of a 2.5” x 4.5” rectangle (Fabric A). Draw a diagonal line, sew on the line, trim the excess, and press open. Repeat on the other side of the rectangle to complete one flying geese unit. Make 4 units.
Now arrange your block in a 3×3 layout. The center will be your pinwheel. Place a flying geese unit above, below, and on either side of the pinwheel so the triangle points aim toward the center. Place the four 4.5” squares in the corners.
Sew the top row (corner, flying geese, corner), middle row (flying geese, pinwheel, flying geese), and bottom row (corner, flying geese, corner). Press the seams of each row, then sew all rows together.
You’ve now completed your Pinwheel Star Quilt Block! Give the block a final press and check the size—it should measure 12.5” square. It’s ready to be added to your quilt top or project.
To make a perfect Pinwheel Star Quilt Block, precision at every step is key—from cutting to pressing. Here are some essential tips to help you get professional results.
Use starch or a fabric stabilizer before cutting your pieces. This keeps the fabric from stretching and helps maintain crisp edges, especially important when working with diagonal seams.
When making half-square triangles, always trim them to the exact size needed. Even a small discrepancy can throw off the alignment of your pinwheel center.
Chain piece your units when possible. This saves time and keeps your pieces in the correct order, helping you avoid confusion and mistakes.
Press seams carefully. Pressing toward the darker fabric or pressing seams open depending on bulk will help your points line up better and make assembly easier.
Double-check the direction of your pinwheel before sewing the center together. It’s easy to accidentally rotate a unit and lose the spinning effect. A quick check can save a lot of seam ripping.
Finally, take your time assembling the rows. Pin at intersections to keep points aligned. Once completed, stand back and admire your stunning Pinwheel Star Quilt Block—a perfect mix of motion and harmony.
What size is the finished Pinwheel Star Quilt Block?
The block finishes at 12” x 12” once sewn into a quilt, or 12.5” x 12.5” before sewing into a project.
Can beginners make the Pinwheel Star Quilt Block?
Yes! This pattern is beginner-friendly and a great way to practice HSTs and flying geese techniques.
Can I use scraps for this block?
Absolutely. The block is perfect for using up coordinated scraps, especially for the HSTs and star points.
How do I avoid cutting off the points of the star?
Always sew with a true ¼” seam and avoid sewing too far past the tips when joining rows. Pinning helps!
Can I resize the block for smaller projects?
Yes. Scale the cuts down proportionally. A 6” or 9” block version works great for pillows or smaller quilts.
Is it possible to make an entire quilt with this block?
Definitely. Repeating the Pinwheel Star Quilt Block in a full layout creates a stunning quilt with movement and structure.
The Pinwheel Star Quilt Block is a delightful fusion of movement and structure, ideal for quilters of all levels. With precise cutting, careful piecing, and creative fabric choices, you can make a block that shines on its own or contributes to a beautiful quilt design. This timeless pattern is a staple that you’ll return to again and again, thanks to its visual impact and piecing satisfaction.
Now it’s your turn—gather your favorite fabrics, follow the steps, and create your own Pinwheel Star Quilt Block. Have fun quilting, and let this dynamic design bring your next project to life. Feel free to share your creations or ask questions in the comments—we’d love to hear from you!


