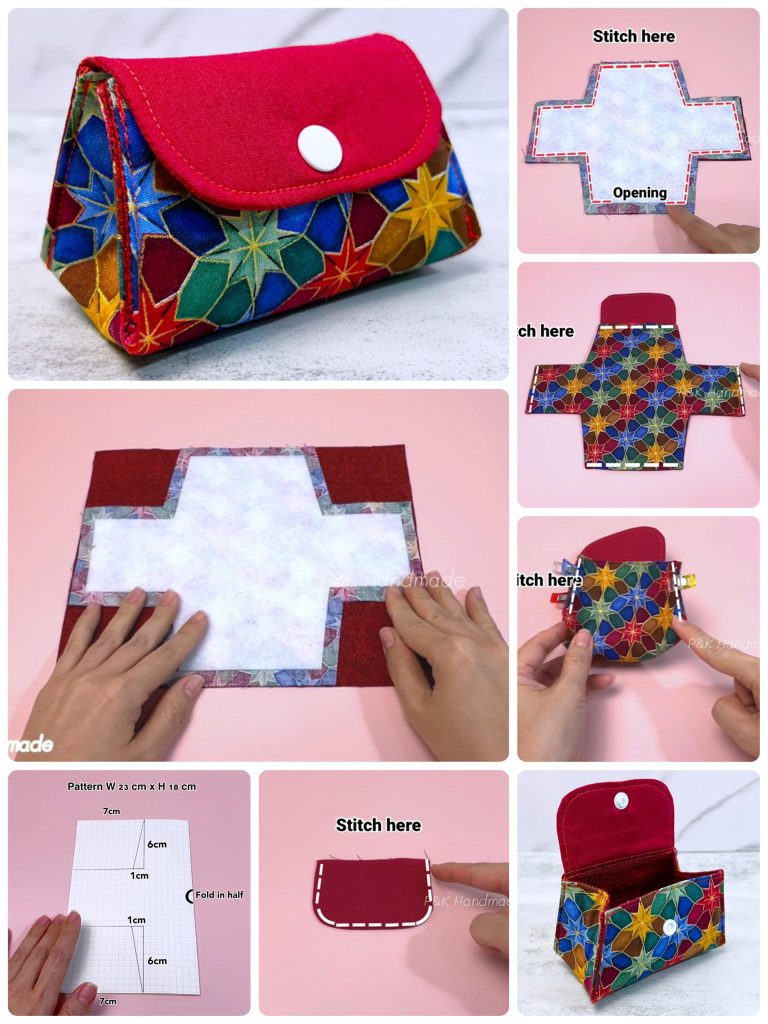
How to Make a Fabric Coin Purse Pattern
Pleated Tree Bag Pattern projects combine festive charm, clever construction, and stash-busting practicality—making them a favorite for sewists who love seasonal décor that stores flat yet displays with sculptural flair. In this guide you’ll learn how to cut, pleat, assemble, and finish a tree‑shaped fabric gift bag (perfect for small presents, ornament storage, or tabletop accents) while naturally weaving in smart SEO practices to help your blog content rank. Everything here is written to comply with Google AdSense–friendly content guidance: original, family‑safe, helpful, and clearly structured.
When you feature a Pleated Tree Bag Pattern tutorial on your site, you’re offering readers a quick win: a reusable wrap that looks like a miniature fabric tree when cinched and a tidy flat circle or wedge when stored. Because it’s fabric, it’s eco‑friendly compared with disposable paper gift bags, and the pleats give surprising volume without requiring a lot of yardage. Beginners can sew it with straight seams; more advanced makers can scale the size, mix prints, or quilt the panels.
If your goal is traffic growth, product affiliate clicks, or ad revenue, a detailed, well‑illustrated article centered on the Pleated Tree Bag Pattern is golden. Searchers often type seasonal phrases like “fabric Christmas tree bag,” “pleated gift sack,” or “reusable holiday wrapping.” By repeating your primary keyword naturally in headings, image alt text, and throughout the walkthrough, you improve topical relevance—without keyword stuffing. Let’s dive into materials, precise fabric cuts, and step‑by‑step sewing instructions you can publish today.

Choosing the right fabrics is the first step in a successful Pleated Tree Bag Pattern project. Look for quilting cottons, light twill, cotton/linen blends, or light holiday prints that press crisply to hold pleats. Avoid very thick fleece or fabrics that resist sharp folds; crisp hand equals cleaner pleats and a neater tree silhouette when the bag is cinched.
Yardage planning for the Pleated Tree Bag Pattern depends on your target finished height and circumference. For a small gift bag (approx. 8 in / 20 cm tall when cinched), 1/2 yd (0.46 m) total quilting cotton in two coordinating prints is usually enough. For a medium (approx. 12 in / 30 cm tall), plan 3/4 yd (0.69 m). For a large decorative version (approx. 16 in / 41 cm tall), 1 yd (0.91 m) each outer and lining fabric gives comfortable cutting room.
Below is a sample cut chart for one medium Pleated Tree Bag Pattern (finished 12 in tall; base diameter ~7 in / 18 cm; circumference expands via pleats). Cut (Outer) – 1 rectangle 34 in W x 13 in H (86 cm x 33 cm). Cut (Lining) – 1 rectangle 34 in W x 13 in H. Cut (Interfacing, medium‑weight fusible) – 1 rectangle 33 1/2 in W x 12 1/2 in H to reduce seam bulk. Cut (Drawstring Casing) – 2 strips 2 in x 18 in (5 cm x 46 cm) or a single long strip if preferred.
Precise pleat depth drives the tree shape in a Pleated Tree Bag Pattern. Mark vertical lines along the width of the outer rectangle: start 1 in from the raw edge, then alternate 1 in (2.5 cm) and 1/2 in (1.3 cm) spacing to create accordion pleats—fold on the 1 in lines, bring to the 1/2 in lines. You’ll repeat this pattern until you reach the opposite side seam allowance; slight trimming at the end is fine. Label mountain folds and valley folds with directional arrows in disappearing ink.
Notions round out your Pleated Tree Bag Pattern supply list: 1 1/4 yd (1.15 m) cording, ribbon, or twill tape for drawstrings; matching all‑purpose thread; safety pin or bodkin; optional small craft bells or tassels for the cord ends; and a scrap of ultra‑firm stabilizer circle (7 1/2 in / 19 cm diameter) if you want a stiff tree “base” that helps the bag stand.
Gather your tools before you start sewing the Pleated Tree Bag Pattern. You’ll need a rotary cutter, self‑healing mat, clear quilting ruler, fabric marking pen, iron with steam, pressing ham or rolled towel for shaping pleats, and standard sewing machine with a 1/4 in foot (or adjustable seam guide). A walking foot is helpful when stitching multiple pleat layers and lining together so nothing creeps.
Pre‑wash, press, and square your fabrics before cutting for the cleanest Pleated Tree Bag Pattern results. Shrinkage after construction can twist pleats out of alignment, so laundering yardage the way the finished bag will be laundered is smart. After pressing, ensure grain lines run straight along the length of your cutting ruler to keep the rectangle edges true.
Cut the outer and lining rectangles to the measurements you chose for your Pleated Tree Bag Pattern. Stack fabrics wrong sides together, trim edges even, then cut interfacing slightly smaller to sit within seam allowances. Fuse interfacing to the wrong side of the outer fabric using manufacturer heat/steam instructions; let cool on a flat surface so no bubbles form under future pleats.
Mark pleat placement across the width of the outer panel for the Pleated Tree Bag Pattern using a disappearing ink pen or Hera marker. Draw an initial vertical line 1 in from the short edge (this becomes side seam allowance). Then mark a 1 in space, a 1/2 in tuck, repeat: 1 in, 1/2 in, 1 in, 1/2 in, etc. Continue until you near the opposite seam allowance. Lightly number each fold pair so you track sequence when pressing.
Fold and press the pleats for the Pleated Tree Bag Pattern. Working from one side, pinch the fabric at the first 1 in line and bring it to meet the adjacent 1/2 in line, forming a 1/2 in deep pleat (consumes 1/2 in of width). Clip or pin. Repeat for all marked pairs. Alternate directions (accordion style) for a stacked fan effect; this gives the later drawstring top a circular, tree‑like flare.
Baste the pleats in place across the top and bottom edges to lock in the Pleated Tree Bag Pattern shaping. Sew within the 1/4 in seam allowance—use a long stitch length (4.0) so removal is easy if you need to adjust fullness. Measure the new pleated width; it should now measure roughly 60–65% of the original cut width depending on how tightly you folded.
Prepare the drawstring casing that crowns the Pleated Tree Bag Pattern. Fold each 2 in x 18 in strip in half lengthwise wrong sides together and press. Open, fold raw long edges to center crease, press again, then refold to enclose edges (like double‑fold binding). Edge stitch both long sides. You’ll install these casings later, aligning openings opposite the side seam for smooth gathering.
Place the pleated outer and flat lining right sides together for the Pleated Tree Bag Pattern. Match raw edges and side seams; because the pleats add loft, you may need extra clips. Stitch the short sides with a 1/4 in seam allowance to form a tube in both outer and lining pieces separately, then press seams open to minimize bulk.
Create the base for the Pleated Tree Bag Pattern by measuring the flat tube circumference and cutting a circle (or truncated wedge that creates a conical tree) from coordinating fabric or stabilizer. For a 34 in cut width reduced by pleating, expect a base circle about 7–8 in diameter; confirm by dividing the measured tube circumference by π (3.14). Add 1/2 in total (1/4 in all around) for seam allowance before cutting the base.
Quarter‑mark both the tube bottom edge and the base circle to keep the Pleated Tree Bag Pattern even. Clip right sides together, easing any slight excess with micro‑pleats in the lining if needed. Sew slowly with the tube against the feed dogs so the machine helps distribute fullness. Trim seam to 1/8 in and finish with a zigzag or serger to reduce fray.
Repeat the base attachment for the lining portion of the Pleated Tree Bag Pattern, but leave a 3 in turning gap in the side seam or along the base seam if easier. Press seam allowances toward the lining. If you’re inserting a stiff stabilizer disc, slide it between lining and outer before final closure later.
Join outer and lining at the top opening of the Pleated Tree Bag Pattern. With right sides together, align raw top edges, making sure pleats point downward and are sandwiched neatly. Stitch around the top with a 1/4 in seam allowance. Grade the seam (trim lining seam allowance shorter than outer), clip the seam at pleat folds to help it turn smoothly, then turn the bag right side out through the lining gap.
Close the lining gap to finish the structural sewing on the Pleated Tree Bag Pattern. Press the opening edges under 1/4 in, stitch close to the fold, then push lining down into the outer shell. A final pressing around the top edge sets the seam crisp and prepares you for casing installation and drawstring threading.
Install the drawstring casings on your Pleated Tree Bag Pattern just below the top seam (about 1 1/4 in down / 3 cm). Position the folded casing strips on opposite sides of the bag so the cord exits at two separate points; this allows a double‑pull closure that cinches evenly around the pleated crown. Stitch top and bottom edges of the casing, leaving side channels open.
Thread cords through the casings to activate the signature gather of the Pleated Tree Bag Pattern. Use a safety pin to feed the first cord all the way around and exit where you started; repeat with the second cord starting on the opposite side so you can pull both ends to close the bag securely. Add knots, beads, tassels, or bells for festive flair.
Shape the finished Pleated Tree Bag Pattern into its tree form by stuffing tissue or a small gift inside and drawing the cords evenly. The accordion pleats blossom upward like tree boughs, while the circular base spreads flat. Adjust pleat creases with light steam to exaggerate the layered “branches.”
Scale and customize your Pleated Tree Bag Pattern for holidays, weddings, or eco‑gift wrapping subscriptions. Patchwork scraps for the outer, contrasting solid lining, or metallic cotton prints all work beautifully. Try tiered height bands: piece two fabrics horizontally before pleating to mimic tree layers of different greens.
Optimize blog SEO when publishing the Pleated Tree Bag Pattern tutorial by including the keyword in your meta title, meta description, first paragraph (done!), image alt tags (e.g., “Sewing the Pleated Tree Bag Pattern – pressing pleats”), and schema‑marked HowTo steps. Use internal links to related sewing tutorials and external links to reputable fabric suppliers to improve topical authority.
Monetize responsibly with Google‑compliant ads around your Pleated Tree Bag Pattern content. Keep ad density reasonable, avoid intrusive pop‑ups over instructions, and clearly label affiliate links. High‑quality step photos, a printable cut chart, and a downloadable PDF attract repeat visits—boosting ad impressions without compromising user experience.
FAQ: Pleated Tree Bag Pattern
What sizes work best for gifts? Small (8 in tall) fits jewelry boxes and ornaments; medium (12 in) suits candles and mug gifts; large (16 in+) handles plush toys or bundled fabric fat quarters. Scale rectangle width proportionally so pleats still flare.
Can I quilt the outer before pleating? Yes. Light, low‑loft quilting adds texture to the Pleated Tree Bag Pattern but keep batting thin (cotton or poly blend) to avoid bulky pleat stacks. Quilt a wholecloth sandwich, then mark and pleat.
How do I wash the finished bag? Most quilting cotton Pleated Tree Bag Pattern bags are machine washable cold, gentle cycle; reshape pleats with steam press after drying flat. If you’ve added bells or trims, hand wash.
Can I serge the seams? You can serge raw edges before assembly, but bulky pleats may catch. Many sewists stitch then zigzag or pink to finish seams inside the Pleated Tree Bag Pattern.
What if my pleats don’t line up? Re‑press with steam, baste again, and trim the width slightly at the side seam. Minor irregularities disappear when you cinch the Pleated Tree Bag Pattern closed.
Is interfacing required? Not strictly, but light fusible interfacing helps pleats stay crisp in the Pleated Tree Bag Pattern, especially if using lighter weight prints or repeated seasonal use.
The Pleated Tree Bag Pattern is a cheerful, reusable, and highly giftable sewing project that doubles as seasonal décor and sustainable wrapping. Its structured pleats create visual drama from simple rectangles, making it accessible to confident beginners and endlessly customizable for advanced quilters and crafters. By providing accurate fabric cuts, clear pleating guidance, and reader‑friendly SEO formatting, you’ll publish a tutorial that builds search traffic and earns ad revenue—while spreading handmade joy. I’d love to hear how you’ll style your first Pleated Tree Bag Pattern: Which fabrics will you choose, and what gifts will you tuck inside? Share your ideas and questions so we can keep creating together!

