Pom Pom Paper Piecing Tutorial: A Creative Guide for Quilting Enthusiasts
Advertising
Are you ready to explore a fun and engaging quilting project? This Pom Pom Paper Piecing Tutorial is perfect for beginners and seasoned quilters alike. Combining precision, creativity, and texture, paper piecing is a technique that allows you to create intricate quilt patterns with ease. Adding pom poms takes it to the next level, giving your project a playful and dimensional look.
Paper piecing, also known as foundation piecing, is a method that involves sewing fabric onto a paper template to achieve perfectly aligned pieces. With this tutorial, you’ll not only master the basics of paper piecing but also learn how to incorporate pom poms into your design. The result? A unique, eye-catching quilt that’s sure to impress.
Advertising
Whether you’re creating a small wall hanging, a quilt block, or an entire quilt, this tutorial will walk you through the process step-by-step. From gathering materials to cutting fabric and sewing everything together, you’ll find all the guidance you need to complete your project. Let’s dive into the details and get started!
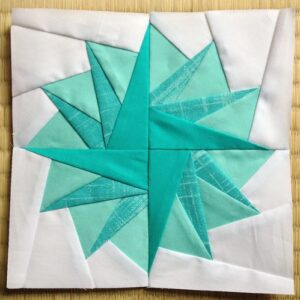
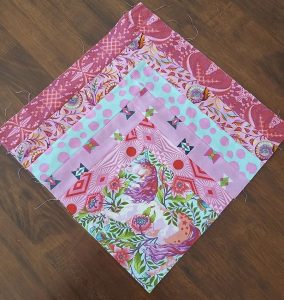
Image From Pinterest
Materials and Tools for Your Pom Pom Paper Piecing Project
Before you begin, it’s important to gather all the necessary materials and tools. Having everything on hand will make the process smoother and more enjoyable. Here’s what you’ll need:
Fabric: Choose a variety of quilting cottons in complementary colors and patterns. For this project, you’ll need pieces measuring at least 5” x 5” for the main design and smaller scraps for the details.
Pom Poms: Select pom poms in colors that match or contrast with your fabric. They should be small enough to fit within your quilt block design without overwhelming it.
Paper Templates: Print or draw your paper piecing pattern on lightweight paper. Make sure the lines are clear and easy to follow.
Thread: Use a high-quality quilting thread that matches your fabric.
Needles: A sharp sewing needle for machine sewing and a hand needle for attaching the pom poms.
Rotary Cutter and Ruler: These tools are essential for precise fabric cutting.
Sewing Machine: A basic machine with a straight stitch is sufficient.
Iron and Ironing Board: Pressing your fabric between steps ensures a clean and professional finish.
Glue Stick (Optional): Some quilters use glue sticks to hold small pieces in place temporarily.
Scissors and Pins: For general cutting and pinning tasks.
Step 1: Preparing Your Paper Template
The first step in this Pom Pom Paper Piecing Tutorial is to prepare your paper template. This will act as your foundation for sewing. Follow these instructions to get started:
Select a Pattern: Choose a quilt pattern that includes clear sections for paper piecing. Many free templates are available online, or you can design your own.
Print or Trace: Print the pattern on lightweight paper, or trace it using a lightbox. Make sure the lines are crisp and include seam allowances.
Label Each Section: Clearly label each part of the template with numbers or letters to indicate the order of assembly. This will help you stay organized.
Cut the Template: Cut out each section of the paper template, leaving a small border around the edges.
Test Fit: Lay the template pieces over your fabric scraps to ensure they’re the right size. Adjust as needed.
Optional Reinforcement: If you’re working with delicate paper, consider reinforcing it with clear tape along the edges.
Accurate fabric cutting is crucial for achieving clean and precise quilt patterns. Here’s how to prepare your fabric for the paper piecing process:
Advertising
Choose Your Fabrics: Select fabrics that complement each other in color and pattern. Consider using solids for a modern look or prints for a whimsical feel.
Iron the Fabric: Press your fabric to remove any wrinkles. This makes cutting easier and ensures a smooth finish.
Cut Larger Pieces: Cut your fabric pieces slightly larger than the sections on your paper template. This gives you some wiggle room for alignment.
Label the Pieces: If your quilt pattern is complex, label the fabric pieces to match the template sections.
Organize by Color: Arrange your fabric pieces by color or pattern to make assembly faster.
Test Fit: Lay the fabric over the paper template to check the size and placement before sewing.
Step 3: Sewing the Paper Piecing Pattern
Now it’s time to sew your fabric pieces onto the paper template. This step requires patience and precision, but the results are worth it.
Position the First Piece: Place the first fabric piece on the back of the paper template, right side facing out. Pin or glue it in place.
Add the Second Piece: Align the second fabric piece with the first, right sides together. Make sure the edges extend beyond the seam line.
Sew Along the Line: Using your sewing machine, sew directly on the line that separates the two sections. Use a short stitch length to make removing the paper easier.
Trim and Press: Trim the seam allowance to ¼” and press the fabric open with an iron.
Repeat the Process: Continue adding fabric pieces in numerical or alphabetical order, sewing along the lines and pressing after each step.
Remove the Paper: Once all sections are sewn, carefully tear away the paper template. Use a seam ripper for stubborn pieces.
Step 4: Adding Pom Poms to Your Quilt
The final step in this Pom Pom Paper Piecing Tutorial is to add the pom poms for a playful and dimensional finish.
Plan the Placement: Decide where you want the pom poms to go. You can add them along the seams, at the center of blocks, or as a border.
Attach by Hand: Use a hand needle and matching thread to sew the pom poms onto the quilt. Secure each one with a knot.
Glue Option: For a quicker method, you can use fabric glue to attach the pom poms. Make sure the glue is washable and dries clear.
Check for Security: Tug gently on each pom pom to ensure it’s securely attached.
Trim Threads: Neatly trim any excess threads for a clean finish.
Admire Your Work: Step back and admire your completed project! The pom poms add a delightful touch that’s sure to stand out.
By following this Pom Pom Paper Piecing Tutorial, you’ve created a unique and beautiful quilt design. Whether you’re making a single quilt block or an entire quilt, the combination of paper piecing and pom poms is a surefire way to impress. Happy quilting!


