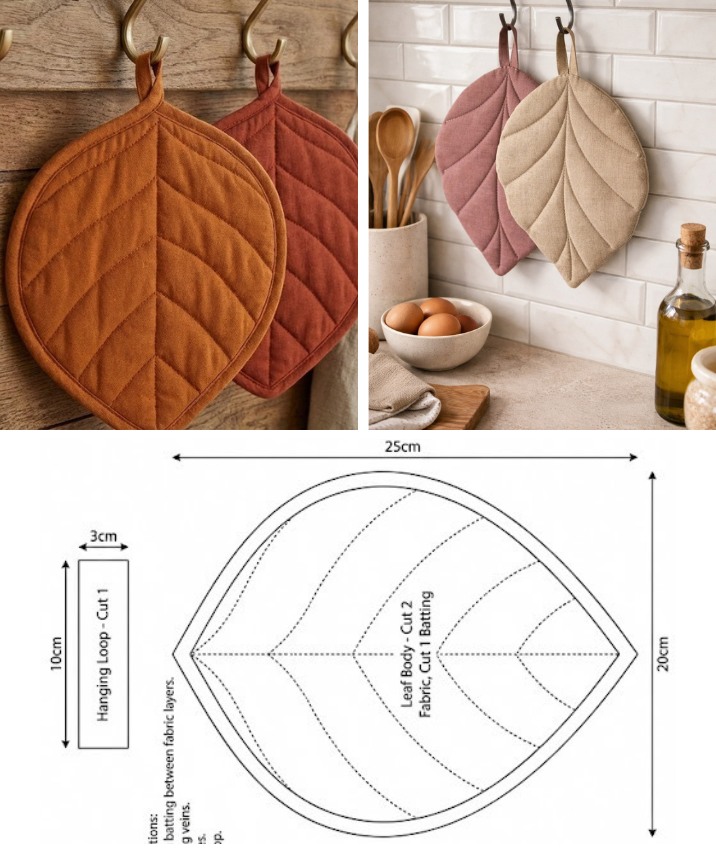
Padding leaf-shaped pot holder Pattern
If you’re looking for a unique and textured quilting project, this Puff Quilt Tutorial is the perfect place to start. Known for its soft, pillowy texture, the puff quilt—also called a biscuit quilt—is an ideal project for beginners or anyone wanting a relaxing and satisfying sew. Whether you’re making a baby gift or a throw for your living room, this quilt stands out both in comfort and design.
In this detailed Puff Quilt Tutorial, we’ll guide you step-by-step through the process, from fabric cutting to final stitching. You’ll find precise fabric measurements, a simple layout method, and all the tips you need to avoid common mistakes. This tutorial is designed to make your experience enjoyable and successful—even if it’s your first time quilting.
Using this guide, you’ll learn not only how to assemble the quilt blocks, but also how to stuff each square to achieve that perfect puff. With just a few basic materials and a bit of patience, you’ll have a charming handmade quilt in no time. Let’s dive into this easy and rewarding Puff Quilt Tutorial!

One of the most important steps in this Puff Quilt Tutorial is selecting the right materials. The fabric you choose will determine not only the final look of your quilt but also how it feels. Cotton fabrics are ideal due to their breathability and ease of use. You can mix solids and patterns for a more playful design or stick with a cohesive color palette for a modern finish.
To start, you’ll need to cut two types of fabric squares: one for the top (the puff) and one for the bottom (the backing of each puff square). For each puff, cut one 6.5″ x 6.5″ square for the top and one 5″ x 5″ square for the bottom. The larger top square allows room for gathering and stuffing, while the smaller bottom square keeps it in shape.
You’ll also need polyester fiberfill or cotton stuffing to create the puff effect. Make sure the stuffing is lightweight and easy to work with, so your quilt doesn’t become too heavy or uneven. A bag of 16 oz fiberfill is generally enough for a small baby quilt, but you may need more for a larger project.
Decide on the final dimensions of your quilt. For a baby puff quilt, a 7×9 grid (63 puffs) works well. For a throw-size quilt, you can go up to 10×12 or larger. Multiply the number of rows by the number of columns to know how many squares you’ll need in total.
In addition to fabric and stuffing, you’ll need coordinating thread, sewing pins or clips, and a sewing machine with a straight stitch setting. A walking foot can be helpful when sewing through multiple layers, but it’s not strictly necessary.
Once everything is cut and ready, organize your puff tops in the desired color layout. This step helps you avoid repeating colors too closely and ensures your quilt has a balanced look. Now you’re ready to start sewing!
Now that your materials are prepped, this Puff Quilt Tutorial will guide you through assembling each individual puff square. This process is repetitive but simple, making it an enjoyable and meditative sewing task.
Start by placing one top square (6.5″) right side up and one bottom square (5″) centered on the back. The top square will naturally puff over the smaller square when sewn. To make it easier, fold and pin the edges of the top square to match the smaller bottom square’s edges. This will create little pleats or gathers.
Sew three sides of the square using a 1/4″ seam allowance, leaving one side open for stuffing. Be sure to backstitch at each end to secure the seams. After sewing, gently turn the square to adjust the gathers evenly and prepare it for stuffing.
Fill the square with a small handful of fiberfill. Don’t overstuff; you want a gentle puff, not a tight ball. The goal is to keep the quilt comfortable and flexible. Distribute the stuffing evenly, pushing it into the corners if needed.
Once filled, fold the open edge inward and pin it closed. Carefully sew the final edge shut using the same 1/4″ seam allowance. Be sure the stuffing stays clear of your needle as you stitch.
Repeat this process until you’ve completed all your puff squares. Stack them in order or by rows to keep your layout organized. With all your puffs sewn and stuffed, you’re now ready to assemble them into a quilt top.
This method ensures that each square is neatly sewn and securely stuffed, creating a uniform and cozy quilt texture. The more consistent your stitching and filling, the better your final quilt will look.
Assembling the quilt top is one of the most exciting parts of this Puff Quilt Tutorial, as you finally see your design coming together. At this stage, you’ll sew your puff squares together into rows and then join those rows to form the full quilt top.
Start by placing two puff squares right sides together. Pin or clip them along one side, then sew with a 1/4″ seam allowance. Continue adding squares until you complete one entire row. Repeat for each row in your layout.
Once your rows are complete, it’s time to connect them. Place two adjacent rows right sides together and align each puff. Pin carefully to keep the seams matched. Sew along the long edge to join the rows, making sure the squares stay aligned as you go.
As you sew the rows, push the stuffing to the center of each puff to avoid sewing through it. This will make your machine run more smoothly and ensure a neater finish. Continue sewing rows together until your quilt top is fully assembled.
After joining all rows, check your quilt top for any uneven edges or loose threads. Trim any excess fabric and press the seams gently, avoiding the puffy centers. This helps flatten the backing and gives a cleaner appearance.
At this stage, your quilt top should be looking plush and beautiful. The final steps will involve adding the quilt backing and optional binding to finish your Puff Quilt Tutorial project. Let’s move on to that next.
Remember, this quilt top doesn’t require traditional batting since each square is already stuffed. This makes the final quilt lighter and easier to handle during finishing.
In this final part of the Puff Quilt Tutorial, you’ll learn how to back your quilt and finish the edges. This part gives your quilt a professional and polished look while ensuring it holds up to use and washing.
First, prepare your quilt backing. You’ll need a single large piece of cotton fabric that’s the same size or slightly larger than your puff quilt top. Iron it to remove any wrinkles, and lay it flat on your work surface with the wrong side facing up.
Place your quilt top over the backing with the puff side up. Align the edges carefully and smooth out any bumps. Use safety pins or basting spray to temporarily hold the layers together. Avoid pinning through the puffy parts—stick to the seams.
If you’d like a more quilted appearance, you can sew along the seams between rows and columns (called “stitch in the ditch”). This anchors the top to the backing while preserving the puffiness of each square. Use a walking foot if possible to handle the thick layers.
To finish the edges, trim any excess fabric from the backing and square off the quilt. You can choose to bind the edges with bias tape or create a simple folded hem. Binding gives a cleaner, durable edge and is recommended for long-lasting use.
Fold the binding over the edge of the quilt, pin it in place, and sew it down with a straight or decorative stitch. This final touch ties the whole project together and reinforces your seams.
Your puff quilt is now ready to be loved, gifted, or used! Whether draped over a crib, couch, or lap, it’s sure to bring softness and handmade charm wherever it goes.
Q: Can I make a Puff Quilt without a sewing machine?
A: Yes, but it will be time-consuming. Hand-sewing is possible, especially for smaller projects like baby quilts.
Q: How do I wash a puff quilt?
A: Use a gentle cycle with cold water and tumble dry on low heat. Avoid high heat to maintain the integrity of the stuffing.
Q: Can I use different fabrics like flannel or minky?
A: Yes, but choose fabrics with similar weights to ensure even puffs and easier sewing.
Q: What size quilt should I start with?
A: Beginners often start with a 7×9 puff layout (baby quilt). It’s manageable and gives great results.
Q: Can I reuse old clothes or fabric scraps?
A: Definitely! Puff quilts are great for upcycling, just make sure the fabrics are clean and soft.
Q: How long does it take to make a puff quilt?
A: Depending on the size and your sewing speed, a baby quilt can take a weekend. Larger sizes may take a few weeks.
This Puff Quilt Tutorial gives you everything you need to create a charming and textured quilt, perfect for gifting or keeping. From fabric selection to sewing, stuffing, and finishing, you’ve now learned every step of this cozy project.
What makes the puff quilt so special is not just its appearance but the joy of making something tactile and beautiful with your own hands. Whether you’re a beginner or an experienced quilter, this project offers creativity and satisfaction.
Remember to experiment with colors, patterns, and even shapes if you’re feeling adventurous. Each puff quilt you make will have its own personality and charm.
We hope this Puff Quilt Tutorial inspired you to get started right away. If you make your own puff quilt, we’d love to hear how it turned out—feel free to share your tips, experiences, and photos!
Happy quilting!


