
Bird Quilt Block Pattern
The Rail Fence Quilt Pattern is one of the most classic and beginner-friendly quilt designs ever created. Loved for its simplicity and versatility, this pattern is perfect for both new quilters learning the basics and experienced quilters looking for a relaxing project. The name comes from the layout of the fabric strips, which resemble the rails of a traditional wooden fence. Despite its straightforward construction, this quilt offers endless design possibilities through fabric choices, color arrangements, and block rotation.
One of the best aspects of the Rail Fence Quilt Pattern is how adaptable it is. You can create a traditional look using classic prints or experiment with modern fabrics for a contemporary twist. Because of its strip-piecing technique, it’s also an efficient way to use up fabric scraps or pre-cut bundles like jelly rolls. This makes it not only economical but also an environmentally friendly quilting choice, as it encourages the creative use of leftover fabrics.
Another reason why quilters love the Rail Fence Quilt Pattern is the satisfaction it provides through its quick assembly. You don’t need to spend hours cutting complicated shapes or aligning intricate points. Instead, you can focus on enjoying the process — from selecting fabrics to watching the geometric design form as the blocks come together. Whether you’re making a baby quilt, a wall hanging, or a full-sized bed cover, this timeless pattern always delivers stunning results.
To start your Rail Fence Quilt Pattern, you’ll need to prepare fabric strips, usually cut into consistent widths — often 2½ inches when using jelly rolls. These strips are sewn together into sets, generally made up of three or four strips. The colors or patterns of the fabrics you choose for these sets are what create the visual rhythm and design of the quilt. After sewing, the sets are cut into square blocks, forming the building units of your quilt top.
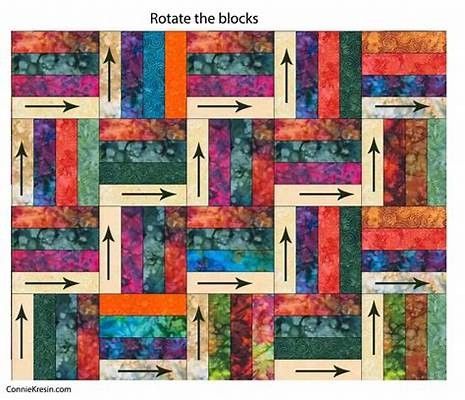
Once your blocks are ready, the fun begins. By rotating each block 90 degrees in alternating directions, you can achieve the signature “rail” look that makes this pattern unique. This layout mimics the crisscross appearance of a wooden fence. The simplicity of the Rail Fence Quilt Pattern makes it incredibly flexible — change the direction of the blocks, and you can create diagonal waves, zigzags, or even diamond effects.
Precision is important when piecing the strips together. To ensure your blocks line up neatly, press your seams carefully and measure each cut consistently. Using a rotary cutter and quilting ruler helps maintain accuracy. Beginners often find this pattern an excellent way to practice seam allowances and alignment, as it builds strong foundational quilting skills.
The next step is assembling your quilt top. Lay out all your blocks on a flat surface or design wall before sewing them together. This allows you to preview the final layout and make adjustments to color balance and block orientation. Once satisfied, sew your rows together, taking care to keep seams matching. The Rail Fence Quilt Pattern can be assembled in rows or columns, depending on your chosen design.
After piecing the quilt top, it’s time to add the batting and backing. Choose a lightweight batting for a cozy, soft quilt, and a fabric backing that complements your front design. Quilt through all the layers using straight-line stitching, following the direction of your rails for a clean, cohesive look. Finally, finish your quilt with a binding around the edges, and you’ll have a beautiful piece of handmade art ready to display or gift.
Because of its simplicity, the Rail Fence Quilt Pattern is also an ideal project for group quilting sessions or classes. It’s easy to teach, rewarding to make, and offers a beautiful finished product that every quilter can be proud of.
Color is what brings the Rail Fence Quilt Pattern to life. With the right palette, even a simple layout becomes visually striking. Traditional rail fence quilts often feature contrasting light and dark fabrics to highlight the fence-like pattern. However, modern quilters experiment with bold colors, gradients, and even monochromatic schemes for unique results.
When selecting fabrics, think about the mood or theme you want your quilt to convey. Soft pastels can create a delicate and cozy baby quilt, while vibrant colors make a lively throw for a living room. A combination of neutrals with one accent color adds elegance and sophistication. The beauty of the Rail Fence Quilt Pattern lies in how easily it adapts to any aesthetic.
Fabric texture also plays a key role. Cotton is the most common choice because of its durability and ease of use, but you can mix in linen or flannel for variety. Just be sure all fabrics are prewashed and of similar weight to ensure even sewing.
If you’re unsure about your color layout, try arranging fabric strips on a design wall or taking a photo to preview how the tones interact. Sometimes, subtle contrasts can make a pattern more interesting than high-contrast combinations.
Another exciting way to personalize your Rail Fence Quilt Pattern is by using ombré or gradient fabrics. These create beautiful visual flow when arranged in sequence. You can also play with prints — stripes, florals, or solids — to achieve different effects. Small prints blend smoothly, while larger patterns create bold statements.
Finally, remember that balance is key. Too many busy fabrics can make the quilt look chaotic, while too many neutrals may seem dull. Aim for harmony, letting your chosen fabrics complement each other and enhance the rhythmic movement of the rails.
Though the traditional Rail Fence Quilt Pattern features simple strips, there are many creative variations to explore. You can experiment with the number of strips per block — three, four, or even five — to change the scale of the design. More strips create thinner rails, while fewer strips give a bolder, chunkier look.
Diagonal rail fence quilts are another popular version. By setting your blocks on point, you can create dynamic zigzag or diamond effects. These variations add movement and depth to the quilt, giving it a more complex appearance while maintaining the same easy construction.
Some quilters also combine the Rail Fence Quilt Pattern with other block designs for added interest. For example, alternating rail fence blocks with solid squares or star blocks can create stunning visual contrast. This approach allows for creative storytelling through fabric, giving your quilt a unique personality.
Mini rail fence quilts are perfect for smaller projects like table runners or wall hangings. The process is the same, but the smaller scale offers a great opportunity to practice precision and color coordination without committing to a large quilt.
Scrappy rail fence quilts are especially beloved in the quilting community. They make use of leftover fabrics from previous projects, creating vibrant, nostalgic pieces full of memories. Each block tells a story, and no two quilts will ever be the same.
Finally, don’t be afraid to explore modern layouts. Using wide solid-colored strips, asymmetrical designs, or negative space gives the Rail Fence Quilt Pattern a fresh, contemporary feel while honoring its traditional roots.
To ensure your Rail Fence Quilt Pattern turns out beautifully, take your time with the cutting and piecing process. Accuracy in these steps will greatly influence how your quilt top aligns later. Use a sharp rotary cutter and double-check your measurements before sewing.
When sewing strips together, maintain a consistent ¼-inch seam allowance. This uniformity helps your blocks fit together perfectly when assembled. Press seams to one side rather than open, as it strengthens the quilt and reduces bulk.
Chain piecing — sewing multiple strip sets in a continuous line — is a time-saving technique many quilters use. It speeds up the process and ensures even stitching.
Quilting your finished top is another opportunity for creativity. You can follow the lines of the rails with straight quilting for a clean look or use free-motion quilting to add texture and dimension. Both techniques enhance the overall design of the Rail Fence Quilt Pattern beautifully.
Adding a border can also frame your quilt nicely. Choose a fabric that complements your blocks without overpowering them. Finally, bind your quilt with a coordinating or contrasting color to give it a polished finish.
With proper care — gentle washing and air drying — your Rail Fence Quilt Pattern creation can last for generations, becoming a treasured heirloom full of warmth and charm.
1. What is the easiest way to start a Rail Fence Quilt Pattern?
Start with pre-cut fabric strips like jelly rolls. These save time and ensure consistent sizes for beginners.
2. How many strips do I need for a Rail Fence Quilt?
It depends on the quilt’s size and the number of strips per block, but typically a standard lap quilt requires around 40 strips.
3. Can I make a Rail Fence Quilt Pattern with scraps?
Yes! This pattern is perfect for using up fabric scraps of similar widths, making it an eco-friendly and creative project.
4. What size should my blocks be?
Most rail fence blocks are between 6 and 12 inches square, but you can adjust based on your desired quilt size.
5. How do I press seams for the Rail Fence Quilt?
Press seams to one side for durability and to help your blocks align neatly during assembly.
6. Can beginners make the Rail Fence Quilt Pattern?
Absolutely! It’s one of the best beginner quilt patterns because it teaches essential sewing techniques while producing beautiful results.
The Rail Fence Quilt Pattern stands the test of time as a simple yet endlessly creative quilting design. From classic to modern interpretations, it allows quilters to express themselves through color, texture, and layout. Whether you’re making your first quilt or your hundredth, this pattern offers joy, relaxation, and a tangible sense of accomplishment.
Now that you’ve learned how to create your own Rail Fence Quilt Pattern, why not give it a try? Share your experiences, your favorite color combinations, and any tips you’ve discovered along the way. Leave your honest opinion and suggestions — your feedback inspires creativity and keeps the quilting tradition alive!


